Creative Sound Design with Effects: A Practical Guide
Creative Sound Design with Effects: A Practical Guide

Creative sound design with effects is the practice of transforming raw audio into expressive, layered sonic experiences through deliberate manipulation of signal processing, synthesis, and mixing techniques. Known in professional circles as sound effects design or SFX design, this discipline sits at the intersection of technical precision and artistic instinct. Whether you are scoring a film, building a game audio library, or crafting a record, the ability to layer transient attacks with evolving tails, apply convolution reverbs, and integrate AI-generated textures separates functional audio from memorable sound. This guide covers the tools, techniques, and workflows that let you build signature effects efficiently.
What is creative sound design with effects?
Creative sound design with effects means treating every sound as a raw material to be sculpted, not a finished product to be placed. The core workflow involves layering sound components — transient, body, low-frequency thump, and tail — each processed separately to maintain clarity and spatial coherence. This four-component model is the foundation of every convincing impact, whoosh, or ambient bed you hear in professional film and game audio.
The scope extends far beyond simple sample placement. Effective sound design is about stacking sounds to tell a story, starting with a single "truth" layer that grounds the listener emotionally, then adding subtle supporting layers that deepen that response. The Stranger Things sound team, for example, built their iconic creature vocalizations from layered animal recordings processed through pitch manipulation and granular synthesis. That approach is replicable in any DAW with the right signal chain.
Understanding this framework matters because it shifts your mindset from "finding the right sound" to "building the right sound." That shift is where creative audio effects work actually begins.
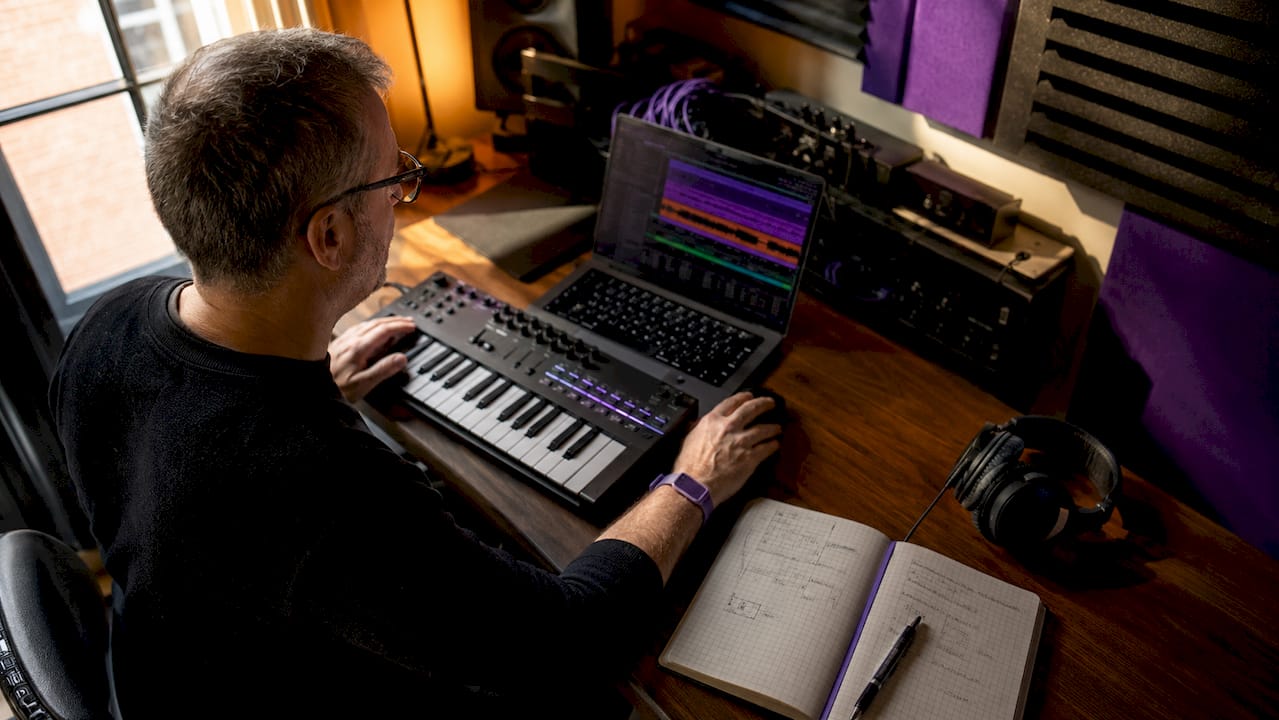
Essential tools for professional sound design workflows
The DAW you choose shapes your creative ceiling. Avid Pro Tools remains the standard for post-production, with its dedicated SFX track routing and tight video sync. Apple Logic Pro and Ableton Live both offer strong native plugin suites for music-focused sound design, while Steinberg Nuendo targets game and film audio with its built-in ambisonics tools and ADR features.
Beyond the DAW, specialized plugins define your palette:
- Transient shapers (such as Waves Smack Attack or Native Instruments Transient Master) control the attack and sustain of any sound independently, letting you punch up an impact without changing its body.
- Convolution reverbs (Altiverb, Waves IR-1) place sounds inside real acoustic spaces using impulse responses captured from actual environments.
- Multi-tap delays with variable timing parameters create rhythmic echo patterns that can transform a simple tone into a textured, evolving effect.
- Granular synthesizers (Ableton's Granulator III, Output Portal) slice audio into microscopic grains and reassemble them with pitch and density control, producing textures impossible to achieve with standard processing.
| Tool type | Example plugins | Best use case |
|---|---|---|
| Transient shaper | Waves Smack Attack, Transient Master | Impact design, drum layering |
| Convolution reverb | Altiverb, Waves IR-1 | Realistic space placement |
| Granular synth | Granulator III, Output Portal | Evolving textures, ambiences |
| Multi-tap delay | Valhalla Delay, EchoBoy | Rhythmic FX, whoosh tails |
| AI SFX generator | ElevenLabs Sound Effects, Adobe Firefly Audio | Rapid variation generation |
Pro Tip: Build a session template with dedicated buses for Dialogue, SFX Foreground, Foley, Ambience, and Music before any creative work begins. Setting your loudness target early — EBU R128 for broadcast, for instance — prevents late-stage remixes that undo your creative decisions.
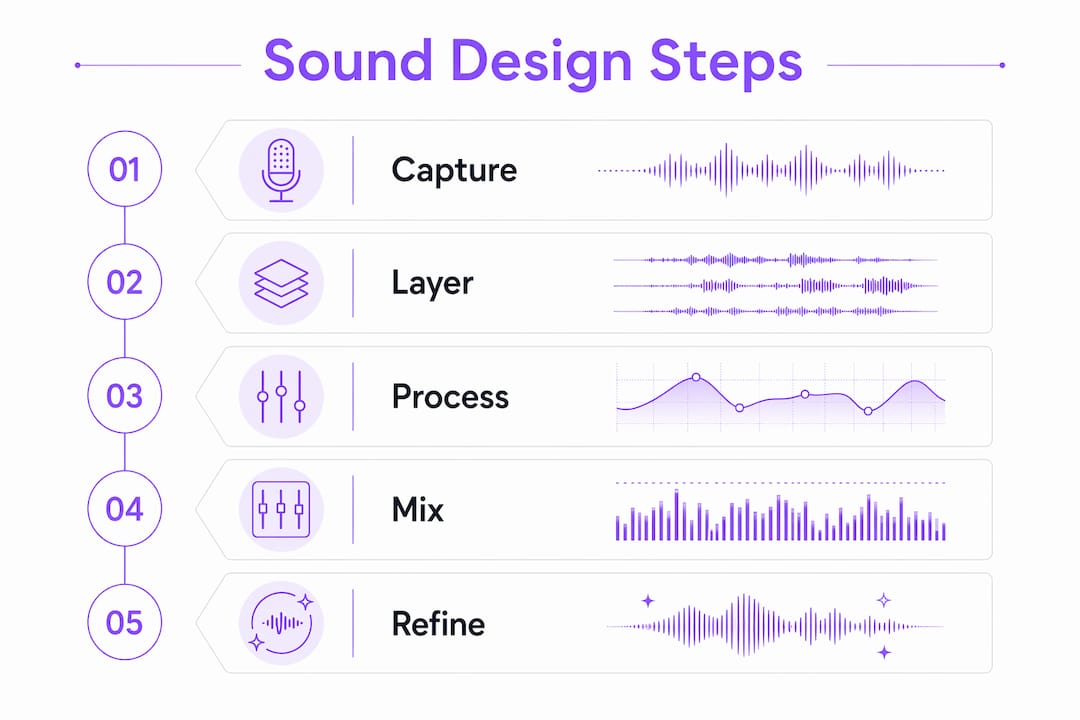
How to layer sounds for maximum impact
Layering is the single most transferable skill in sound design. Precise transient alignment with visual frames or musical cues is what separates a convincing layered effect from a muddy pile of sounds. Every millisecond of misalignment at the transient weakens the perceived impact.
Here is a step-by-step process for building a layered impact sound:
- Start with your truth layer. Choose one recording that captures the essential character of the sound. For a door slam, this might be a real recorded slam. For a sci-fi weapon, it might be a metal strike.
- Add the low-frequency thump. Layer a sub-heavy kick drum sample or a processed bass hit underneath, aligned exactly to the transient of your truth layer. This gives the sound physical weight.
- Layer the body. Add a mid-range texture, such as a processed wood crack or a compressed noise burst, to fill the frequency space between the transient and the sub.
- Design the tail. Apply a convolution reverb or a granular processor to one of your layers and automate the wet/dry ratio to create a decaying, evolving release.
- EQ each layer separately. Cut competing frequencies between layers. The sub layer should be high-passed above 200 Hz on all other layers. The transient layer should be low-passed below 300 Hz on the sub.
- Automate pitch and stereo placement. A subtle pitch drop of 2 to 4 semitones over the tail length adds perceived weight. Widening the stereo field on the tail while keeping the transient mono creates a natural sense of space.
This same process applies to whooshes, transitions, and ambient beds. For a whoosh, the truth layer becomes a recorded pass-by, the body becomes a filtered noise sweep, and the tail becomes a granular shimmer fading into silence.
Pro Tip: Changing pitch transforms an effect's character entirely. Pitch a metal clang down an octave and it becomes a cinematic impact. Pitch it up two octaves and it becomes a UI click. Keep pitch automation in your toolkit for every layer, not just the lead sound.
Modern pros focus on fast iteration over perfecting isolated effects, valuing how multiple sound elements interact within a scene rather than how each sounds in solo. Build your layers in context, with the full mix playing, from the first pass.
How do AI tools change creative sound design?
AI sound effect generators have moved from novelty to genuine workflow accelerators. Tools like ElevenLabs Sound Effects and Adobe Firefly Audio let you type a text prompt and receive multiple audio variations in under a minute. The AI generation workflow follows a clear pattern: write a specific prompt, generate four or more variations, audition each in context within your session, select the strongest take, trim to exact duration, and add a 50ms fade-out to eliminate clicks.
The critical editorial principle here is that AI tools require deliberate curation. Never accept the first or most average result. Generate a batch, listen to all variations at full volume in context, and select only the one that serves the scene. This approach treats the AI as a generative model rather than a database, which is the correct mental model.
Practical steps for integrating AI-generated sounds into a traditional workflow:
- Clean the output first. AI-generated audio often contains low-level artifacts or inconsistent noise floors. Run each file through a noise reduction pass in iZotope RX before layering.
- Layer AI sounds with recorded elements. A purely AI-generated impact rarely has the physical weight of a real recording. Combine the AI texture with a recorded transient for the best of both.
- Use AI for variation, not foundation. Generate AI variations of a sound to build a randomized pool for game audio or to create subtle differences between repeated SFX cues in film.
- Explore AI audio enhancement techniques to refine and polish AI-generated material before it enters your final mix.
Granular synthesis complements AI generation well. Feed an AI-generated texture into a granular processor like Output Portal, adjust grain size and density, and you produce evolving ambiences that no prompt alone could generate. The combination of AI speed and granular manipulation depth is one of the most productive creative audio effects workflows available in 2026.
Workflow best practices and common pitfalls
A well-organized session is the difference between a creative pass that takes two hours and one that takes two days. Session templates with consistent naming conventions reduce repetitive setup work and let you move directly into creative decisions. Use color coding for track types, markers for scene boundaries, and minimal signal chains during rough passes to keep CPU load low.
The most common mistakes in sound design workflows fall into three categories:
- Over-processing. Adding five plugins to a single layer rarely improves it. Each plugin introduces phase shift and potential artifacts. Start with one plugin per layer and add only when a specific problem demands it.
- Neglecting variation. Repeating the same sound effect without pitch, timing, or level variation breaks listener immersion. Build pools of at least three variations for any repeated cue.
- Ignoring fade-outs. Abrupt endings on any sound, especially ambiences and tails, create jarring cuts. Every sound file should have a fade-out applied before it enters the session.
Mixing for clarity rather than loudness is the governing principle for SFX work. EQ carving to prevent dialogue masking means cutting a narrow band around 2 to 4 kHz on SFX layers whenever dialogue is present. Subtle saturation on impact layers adds harmonic warmth without raising perceived loudness.
| Challenge | Solution |
|---|---|
| Muddy low end | High-pass all non-sub layers above 80 to 120 Hz |
| Dialogue masking | EQ cut on SFX at 2 to 4 kHz during dialogue sections |
| Repetitive SFX | Build variation pools of 3 or more takes per cue |
| Abrupt endings | Apply 50ms to 200ms fade-out on all sound files |
| Session disorganization | Use stem buses: Dialogue, SFX, Foley, Ambience, Music |
Pro Tip: Organizing stems around dialogue, Foley, SFX, ambience, and music simplifies mixing and allows for editorial efficiency. Each stem type carries different priority and processing requirements, so routing them separately from the start prevents conflicts at the mix stage.
Connecting SFX and Foley creation tightly to mixing ensures sounds serve the narrative rather than existing as isolated technical achievements. Build with the picture playing. Mix with the dialogue present. Every creative decision should be tested in the full context of the scene.
For deeper grounding in spatial audio production, understanding how sounds occupy three-dimensional space adds another dimension to your layering decisions, particularly for game audio and immersive formats.
Key takeaways
Creative sound design with effects requires layering distinct components, maintaining session structure, and combining AI tools with traditional processing to produce sounds that serve the narrative with precision and clarity.
| Point | Details |
|---|---|
| Layer by component | Split every sound into transient, body, LF thump, and tail for clarity and control. |
| Align transients precisely | Sync the attack of each layer to the same frame or beat to maximize perceived impact. |
| Use AI as a generator, not a database | Batch-generate variations, curate editorially, and layer AI output with recorded elements. |
| Organize sessions with stem buses | Route Dialogue, SFX, Foley, Ambience, and Music to dedicated buses from the start. |
| Mix for clarity, not loudness | EQ carve around dialogue frequencies and apply fade-outs to every sound file. |
What I've learned from years of building sound worlds
The most productive shift I made in my own practice was stopping the search for the perfect single sound and starting to think in systems. A convincing explosion is never one recording. It is a system of four to six layers, each doing a specific job, each processed to stay out of the others' way. Once you internalize that, you stop auditioning libraries looking for the answer and start treating every sound you hear as raw material.
AI tools have genuinely changed the speed of that process, but not in the way most people expect. The value is not in the quality of any single generated output. It is in the volume of variation you can produce in a short time. Generate twenty versions of a prompt, pick the two that have something interesting, and layer them with a recorded element. That combination almost always beats either source alone.
The part of this workflow that most designers undervalue is the sound design basics of session organization. Creative decisions made at 2 AM in a disorganized session get undone at the mix stage. The template is not a constraint on creativity. It is the structure that makes creativity sustainable across a full project.
Embrace imperfections in your layers. A slightly off-pitch tail, a subtle timing variation between takes, a noise floor that breathes. Those are the details that make a sound feel real rather than constructed. The goal is not technical perfection. The goal is emotional truth.
— Kai
Explore Vector-dsp tools for your sound design workflow
Vector-dsp builds professional audio plugins grounded in advanced DSP technology, designed specifically for sound designers and producers who need precise control over every stage of signal processing. The ToneLab plugin suite supports flexible layering workflows, giving you the parameter control needed to sculpt transients, shape tails, and experiment with effect combinations without sacrificing real-time performance. If you are building a sound design toolkit that can handle both traditional layering and experimental processing, Vector-dsp's full plugin catalog is worth exploring. Every tool is built to the VST3, AU, and AAX standard, so it integrates directly into your existing session template.
FAQ
What does creative sound design with effects mean?
Creative sound design with effects is the practice of building original audio experiences by layering, processing, and manipulating sounds through signal processing tools and synthesis techniques. It covers everything from film SFX design to music production and game audio.
What are the top creative effects for sound design?
Convolution reverb, granular synthesis, multi-tap delay, and transient shaping are the most widely used creative audio effects in professional sound design. Each addresses a different stage of the sound: space, texture, rhythm, and attack.
How do you layer sounds effectively?
Layer sounds by splitting each effect into four components: transient, body, low-frequency thump, and tail. Align each layer's transient precisely, EQ them to avoid frequency overlap, and process each separately before combining.
How do AI sound generators fit into a professional workflow?
AI generators produce multiple variations quickly from a text prompt, but they require editorial curation. Generate a batch, select the strongest take, clean it with noise reduction, and layer it with recorded elements for the best results.
How do I prevent muddiness when layering multiple sounds?
High-pass all non-sub layers above 80 to 120 Hz, EQ carve around the 2 to 4 kHz range when dialogue is present, and apply fade-outs to every file. Mixing for clarity rather than loudness is the governing principle for clean layered SFX.