Per-Band Saturation: A Complete Mixing and Mastering Guide
Per-Band Saturation: A Complete Mixing and Mastering Guide
Per-band saturation means applying independent saturation to separate frequency bands, so you can add harmonic weight to your low-mids without touching the highs, or tame harshness in the presence region without affecting the sub. It is the surgical alternative to full-band saturation, and once you understand the routing, it changes how you approach glue, color, and density in a mix.
Quick recipe to get started:
- Split your signal into three or more bands (typical crossovers: 200 Hz, 800 Hz, 3.5 kHz, 10 kHz).
- Choose a saturation character per band: tape or tube for lows, tube or transistor for mids, gentle tape or transformer for highs.
- Start drive at 10–20% per band, wet/dry mix at 30–50%, then balance output gain to unity before comparing.
High-value use cases:
- Mix bus glue without dulling transients
- Parallel drum bus punch and grit
- Bass phantom fundamental generation
- Vocal presence without sibilance
- Reverb tail warmth without masking the dry signal
Key Takeaways
Per-band saturation gives you harmonic control at the frequency level, and crossover placement determines the result more than drive level does.
| Point | Details |
|---|---|
| Crossover placement first | Set band boundaries before touching drive; they determine harmonic character, not drive level. |
| Match phase mode to session | Use IIR zero-latency crossovers for mixing and tracking; reserve linear-phase FIR for mastering. |
| Parallel routing preserves transients | Blend saturated bands with the dry signal to keep attack intact while adding harmonic weight. |
| Mastering needs metering | Check LUFS, true-peak, spectral balance, and stereo correlation after every per-band saturation pass. |
| Vector-dsp ToneLab | ToneLab's per-lane EQ targeting replicates per-band saturation recipes in a single multi-lane plugin instance. |
Table of Contents
- How does per-band saturation actually work at the DSP level?
- What routing patterns work best for multiband saturation?
- Source-specific recipes for drums, bass, vocals, and more
- Quick-reference band ranges and starting settings
- How do you fix masking, harshness, and pumping in multiband saturation?
- When should you use per-band saturation in mastering?
- Vector-dsp's practical DSP notes on per-band harmonic control
- When per-band saturation is the right call, and when it is not
- ToneLab by Vector-dsp puts per-band saturation into practice
- Sources
How does per-band saturation actually work at the DSP level?
The core mechanism is a crossover filter network that splits your audio into frequency bands before any nonlinear processing touches the signal. Each band then passes through its own saturation algorithm, and the bands are summed back together at the output. What happens inside that split determines everything about transparency, phase behavior, and harmonic character.
Crossover types and what they cost you
The two dominant crossover designs you will encounter in multiband saturation plugins are Linkwitz-Riley (LR) filters and linear-phase FIR filters. A fourth-order Linkwitz-Riley (LR4) crossover sums to a flat magnitude response, which sounds ideal, but it introduces phase rotation that varies with frequency. That phase shift is minimum-phase, meaning it is causal and adds no latency, which is why IIR-based crossovers are the default in real-time mixing contexts.
Linear-phase FIR crossovers, by contrast, preserve phase relationships across the spectrum. The tradeoff is latency: FIR filters require look-ahead buffering, which adds processing delay. For mastering, that latency is usually acceptable. For tracking or live performance, it is not. The open-source SATORDIST2 multi-band saturator makes this explicit by offering both zero-latency IIR and linear-phase FIR modes, letting you match the tool to the session's requirements.
Steeper slopes (24 dB/octave or higher) give you tighter band isolation, but they also increase phase rotation in minimum-phase designs and can create pre-ringing artifacts in linear-phase designs. Shallower slopes (12 dB/octave) are more transparent but let more energy bleed between bands, which can cause inter-band harmonic buildup when you push drive.
How saturation interacts with band-split content
When you saturate a narrow band, the nonlinear algorithm generates harmonics relative to the content in that band only. A tube-style even-order saturator on a bass band adds a second harmonic an octave up, which sits in the low-mid range and adds perceived warmth. A transistor-style odd-order saturator on a mid band adds a third harmonic that can add grit or, pushed too hard, harshness.
This is the insight most engineers miss. Crossover placement, not drive, is the primary tonal decision. A crossover set at 2 kHz instead of 3.5 kHz on a vocal will push saturation harmonics into a completely different spectral region.
Oversampling and aliasing
Saturation algorithms generate harmonics above the Nyquist frequency, which fold back into the audible range as aliasing artifacts. Oversampling (typically 2x or 4x) raises the effective Nyquist ceiling before processing, then downsamples afterward, reducing aliasing at the cost of additional CPU load.
Pro Tip: In a mix session with many instances of multiband saturation, disable oversampling on low-drive bands and reserve it for the parallel drum bus or mix bus where you are pushing harder. Your CPU will thank you, and the sonic difference at low drive is negligible.
Psychoacoustic research supports the idea that harmonic additions in the 2–5 kHz range have the strongest effect on perceived clarity and presence, which is why psychoacoustic principles applied to production often point engineers toward targeted mid-range saturation rather than full-band processing.
What routing patterns work best for multiband saturation?
Signal flow is where most engineers make their first mistake with multi-band saturation. The routing you choose determines how much control you have, how the dynamics behave, and whether you can undo the effect without rebuilding your session.
Parallel multi-lane architecture
Parallel processing sends a copy of the signal to a separate processing chain, then blends the processed and dry signals together. For per-band saturation, this means each band's saturation runs in parallel with the clean signal, and you control the blend with a wet/dry mix or a return fader. The key advantage: transient integrity. Because the unprocessed signal is always present in the blend, attack and release characteristics stay intact even when you push individual bands hard.
This is the architecture behind parallel processing techniques that engineers use on drum buses, where you want the crack of a snare preserved while adding low-mid weight and high-frequency grit. Community practice on forums like KVR Audio confirms that pairing per-band saturation with parallel routing is the most common workflow for engineers who want harmonic weight without dynamic compression artifacts.
Serial multiband (cascaded splits)
Serial processing inserts the multiband saturator directly in the signal path. Every bit of audio passes through the crossover and saturation stages before reaching the next plugin. This gives you maximum harmonic density and the most colored result, but it also means the saturation directly affects dynamics. If your saturator has any compression-like behavior (soft-clipping, for instance), that compression is baked into the signal. Serial multiband works well on mix buses where you want glue and density, less well on individual sources where you need transient precision.
Split-band sends
A split-band send routes individual frequency ranges to separate aux channels using high-pass and low-pass filters. You saturate each send independently, then blend the sends back into the mix. This approach gives you the most granular control: separate faders, separate metering, and the ability to apply different plugins per band. The downside is session complexity. Three bands means three sends, three return channels, and careful gain staging across all of them.
Mid/side per-band saturation
M/S routing decodes the stereo signal into a center (mid) channel and a difference (side) channel before splitting into bands. You can then saturate the mid and side independently per band. A common mastering application: add subtle tape saturation to the mid channel's low-mids for warmth, while leaving the side channel's lows clean to preserve stereo bass focus. The SATORDIST2 architecture includes per-band M/S routing as a first-class feature, which illustrates how seriously DSP designers take this dimension of control.
Routing patterns compared
| Routing Pattern | Transparency | Control Level | Latency Impact | Best For |
|---|---|---|---|---|
| Parallel multi-lane | High | High | Low (IIR) | Drums, bass, mix bus blend |
| Serial multiband | Low to medium | Medium | Low to high | Mix bus glue, mastering color |
| Split-band sends | High | Very high | Low | Stem mixing, surgical correction |
| M/S per-band | High | Very high | Low to high | Mastering, stereo width control |
Source-specific recipes for drums, bass, vocals, and more
Drums
Run a parallel drum bus and insert your multiband saturator on the parallel return, not the main drum bus. Set three bands: sub/low, low-mid/mid, and high frequency ranges as typical crossover points. Use appropriate saturation characters per band with moderate drive levels to enhance each drum element, then blend the parallel return at a moderate wet mix.

FabFilter Saturn 2 is a go-to for this workflow because each band accepts a different saturation style and modulation independently, which is exactly what a parallel drum bus recipe needs.
Bass
Bass per-band saturation solves a specific problem: the sub frequencies often carry energy that small speakers cannot reproduce, so the bass sounds thin on earbuds or laptop speakers. Splitting the bass signal and applying even-order (tube) saturation to the sub band generates a second harmonic an octave up, which is audible on smaller speakers. Use moderate drive levels and wet/dry mix on the sub band, and keep low drive on mid and high bands to preserve note definition.
Guitars and synths
For electric guitar, the mid band is where character lives. Transistor saturation in this range at a moderate drive level adds the kind of grit that makes a rhythm guitar cut through a dense mix. For synths with complex harmonic content, use conservative drive levels on mid and high bands to add air without creating aliasing artifacts.
Vocals
Vocal per-band saturation is about presence without sibilance. Use suitable crossover points to separate bands. On the low band, use tube saturation with a low drive level to add body. On the presence band, use tape saturation with moderate drive to add intelligibility. Keep drive low or bypass the air band. Automate the presence band's drive level to follow the vocal's dynamic contour: push it up during quieter phrases, pull it back during loud peaks. This is more effective than static drive because it responds to the performance.
The Undertone Audio MPEQ-1 takes this concept further by embedding per-band saturation directly into a super-parametric EQ, letting you shape tonal balance and harmonic character in a single plugin pass.
Reverb and effects
Saturating reverb tails per-band adds warmth without masking the dry signal. Insert a multiband saturator on the reverb return, not the send. Focus saturation on the low-mid band at moderate drive levels to add warmth to the tail. Leave the high band clean or apply very gentle saturation to preserve air without harshness. The dry signal is unaffected because the saturator sits only on the reverb return.
Numbered workflow for any source:
- Set crossover points first, before touching drive.
- Bypass all bands and listen to the dry signal.
- Enable one band at a time, add drive slowly, and compare to bypass.
- Set wet/dry mix last, after all bands are dialed in.
- Check output gain against the bypassed signal to avoid level-based bias.
Quick-reference band ranges and starting settings
| Band | Frequency Range | Crossover Slope | Starting Drive | Wet/Dry Mix | Saturation Type |
|---|---|---|---|---|---|
| Low | 20–200 Hz | 24 dB/oct LR4 | Low to moderate drive | Moderate wet/dry mix | Tube (even-order) |
| Low-Mid | 200–800 Hz | 24 dB/oct LR4 | 10–20% | 30–50% | Tape |
| Mid | 800 Hz–3.5 kHz | 24 dB/oct LR4 | 15–30% | 30–50% | Tape or transistor |
| High-Mid | 3.5–10 kHz | 12–18 dB/oct | Low drive | Low to moderate wet/dry mix | Tape |
| High | 10 kHz and up | 12 dB/oct | 5–12% | 15–30% | Transformer or tape |
For mastering, use shallower slopes (12 dB/octave) across all bands to minimize phase rotation and keep the crossover region transparent. For mixing, 24 dB/octave LR4 crossovers give you tighter band isolation and more predictable harmonic behavior per band.
Pro Tip: Always set your crossover points to avoid splitting a source's fundamental frequency. If a kick drum's fundamental sits at 60 Hz, set your low/low-mid crossover at 150–200 Hz, not 80 Hz. Splitting the fundamental across two bands and saturating each independently creates phase and harmonic artifacts that are difficult to diagnose later.
A rule from hardware-inspired multiband units: apply drive until you hear the saturation, then back off slightly. That threshold point, just below audible distortion, is where harmonic enhancement is most effective without introducing obvious coloration.
How do you fix masking, harshness, and pumping in multiband saturation?
Detecting masking and harmonic buildup
The first sign of inter-band masking is a loss of definition in the 1–3 kHz range, where mid-range harmonics from the low-mid band start competing with the fundamental content of the mid band. Use a spectrum analyzer (Voxengo SPAN or similar) to compare the saturated signal against the dry signal. Look for unexpected energy buildup in the 500 Hz–2 kHz range. If you see a broad hump that was not there before, your low-mid drive is too high or your crossover is set too low.
Listening checklist:
- Solo each band and listen for harmonic artifacts before summing.
- Compare the full mix with saturation bypassed at matched levels.
- Check the 2–5 kHz range specifically for harshness after enabling the mid band.
- Listen on multiple playback systems (headphones, small speakers, full-range monitors).
Fixing harsh high-frequency saturation
High-band saturation is the most common source of harshness. Three fixes, in order of preference:
- Place a gentle low-pass filter (12 dB/octave, starting at 14–16 kHz) after the high-band saturation stage to roll off the uppermost harmonics.
- Reduce the wet/dry mix on the high band before reducing drive. A lower blend often sounds more natural than a lower drive at the same blend.
- Switch the high-band saturation algorithm from transistor or hard-clip to tape or transformer, which generate harmonics that roll off more naturally at high frequencies.
Addressing pumping
Pumping in multiband saturation usually comes from one of two sources: steep crossover slopes creating dynamic artifacts at the band boundaries, or a saturator with built-in compression behavior responding to transients. For the first, try reducing the crossover slope from 24 dB/octave to 12 dB/octave on the affected band. For the second, check whether your saturator has a soft-knee or auto-gain feature and disable it, or switch to a simpler waveshaping algorithm.
Troubleshooting flow
- Bypass all saturation and confirm the dry signal is clean.
- Enable one band at a time and check for artifacts before enabling the next.
- If harshness appears, check drive first, then crossover placement, then algorithm type.
- If pumping appears, check crossover slope and any built-in compression behavior.
- If phase issues appear, check whether you are mixing IIR and FIR modes across bands.
- Run a null test against the dry signal to confirm the saturated output sums correctly.
When should you use per-band saturation in mastering?
Per-band saturation in mastering is a corrective and enhancement tool, not a character tool. The goal is tonal balance and subtle glue, not audible distortion. If you can hear the saturation as saturation, the drive is too high.
The appropriate order of operations for a mastering chain: EQ first to correct tonal imbalance, then per-band saturation for harmonic enhancement and glue, then gentle bus compression to control dynamics, then a limiter for true-peak control. Placing saturation before compression means the compressor responds to the harmonically enhanced signal, which tends to produce more natural-sounding compression behavior.
Mastering metering checklist after per-band saturation:
- Check integrated LUFS against your target (typically -14 LUFS for streaming, -9 to -11 LUFS for club formats). Per-band saturation adds perceived loudness without raising true peak, so your LUFS reading may increase slightly.
- Check true-peak level. Saturation can create inter-sample peaks that exceed 0 dBFS even when the waveform looks clean. Use a true-peak meter and keep peaks below -1 dBTP before limiting.
- Check spectral balance with a long-term spectrum analyzer. Compare the saturated master against a reference track in the same genre.
- Check stereo correlation. M/S per-band saturation can narrow or widen the stereo image. A correlation meter below +0.5 on the low band indicates potential mono compatibility issues.
For professional audio standards compliance, true-peak and LUFS targets vary by platform, so confirm the delivery spec before finalizing your mastering chain settings.
Automate drive on the mid band to follow the track's energy contour, pulling back during dense passages and adding slightly during sparse sections.
Vector-dsp's practical DSP notes on per-band harmonic control
Vector-dsp's multiband processing guide provides a detailed breakdown of crossover behavior, routing patterns, and measured examples that directly support the techniques in this guide. The architecture Vector-dsp uses in ToneLab is a multi-lane parallel processing system, where each lane carries its own EQ targeting, saturation character, and gain structure before summing to the output.
This architecture has a practical advantage over fixed-crossover designs: the lane EQ can be a bell, shelf, or high/low-pass filter, so you can target a narrow resonant peak for saturation without affecting the surrounding spectrum. A fixed crossover cannot do that.
Key technical properties of ToneLab's architecture:
- Multi-lane parallel processing with per-lane EQ targeting for frequency-specific harmonic control
- Real-time low-latency DSP suitable for tracking and mixing sessions
- Support for VST3, AU, and AAX formats across Windows and macOS
- Preset system that stores lane configurations, EQ settings, and drive values as a single recall
The psychoacoustics guide from Vector-dsp adds perceptual context: harmonic additions in the 2–5 kHz range have the strongest effect on perceived presence and clarity, which maps directly to the mid-band saturation recipes in this guide. Knowing where the ear is most sensitive to harmonic content helps you decide which bands to push and which to leave clean.
When per-band saturation is the right call, and when it is not
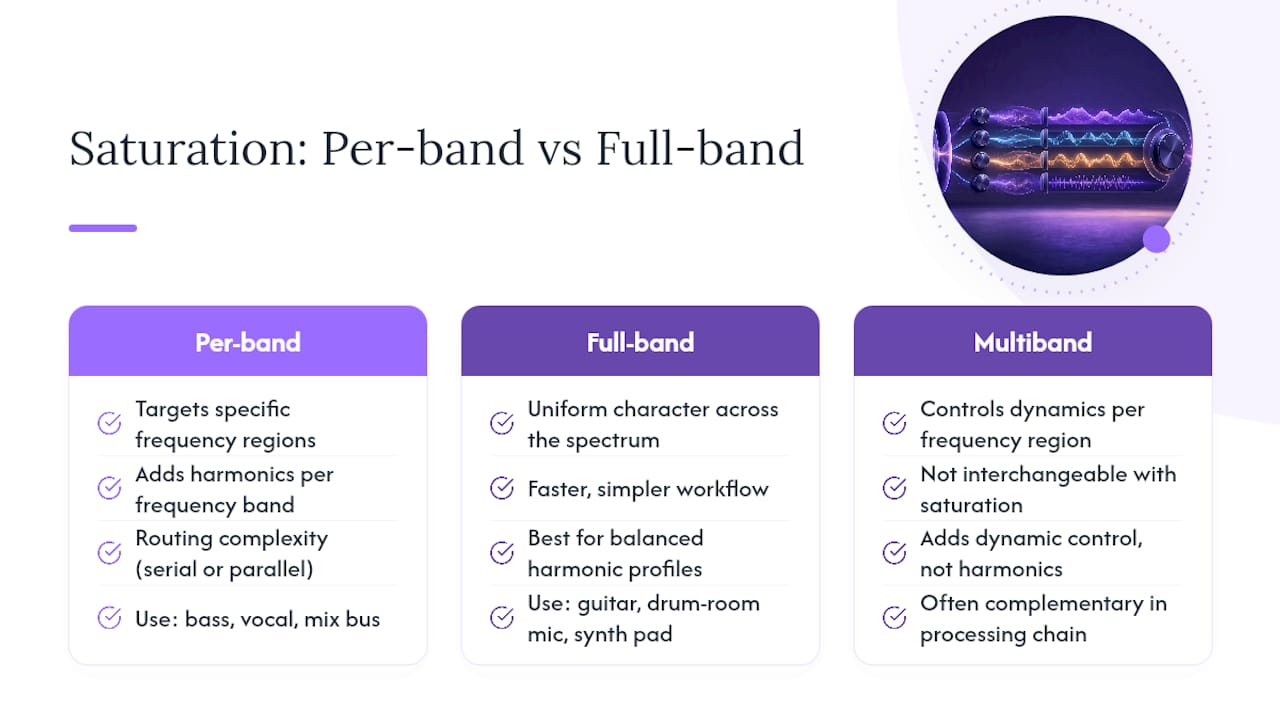
Per-band saturation earns its place in a session when you have a specific frequency region that needs harmonic enhancement and you cannot achieve it with full-band saturation without affecting the rest of the spectrum. A bass that needs phantom fundamental generation, a vocal that needs presence without sibilance, a mix bus that needs low-mid glue without dulling the top end. Those are the scenarios where the extra routing complexity pays off.
Full-band saturation is faster and often sufficient when the source has a balanced harmonic profile and you want a uniform character across the spectrum. A guitar amp, a drum room mic, a synthesizer pad. For those sources, splitting into bands and saturating each independently adds complexity without adding meaningful control.
Multiband compression and per-band saturation solve different problems. Multiband compression controls dynamics per frequency region. Per-band saturation adds harmonics per frequency region. They are not interchangeable, though they are often complementary. For a detailed look at compression architectures and how they compare to saturation-based harmonic control, that distinction matters when you are building a processing chain.
My preferred session template puts per-band saturation on three places: the parallel drum bus (three bands, parallel blend), the bass channel (two bands, serial), and the mix bus (four bands, very low drive, linear-phase crossovers). Everything else gets full-band saturation or nothing. That discipline keeps the session manageable and the decisions audible.
Automation is where per-band saturation becomes a creative tool rather than a corrective one. Automating the mid-band drive on a vocal to follow the phrase energy, or automating the low-band drive on a synth pad to swell during a chorus, creates movement that static processing cannot. The effect is subtle but cumulative across a mix.
ToneLab by Vector-dsp puts per-band saturation into practice

ToneLab's multi-lane parallel architecture maps directly to the techniques in this guide. Each lane functions as an independent processing path with its own EQ targeting, which means you can replicate the drum bus recipe (three bands, different saturation characters, parallel blend) inside a single plugin instance. The per-lane EQ targeting replaces fixed crossovers with flexible filter shapes, giving you more precise band definition than a standard multiband saturator.
Lane 1 targets below 200 Hz with a low-pass EQ curve and tube character. Lane 2 targets 3–8 kHz with a bell or shelf and tape character. Lane 3 is disabled. Save it as a preset and recall it on any vocal channel.
ToneLab is available in VST3, AU, and AAX formats for Windows and macOS, with a free demo version so you can run the recipes in this guide before committing to a license. Visit the ToneLab product page to download the demo and see the full feature set.
Sources
- FabFilter Saturn 2 Review: Multiband Saturation as a Complete Tone-Shaping System | MUSCO SOUND
- Codeberg
- Looking for a multiband compressor with per-band saturation