Why You Should Resample Audio Projects: A Producer's Guide
Why You Should Resample Audio Projects: A Producer's Guide

You resample audio projects to solve three distinct problems: format compatibility (44.1 kHz vs. 48 kHz), creative printing of processed chains, and aliasing control through oversampling workflows. Get any one of those wrong and you either lose pitch accuracy, waste CPU, or accumulate artifacts you can't undo. The verdict is simple: resample once, at the highest quality setting your tools allow, and only when you have a clear reason.
- Delivery compatibility. Music distribution targets the common audio standard sample rate; video post-production uses a slightly higher standard sample rate. Mismatched sample rates cause pitch shifts and playback speed errors if the conversion isn't handled deliberately.
- Creative printing. Committing a saturated, oversampled plugin chain to a new audio file captures the exact transient behavior of that moment and frees CPU for the next stage.
- Aliasing and DSP control. Running a project at a higher sample rate or using chain oversampling reduces aliasing in non-linear processors without stacking per-plugin overhead.
Pro Tip: Never change your project sample rate mid-session. Set it before you record the first track and resample once, at the end, when preparing deliverables.
Table of Contents
- What resampling actually is, and how it differs from pitch-shifting
- Why you resample audio projects: the practical reasons
- How resampling affects audio quality
- How to resample correctly in your DAW
- Which tools handle resampling well?
- Creative resampling workflows that actually produce results
- Common resampling problems and how to fix them
- What the experts actually say about resampling
- Pre-delivery resampling checklist
- Key Takeaways
- A note on how I structure sessions around resampling
- Useful sources and further reading
What resampling actually is, and how it differs from pitch-shifting
Audio resampling, technically called sample-rate conversion) (SRC), is the process of converting a discrete digital audio stream from one sampling frequency to another. That's it. The underlying audio content doesn't change in intent, but the grid of samples that represents it does.
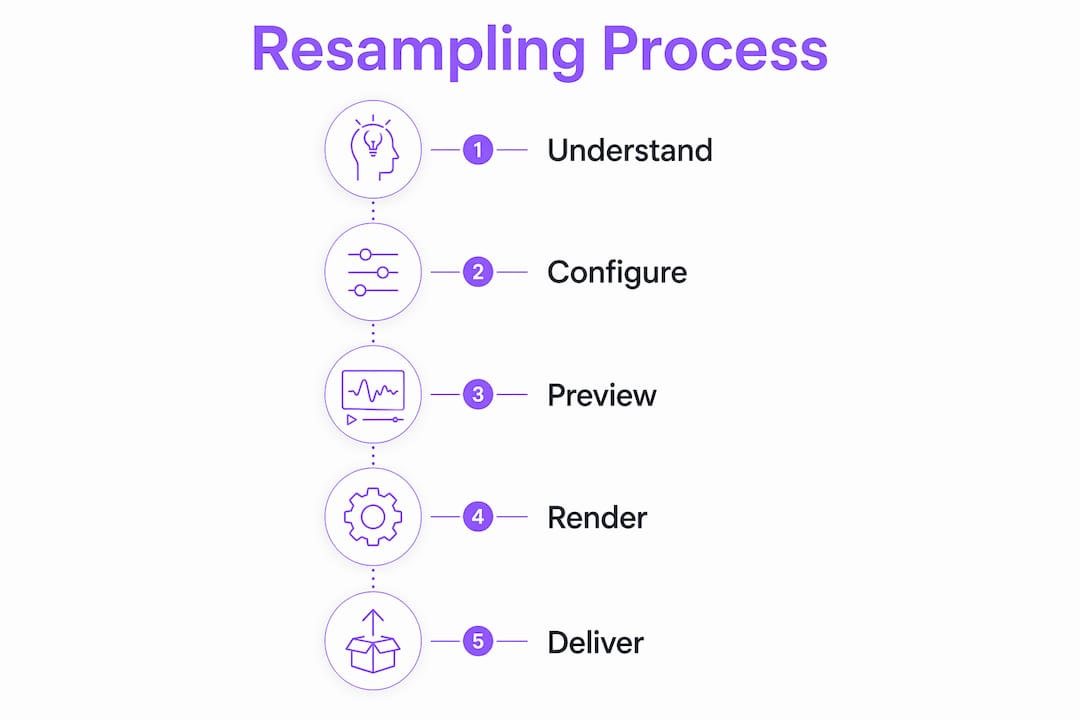
Here's how it works at a practical level. When you upsample, the algorithm inserts new samples between existing ones using interpolation, typically a windowed-sinc or Kaiser-windowed FIR filter. When you downsample, an anti-aliasing low-pass filter removes content above the new Nyquist limit before the sample count is reduced. The bandlimited interpolation approach, described in detail by Julius O. Smith at Stanford's CCRMA, is the theoretical basis for every high-quality SRC implementation you'll encounter in a DAW or standalone tool.
What resampling does not do: it doesn't pitch-shift or time-stretch in the musical sense. Pitch-shifting and time-stretching use phase vocoders, granular engines, or formant-preserving algorithms to change pitch or duration independently. Resampling reinterprets the sample grid. If you import a 44.1 kHz file into a 48 kHz project without SRC, the file plays back faster and higher in pitch, because the DAW reads those samples at the wrong rate. That's the mismatch resampling is designed to prevent.
Resampling changes how many samples per second represent the signal. Pitch-shifting changes which frequencies are in the signal. They are not interchangeable, and confusing them is the most common source of unexpected pitch errors in cross-format projects.
A quick example: you drop a 44.1 kHz music track into a 48 kHz video timeline. Without proper SRC, the DAW reads 48,000 samples per second from a file that only has 44,100 per second of audio information. The result is a track that plays roughly 8% faster and sharp in pitch. Proper resampling reconstructs the signal at 48,000 samples per second so timing and pitch stay locked.
Why you resample audio projects: the practical reasons
Delivery format compatibility is the most common reason producers and engineers resample, and it breaks down into a few concrete scenarios.
- Music vs. video standards. CD and streaming distribution uses 44.1 kHz. Film and broadcast video uses 48 kHz. If your music session is at 44.1 kHz and a sync client needs stems at 48 kHz, you resample before delivery.
- Telecom and podcast formats. Some podcast hosts and telephony systems target 22.05 kHz or 16 kHz. Delivering at the wrong rate causes the platform's own resampler to do the conversion, which is usually lower quality than doing it yourself.
- Printing heavy plugin chains. A saturated synth running through three oversampled processors is expensive. Bouncing that chain to a new audio file at your session rate locks in the sound, frees CPU, and gives you a stable file to send to a collaborator or mastering engineer.
- Preparing stems for outside mastering. Mastering engineers often request 24-bit files at a specific sample rate. Resampling to their spec before delivery prevents them from doing a lower-quality conversion on their end.
- Chain oversampling workflows. Running a channel strip at 2x or 4x internally and then rendering to your project rate reduces aliasing from non-linear processors without the CPU cost of enabling oversampling on every individual plugin.
Pro Tip: When sending stems to a video editor, always confirm the target sample rate in writing before you bounce. A 44.1 kHz stem in a 48 kHz Premiere Pro timeline will drift over time if the editor's SRC is off.
Creative resampling is a separate category entirely. Producers use it to transform sounds: print a granular effect at an extreme setting, resample the result at a lower rate to introduce aliasing textures, then time-stretch back to the original length for gritty, lo-fi character. That's a workflow, not a mistake.
How resampling affects audio quality
The quality impact of SRC depends almost entirely on the algorithm and how many times you run it. The artifacts to know:
- Aliasing. When downsampling without an adequate anti-aliasing filter, frequencies above the new Nyquist limit fold back into the audible range as harmonic noise. This is the most audible artifact and the reason filter quality matters.
- Ringing (pre- and post-ringing). FIR-based anti-aliasing filters introduce time-domain ringing around transients. Longer filter windows reduce frequency-domain error but spread the ringing further in time.
- Phase smear. Linear-phase FIR filters preserve frequency response but introduce group delay. Minimum-phase designs reduce latency but alter phase relationships across the spectrum.
- Interpolation error. Every interpolation pass introduces small inaccuracies. Resamplers can introduce passband ripple and aliasing harmonic noise, and the effect compounds with each successive conversion.
Upsampling alone adds no new audio information. It spaces existing samples further apart and fills the gaps with interpolated values. The signal doesn't gain high-frequency detail it didn't have at the original rate.
Algorithm quality matters more than sample rate in most practical scenarios. Blind tests show that properly resampled 44.1 kHz audio can be indistinguishable from 96 kHz originals when a top-quality SRC is used. The practical rule: minimize conversions, and when you must convert, use the best SRC available at its highest quality setting. Apply dither only when reducing bit depth, not sample rate.
How to resample correctly in your DAW
The decision comes before the steps. Are you resampling for delivery, or printing a creative chain? That determines your target sample rate, bit depth, and whether you need dither.
- Confirm your target spec. Know the delivery sample rate and bit depth before you touch anything. 48 kHz / 24-bit for video, 44.1 kHz / 16-bit for CD, 44.1 kHz / 24-bit for most streaming masters.
- Duplicate your session. Never resample the only copy of your project. Save a new version with a clear name ("_RESAMPLE_48k") before changing any settings.
- Consolidate or bounce all tracks. Render each track to a single continuous audio file at the current session rate and bit depth. This eliminates plugin state variables from the equation.
- Set SRC quality to high or very high. In Reaper, choose the longest sinc window your CPU can handle. In Pro Tools, use "Tweak Head" for offline conversion. In Logic Pro, "Best" quality uses a high-order linear-phase filter. For batch conversions outside the DAW, soxr (the SoX resampler library) at its highest quality setting is a reliable benchmark.
- Render offline, not real-time. Offline rendering processes the entire file in one pass with a consistent filter state. Real-time conversion can introduce clicks or inconsistencies when the filter recomputes at buffer boundaries.
- Verify timing and phase. Import the resampled file back alongside the original (time-aligned) and null-test or listen for phase smear and timing drift. A sine sweep from 20 Hz to 20 kHz is a clean diagnostic signal.
- Apply dither if and only if you're reducing bit depth. Going from 24-bit to 16-bit requires dither (TPDF is the standard choice). Going from 48 kHz to 44.1 kHz at the same bit depth does not.
Pro Tip: Resample once at the very end of your workflow. If you need to iterate, always go back to the original high-resolution archive, not the already-converted file.
Real-time SRC in a DAW is convenient but carries a cost. Reaper's playback resample modes use sinc-based kernels of varying lengths; longer windows reduce noise and distortion but demand more CPU per sample. For monitoring and rough work, a medium-quality real-time mode is fine. For final delivery, always go offline.
Which tools handle resampling well?
The right tool depends on whether you need transparency, batch processing, or creative control.
- SoX / soxr. The SoX command-line tool and its soxr library are the reference standard for transparent batch conversion. Free, cross-platform, and used internally by several DAWs. For 44.1 ↔ 48 kHz conversions, soxr at "very high" quality is effectively transparent.
- iZotope RX. The Resample module in RX gives you a GUI, spectral preview, and the ability to inspect artifacts before committing. Useful when you need to verify a conversion or handle a problematic source file.
- FFmpeg. For scripted or automated workflows, FFmpeg with the soxr resampler backend handles batch conversions across large file sets. Common in post-production pipelines where hundreds of stems need to hit a delivery spec.
- DAW built-in SRC. Convenient for session-level work. Quality varies by DAW and setting. Always choose the highest quality mode for final renders; use faster modes only during composition and editing.
- Audacity. A reasonable free option for one-off conversions. Its resampler quality is adequate for most tasks, though it doesn't match soxr at maximum settings.
Understanding how oversampling differs from project-wide SRC matters here. Plugin oversampling raises the internal Nyquist limit for that plugin's DSP. Project-level resampling is a structural conversion for compatibility or delivery. They solve different problems, and conflating them leads to redundant processing and unnecessary CPU load. For more on how these DSP algorithm types interact inside plugins, Vector-dsp's technical blog covers the underlying architecture in detail.
Creative resampling workflows that actually produce results
Resampling as a sound-design tool is underused. Here's how to make it deliberate.
- Print a saturated chain, then resample down. Run a synth through heavy saturation and distortion at 96 kHz. Bounce to audio. Then resample that file down to 22.05 kHz and back up to your session rate. The aliasing folds back in as harmonic content that wasn't there before. Layer this with the clean original for controlled grit.
- Resample loops at non-standard rates. Take a drum loop and resample it to an odd rate like 32 kHz, then import it back at your session rate without correcting the pitch. The slight pitch shift and timing compression create a lo-fi, tape-adjacent character. Time-stretch it back to the original length for rhythmic artifacts.
- Vocal texture from rate conversion. Convert a vocal phrase to 11.025 kHz, then time-stretch it back to the original duration at your session rate. The bandwidth reduction combined with stretch artifacts produces a gritty, telephone-style texture that sits differently in a mix than a standard lo-fi plugin.
- Layer resampled material with the original. The resampled version often loses transient sharpness. Keep the original for attack and blend the resampled version underneath for body and color. This preserves punch while adding the timbral character the conversion introduced.
Pro Tip: Always keep a labeled, unprocessed version of every source file before creative resampling. Name it clearly ("_ORIGINAL_PRE-RESAMPLE") and archive it with the session. Creative resampling is non-destructive only if you kept the source.
The hardware vs. software processing distinction matters in creative contexts too. Printing a chain to disk is the software equivalent of committing to tape: you gain stability and CPU headroom, but you lose the ability to recall exact plugin states without the archive.
Common resampling problems and how to fix them
Most resampling errors fall into four categories, and each has a clear diagnostic path.
- Pitch or speed mismatch. The file plays back at the wrong pitch or speed. Check: what was the original file's sample rate? What is the project sample rate? Did the DAW apply SRC on import, or did it treat the file as native? In most DAWs, right-clicking the clip and checking its properties shows the embedded sample rate. If the embedded rate doesn't match the project rate and SRC wasn't applied, that's your problem.
- Phase smear and timing drift. After resampling, transients feel soft or slightly late. This is usually a linear-phase FIR filter artifact. Try a minimum-phase SRC mode if your tool offers one, or check whether multiple SRC passes happened (DAW import + bounce + export). Each pass compounds the smear.
- Plugin oversampling conflicts. A plugin running at 4x internal oversampling inside a 96 kHz project is effectively running at 384 kHz internally. That's rarely necessary and can cause peak-level increases and phase side effects. Oversampling increases CPU and can raise peak levels; use it selectively and A/B test with it on and off. Disable per-plugin oversampling when chain oversampling or a higher project rate already handles aliasing.
- Incorrect dithering. Dither applied when increasing bit depth adds noise for no reason. Dither applied when not reducing bit depth is equally pointless. The rule: dither once, at the final stage, only when going from a higher bit depth to a lower one (24-bit to 16-bit). Never dither when only changing sample rate.
Pro Tip: When troubleshooting a suspected SRC artifact, render a 1 kHz sine wave through the same conversion chain and inspect the output in a spectrum analyzer. Aliasing shows up as spurious tones; ringing shows up as pre-echo in the time domain.
What the experts actually say about resampling
The studio mythology around sample rates is thick, and a few authoritative voices cut through it cleanly.
Hugh Robjohns, technical editor at Sound On Sound, is direct: avoid mid-session sample-rate changes. Set your session rate before you record anything, stick to it, and perform any necessary conversion once at the end. Changing the project rate mid-session risks unintended pitch shifts on already-recorded material and forces the DAW to apply SRC to files that were recorded at a different rate.
Dan Lavry's position is more nuanced and worth understanding. His white paper argues that higher sample rates are not automatically better: there is an optimal rate, and conversion beyond it can actually reduce converter accuracy. Good converters at 96 kHz can approach theoretical limits, but pushing to 192 kHz or beyond introduces practical trade-offs in filter design and converter performance that often outweigh any theoretical benefit.
Vector-dsp's practical rules, grounded in the same DSP principles:
- Record at your intended delivery sample rate when possible. This eliminates the need for SRC entirely.
- When you must resample, do it once, at the highest quality SRC setting available.
- Use plugin oversampling selectively, not universally. Chain oversampling or a higher project rate is often a cleaner solution.
- Keep originals. Every destructive conversion should have a labeled archive of the pre-conversion files.
- Validate with a sine sweep when troubleshooting. Frequency-domain inspection reveals aliasing and passband ripple that listening alone can miss.
Pro Tip: Upsampling does not add new audible detail. It spaces existing samples further apart and fills gaps with interpolated values. A 44.1 kHz recording upsampled to 96 kHz contains no more audio information than it did at 44.1 kHz. The myth that "higher is always richer" leads to unnecessary conversions and larger files with no quality gain.
For a deeper look at how professional audio standards govern delivery specs and bit-depth practices, Vector-dsp's standards overview is a practical reference.
Pre-delivery resampling checklist
Before you export stems, send files to a client, or prepare a final master, run through this list.
- Confirm target sample rate and bit depth. Get it in writing from the client, platform spec sheet, or delivery guide. Don't assume.
- Check source SR against target SR. If they match, skip resampling entirely. Unnecessary conversion only adds risk.
- Resample offline at the highest quality setting. Never use real-time SRC for final deliverables.
- Apply dither only when reducing bit depth. 24-bit to 16-bit: yes. 48 kHz to 44.1 kHz at 24-bit: no dither needed.
- Keep the original files. Archive the pre-conversion versions with a clear naming convention before any destructive export.
- Test in the target playback environment. Play the delivered file in the client's DAW, the streaming platform's preview player, or the video editor's timeline. Pitch and timing should be identical to your session.
Pro Tip: Before any destructive export, render a labeled archive of your original high-resolution files. Name it with the date and session rate ("_ARCHIVE_96k_24bit_2026-06-15") so you can always return to the source.
Key Takeaways
Resampling audio projects is a precision task: do it once, at the highest quality setting, with a clear reason, and always keep the original files.
| Point | Details |
|---|---|
| Resample for compatibility | Match delivery specs (44.1 kHz for music, 48 kHz for video) to prevent pitch and speed errors. |
| Resample once, not repeatedly | Each conversion pass compounds interpolation artifacts; always go back to the original archive if you need to re-convert. |
| Algorithm quality beats sample rate | High-quality SRC (soxr, iZotope RX) can produce transparent conversions; the tool matters more than the rate. |
| Dither only when reducing bit depth | Apply TPDF dither at the final stage when going from 24-bit to 16-bit; never when only changing sample rate. |
| Creative resampling is a technique | Printing processed chains and rate-converting for texture are legitimate sound-design moves, not mistakes. |
A note on how I structure sessions around resampling
The habit that changed my workflow most: recording at the intended delivery sample rate from the start. For a music project going to streaming, that's 44.1 kHz. For anything touching video, 48 kHz. That single decision eliminates the most common resampling scenario entirely.
When I do need to print a heavy chain, I treat it like a commit, not a convenience. The processed file gets a clear name, the original plugin chain stays in the session (muted, not deleted), and both get archived together. That's the Vector-dsp approach to precision: predictable DSP behavior means knowing exactly what state your audio is in at every stage of the project.
The one habit I'd pass on: version your archives with the sample rate and bit depth in the filename. "Synth_Lead_PRINT_48k_24bit" tells you everything you need to know six months later when a client asks for a revision. Naming conventions are boring until the day they save a project.
Useful sources and further reading
These are the references worth bookmarking if you want to go deeper on any aspect of audio resampling.
- Digital Audio Resampling Home Page, Julius O. Smith, Stanford CCRMA. The theoretical foundation for bandlimited interpolation and SRC algorithm design. Dense but authoritative; the math behind every high-quality resampler in use today.
- Sample-Rate Conversion, Wikipedia). A clear overview of the conceptual approaches to SRC, including the L/M integer-ratio method used for 44.1 ↔ 48 kHz conversion. Good starting point for understanding the mechanics.
- What Is Audio Resampling?, AudioUtils. Practical guide covering compatibility, creative uses, and algorithm quality. Accessible for producers who want application-level understanding without heavy DSP theory.
- Sampling Audio, Android Developers. Covers FIR filter design for downsampling, Kaiser-windowed sinc implementations, and artifact trade-offs. Useful for understanding why filter length and quality settings matter.
- Q. Can You Explain Reaper's Playback Resample Mode?, Sound On Sound. Explains sinc-based SRC in a DAW context, with practical guidance on quality vs. CPU trade-offs.
- Q. How Do I Resample My Project 48 ↔ 44.1 kHz?, Sound On Sound. Hugh Robjohns' direct advice on avoiding mid-session SR changes and handling cross-format conversions cleanly.
- When Should You Use Oversampling?, Sound On Sound. Covers the distinction between plugin oversampling and project-level SRC, with practical guidance on CPU, phase, and peak-level side effects.
- The Optimal Sample Rate for Quality Audio, Dan Lavry, Lavry Engineering. The authoritative correction to "higher is always better." Required reading for anyone making decisions about project sample rates.
- Vector-dsp Blog. Vector-dsp's technical articles cover DSP algorithm design, plugin architecture, and professional audio standards, with practical guidance grounded in the same engineering principles discussed here.