CPU Load in Audio Processing: What Producers Must Know
CPU Load in Audio Processing: What Producers Must Know

CPU load in audio processing is the percentage of available buffer time your DAW's audio thread consumes to calculate each audio frame before it must play. When that percentage hits 100%, the math takes longer than real time and you get clicks, dropouts, or silence. Three things to try right now: raise your buffer size, freeze the heaviest track in your session, and kill nonessential background apps before you open your project. Running sustained at maximum audio-thread load is a recipe for glitches, even on fast hardware—leave headroom.
Ableton's CPU meter, for example, measures exactly this buffer-processing ratio, not your overall system load. ASIO on Windows and Core Audio on macOS are the driver layers that hand the audio thread its time slice. Vector-dsp builds its plugins around this same real-time constraint, which is why efficient DSP design is central to everything the company ships.
Pro Tip: The DAW CPU meter and your OS task manager measure completely different things. A session showing 85% in Ableton can register under 10% in Windows Task Manager. Both readings are correct — they just answer different questions.
Table of Contents
- What does the CPU actually do for your DAW?
- How buffer size trades latency for CPU headroom
- What DAW CPU meters show versus what your OS reports
- How to diagnose CPU-related audio dropouts step by step
- What actually causes high CPU load in audio sessions
- How to reduce CPU load in your DAW: a prioritized approach
- Recording vs. mixing: the right settings for each workflow
- Why plugin and engine design determines your CPU ceiling
- Key Takeaways
- The part most producers skip
- Useful sources and diagnostic tools
What does the CPU actually do for your DAW?
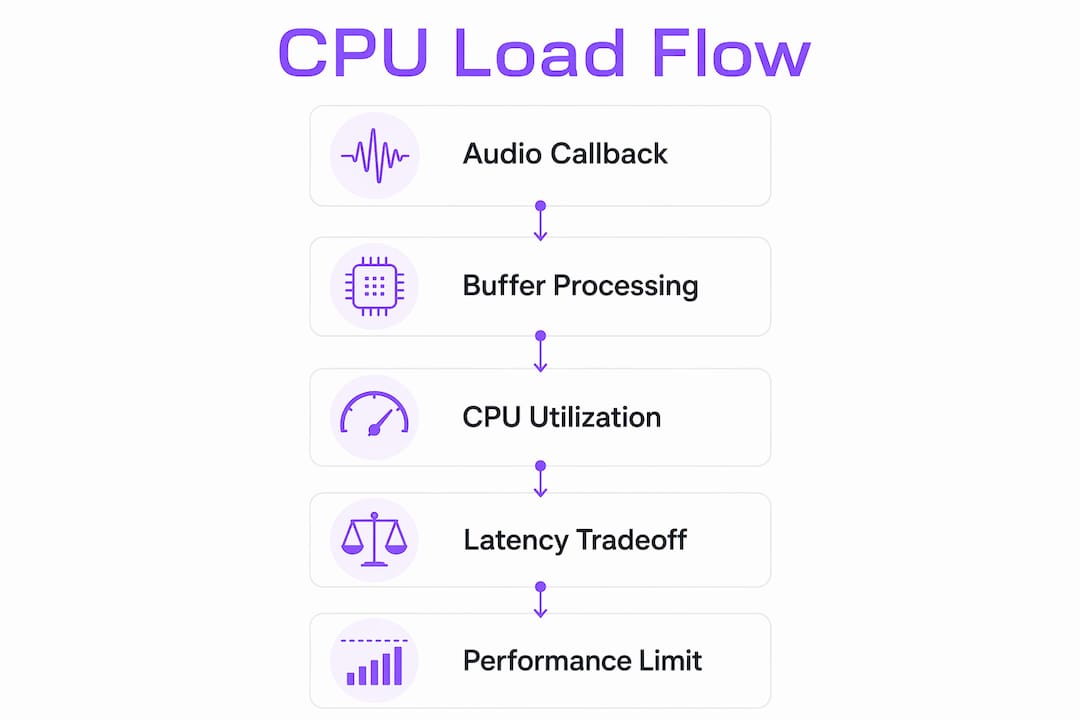
Every time your audio interface needs a new block of samples, your DAW fires an audio callback — a timed interrupt that says "process this buffer now." The DAW must finish all plugin calculations, routing, and mixing before the next buffer is due. Miss that deadline and you hear a dropout.
The catch is that many plugin chains and mixer channels are effectively single-threaded. A channel strip loaded with a linear-phase EQ, a convolution reverb, and a saturator may be locked to one core, even if your machine has 16 available. Studio One's Performance Monitor shows this clearly: one core can spike to 100% while the others sit idle. Freezing or bouncing that channel is the standard fix.
RAM and disk I/O add another layer. Streaming sample libraries pull data from storage continuously, and when the disk can't keep up, the OS registers that wait time as "load" rather than CPU utilization. That distinction matters for diagnosis, covered below.
The OS scheduler is the final arbiter of which thread runs when. DAWs expect the audio thread to have the highest priority, but background interrupts — antivirus scans, OS update checks, Wi-Fi drivers — can preempt it. Ableton's manual explicitly notes that thread prioritization is ultimately the OS's decision, which is why a single background process can cause a spike in the DAW CPU meter even during a light session.
Pro Tip: Many heavy soft-synths and legacy plugins are single-threaded by design. Before you blame your CPU core count, identify which instruments can't be parallelized and freeze them first.
How buffer size trades latency for CPU headroom
Buffer size is the most direct lever you have over audio processing CPU usage. A smaller buffer means the audio thread fires more frequently, each time with less work per cycle but with less margin for error. A larger buffer fires less often, giving the CPU more time per cycle to finish its calculations.
FL Studio's optimization guide explains that very short buffers cause buffer underruns rapidly on most systems, and recommends certain buffer ranges as a starting point for Apple Silicon. Intel and AMD systems may tolerate somewhat larger buffers before latency becomes noticeable during tracking.
| Workflow | Recommended buffer | Approximate latency | Priority |
|---|---|---|---|
| Tracking / overdubbing | small buffer sizes | low latency | |
| Tracking with hardware monitoring | moderately small buffer sizes | moderate latency | |
| Mixing / production | larger buffer sizes | greater headroom | |
| Mastering / offline render | largest buffer sizes | latency irrelevant | Stability |
A few practical points on driver choice:
- ASIO (Windows) and Core Audio (macOS) give the audio thread direct, low-latency access to hardware. Use these whenever possible.
- Aggregate drivers (combining multiple interfaces) add latency and can introduce timing jitter that shows up as sporadic spikes.
- Hardware direct monitoring routes your input signal through the interface's own circuitry, bypassing the CPU entirely for monitoring. This lets you use a longer buffer during tracking without hearing the latency on your headphones.
- Switching to the built-in audio driver is a useful diagnostic step: if spikes disappear, your interface driver is the culprit.
What DAW CPU meters show versus what your OS reports
This is where most producers get confused. A DAW CPU meter measures buffer-processing time relative to buffer-playback time. A reading of 50% means the DAW is processing each buffer twice as fast as it needs to play it. A reading above 100% means the math is taking longer than real time, and glitches are imminent.
Your OS tools — Task Manager on Windows, Activity Monitor on macOS, top on Linux — measure cumulative CPU utilization across all processes and cores. These two numbers can diverge dramatically. A session with 85% on the DAW meter might show 8% in Task Manager because the audio thread is one small slice of total system activity, but it's running at near-maximum capacity within its own time window.
Linux load average adds another wrinkle: it counts both runnable tasks and tasks blocked on I/O, so a high load average with low CPU utilization usually means disk or network bottleneck, not processor pressure. The same principle applies on any platform: high OS I/O wait with a low DAW meter points at your sample library streaming, not your plugins.
Quick diagnostic heuristic:
- High DAW meter + low OS CPU → the audio thread is the bottleneck; freeze tracks or raise buffer.
- Low DAW meter + high OS I/O → disk is the bottleneck; move sample libraries to a faster drive.
- High OS CPU on one core + moderate DAW meter → a single-threaded plugin or process is saturating one core.
How to diagnose CPU-related audio dropouts step by step
Reproducing the problem consistently is the first step. A glitch you can't reproduce on demand is nearly impossible to fix.
- Reproduce with everything active. Play back the full session with all plugins enabled. Note whether the DAW CPU meter spikes before the dropout.
- Check the DAW CPU meter. In Ableton, watch both the Average and Current meters. In Studio One, open the Performance Monitor to see per-core impact.
- Check OS per-core load. On Windows, open Task Manager and switch to the Performance tab to see individual core graphs. On macOS, use Activity Monitor's CPU tab. On Linux, run
htopormpstat -P ALL 1. - Check disk I/O. On Windows, use Task Manager's Performance > Disk view. On macOS, Activity Monitor's Disk tab. On Linux,
iotop -oPoriostat -xz 1. - Isolate driver vs. plugin. Switch to the built-in audio driver and open an empty project. If spikes disappear, your interface driver is the issue. If they persist, add plugins back one at a time.
- Test with a heavy synth or reverb. Add a convolution reverb or a dense polyphonic synth and watch the DAW meter spike in isolation. This confirms which plugin type is responsible.
Recommended tools by platform:
- Windows: Task Manager, LatencyMon (identifies driver interrupt latency), DAW-specific performance windows
- macOS: Activity Monitor, the DAW's built-in CPU meter
- Linux:
htop,iotop,iostat,LatencyTOP - All platforms: real-time audio monitoring tools purpose-built for DAW diagnostics
What actually causes high CPU load in audio sessions
Most sessions don't fail because of raw CPU speed. They fail because of how the load is distributed.
- CPU-heavy plugins: Convolution reverbs, linear-phase EQs, and dense polyphonic synthesizers are the most common offenders. A single convolution reverb on a bus can consume more CPU than a dozen simple EQs.
- Long plugin chains on single channels: Because many DAWs process a channel's plugin chain serially on one core, stacking eight plugins on a single track creates a single-core bottleneck even when other cores are free.
- Sample library streaming: Large orchestral libraries stream audio from disk continuously. When the drive can't deliver data fast enough, the OS registers I/O wait, which looks like high "load" but isn't CPU pressure.
- Driver and firmware issues: Device drivers and audio interface firmware can produce CPU spikes even in an empty project. Outdated firmware is a surprisingly common cause of intermittent dropouts.
- Background processes: Antivirus real-time scanning, OS update services, and power-saving CPU core switching (particularly Windows power plans set to "Balanced" or Apple Silicon's efficiency-core scheduling) can preempt the audio thread at the worst moment.
How to reduce CPU load in your DAW: a prioritized approach
Work through these tiers in order. Most sessions are fixed at tier one.
Tier 1 — Quick fixes (try these first):
- Raise your buffer size to 256 or 512 samples during mixing.
- Freeze the track with the highest per-track CPU meter reading.
- Enable plugin "sleep" or "plug-in nap" in your DAW if supported — this suspends plugins that aren't receiving audio.
- Disable unused audio inputs and outputs in your audio settings.
- Bounce heavy processing offline: render a convolution reverb to audio and remove the plugin.
Tier 2 — Workflow changes:
- Submix groups of tracks to a single stereo stem and freeze the group.
- Use offline rendering for mastering-grade limiters or CPU-heavy effects that don't need real-time adjustment.
- Split multi-instrument instances across separate tracks where your DAW allows parallel processing.
Tier 3 — System and driver fixes:
- Update your audio interface firmware and drivers. Check the manufacturer's site, not Windows Update.
- Set your Windows power plan to "High Performance" or use a dedicated audio-optimized power plan. "Balanced" allows the CPU to throttle down between interrupts, which causes spikes.
- On macOS, disable automatic graphics switching if you're on a laptop — it can cause brief CPU stalls.
- Consult Vector-dsp's guide on hardware vs. software processing for a deeper look at when software optimization reaches its limits.
Tier 4 — Upgrade decisions:
When you consistently hit single-core bottlenecks and freezing isn't practical, the decision comes down to single-core clock speed versus core count. For plugin-heavy mixing, a faster single core often helps more than adding cores. For large template-based orchestral work, core count and RAM matter more. GPU and hardware offload becomes relevant when you're running dozens of real-time effects and software optimization has been exhausted.
Recording vs. mixing: the right settings for each workflow
These two workflows have opposite requirements, and using the wrong buffer for the task is one of the most common causes of unnecessary problems.
For tracking (recording):
- Use the shortest buffer your system handles without dropouts: 64–128 samples on most modern interfaces.
- Enable hardware direct monitoring on your audio interface so you hear yourself through the interface, not through the DAW. This removes monitoring latency entirely and lets you use a longer buffer if needed.
- Disable nonessential plugins during overdubs. Mute or bypass CPU-heavy effects on the input channel.
- Prefer ASIO or Core Audio drivers. Avoid aggregate devices during critical takes.
For mixing:
- Set your buffer to 256–1024+ samples. Latency is irrelevant when you're not playing in real time.
- Use the extra headroom to run more plugins without freezing.
- Re-enable all effects and check the DAW CPU meter at peak complexity (chorus sections, full arrangement).
The toggle habit: Many experienced engineers keep two buffer presets saved in their audio settings and switch between them at the start of each session. Low buffer for tracking, high buffer for mixing. It takes ten seconds and prevents most CPU-related frustration.
Why plugin and engine design determines your CPU ceiling
Sound on Sound describes the hard ceiling clearly: once the audio thread occupies 100% of buffer time, no additional real-time processing is possible. The only ways past that ceiling are to reduce the work per buffer or to finish each unit of work faster.
This is where algorithm design becomes the deciding factor. Plugins built with vectorized SIMD processing can process multiple audio samples simultaneously using a single CPU instruction, cutting per-buffer time significantly compared to scalar implementations. Cache-friendly algorithms that keep working data in L1/L2 cache avoid the latency penalty of fetching from main RAM on every buffer cycle. Plugins that support multi-threading can distribute work across cores, avoiding the single-core bottleneck that kills sessions loaded with serial plugin chains.
Intel's guidance on high CPU usage notes that CPUs can safely reach 100% utilization, but sustained maximum load in latency-sensitive workloads degrades real-time performance. For audio, that means the goal isn't to avoid high CPU usage altogether — it's to avoid sustained audio-thread saturation.
When evaluating plugins, look for:
- Multi-threading support or explicit parallel processing architecture
- Plug-in nap / sleep mode compatibility with your DAW
- Documentation of CPU benchmarks at common buffer sizes
- Efficient DSP design that doesn't rely on brute-force oversampling for quality
Vector-dsp designs its processing engines around these principles: low per-buffer overhead, cache-aware algorithms, and real-time performance that doesn't require you to freeze tracks just to run the plugin. For sessions pushing the limits of software, the audio hardware acceleration guide covers when dedicated DSP offload is worth considering.
Key Takeaways
CPU load in audio processing is a real-time constraint: the audio thread must finish processing each buffer before playback demands the next one, and managing that deadline is the core skill of DAW performance optimization.
| Point | Details |
|---|---|
| DAW meter vs. OS meter | DAW CPU meters measure buffer-processing time; OS tools measure total system utilization — they can diverge dramatically. |
| Buffer size is the primary lever | Raise to 256–1024 samples for mixing; drop to 128 only when tracking and latency matters. |
| Single-core bottlenecks are common | Plugin chains on one channel are often locked to one core — freeze or bounce that channel before blaming total CPU. |
| Diagnose before you upgrade | Check driver, I/O, and per-core load before concluding you need faster hardware. |
| Algorithm design sets the ceiling | Plugins using SIMD and cache-friendly DSP consume less buffer time, giving your session more headroom. |
The part most producers skip
Most CPU troubleshooting guides stop at "raise your buffer." That's good advice, but it misses the deeper pattern: the sessions that run into CPU walls most often aren't running too many plugins — they're running the wrong plugins in the wrong configuration.
A convolution reverb on every bus, a linear-phase EQ on every channel, a dense polyphonic synth with no freeze — these aren't CPU problems, they're session design problems. Understanding what CPU load actually measures in a DAW context changes how you build sessions from the start. You stop treating the CPU meter as a warning light and start treating it as a mixing tool: something you watch the way you watch gain staging.
The other thing worth saying: single-core performance still matters more than core count for most mixing workflows. A session with 40 plugin-heavy channels will hit a single-core ceiling on a 32-core machine before it runs out of total CPU. That's not a hardware failure — it's a DAW architecture reality. Knowing that changes which hardware you prioritize when it's time to upgrade, and it changes which plugins you reach for when headroom is tight.
Vector-dsp publishes deeper technical writing on these topics — GPU offload, vectorized DSP, audio thread programming — on the Vector-dsp blog. If you want to understand not just what to click but why it works, that's where to go next.
Useful sources and diagnostic tools
| Source | What it covers |
|---|---|
| Ableton Reference Manual — Computer Audio Resources | How Ableton calculates its CPU meter, freeze track behavior, and multicore support |
| Sound on Sound — Processing Power | Real-time audio packetizing and the hard ceiling concept |
| PreSonus — Managing CPU in Studio One 6 | Per-core Performance Monitor, plug-in nap, single-core mixer limits |
| PreSonus — CPU troubleshooting (legacy) | Driver isolation steps and interface firmware guidance |
| Image-Line — FL Studio Optimization | Buffer underruns, platform-specific buffer recommendations, Apple Silicon notes |
| Linuxize — Load Average | Why load average and CPU utilization diverge; I/O wait diagnostics |
| Intel — High CPU Usage | CPU safety at 100% utilization and real-time performance implications |
| Vector-dsp Blog | GPU offload, hardware acceleration architecture, vectorized DSP deep dives |
Consult your DAW's own manual for host-specific CPU meter behavior and buffer settings — Ableton, Studio One, FL Studio, Logic Pro, and Pro Tools each implement performance monitoring differently.