Latency Compensation in DAWs: A Guide for Engineers
Latency Compensation in DAWs: A Guide for Engineers
DAW latency compensation keeps every track time-aligned by delaying faster audio paths to match the slowest processing chain in your session. Whether that slowest path is a linear-phase EQ, a convolution reverb, or an external hardware insert, the DAW holds the other tracks back until everything lines up at the output. The Ardour manual draws a clear distinction: plugin delays are usually handled automatically, but external hardware almost always requires you to measure round-trip latency and enter a manual offset.
Three things to check right now if you suspect a timing problem:
- Verify Plugin Delay Compensation (PDC) is enabled. In most DAWs, it lives under Preferences or the mixer settings. It should be on by default, but it can get toggled off accidentally.
- Check per-track reported delay values. Most DAWs display the compensated delay in samples per track. If one track shows an unusually large number, that plugin chain is your bottleneck.
- Run a hardware loopback test if you use external gear. Send a click from your DAW output, record it back through your hardware insert, and measure the offset between the original and the returned click.
Key Takeaways
Effective latency compensation in a DAW requires accurate plugin latency reporting, correct hardware offset measurement, and separate buffer strategies for tracking and mixing.
| Point | Details |
|---|---|
| Enable and verify PDC | Confirm Plugin Delay Compensation is on in your DAW's preferences and check per-track delay values in the mixer. |
| Use the buffer formula | Calculate baseline I/O latency with ms = (buffer ÷ sample rate) × 1000; round-trip is roughly double plus converter overhead. |
| Measure hardware offsets | Run a loopback test for any external gear, convert the result to samples, and enter it as a manual hardware offset. |
| Separate tracking and mixing buffers | Use 64–128 samples for tracking with direct monitoring; raise to 512–1024 samples for mixing with full PDC enabled. |
| Vector-dsp ToneLab | ToneLab's real-time low-latency DSP lets you run it on monitored tracks during tracking without sacrificing sound quality. |
Table of Contents
- What actually creates latency in your DAW?
- How DAWs actually implement latency compensation
- How to calculate and measure latency precisely
- Where to find PDC settings in major DAWs
- Troubleshooting when compensation still fails
- Tracking vs. mixing: different buffer strategies for each phase
- How plugin delay compensation works under the hood
- The part of latency compensation most engineers get wrong
- ToneLab keeps your monitoring tight when it matters
- Sources
What actually creates latency in your DAW?
Every millisecond of delay in your session comes from a specific source. Knowing the source tells you whether PDC handles it automatically or whether you need to intervene.
Host I/O buffer is the biggest variable under your control. The buffer size and sample rate together determine your baseline I/O latency. At 44.1 kHz with a 256-sample buffer, the output latency is several milliseconds. At 48 kHz the same buffer yields slightly less latency. Smaller buffers at higher sample rates reduce latency further. The canonical formula) is straightforward:
That number is your theoretical I/O floor. It does not include plugin processing or hardware round-trip delay.
AD/DA converters add their own conversion time. Consumer interfaces typically add 1–3 ms per conversion stage; high-end converters can be tighter, but the round-trip through an analog insert always adds at least one AD and one DA stage.
Plugin processing is where things get complicated. Most dynamics and saturation plugins add only a handful of samples. But certain plugin categories introduce far larger delays: linear-phase EQs commonly add 2,000–8,000 samples of lookahead, convolution reverbs can run even higher, and lookahead compressors and limiters typically add 64–1,024 samples depending on their window size. One linear-phase EQ on a single bus can force every other track in your session to wait thousands of samples.
Driver and aggregate device overhead adds latency that varies by operating system and driver model. ASIO on Windows is generally the tightest. Core Audio on macOS is reliable but adds a small fixed overhead. Aggregate devices, where you combine two interfaces into one virtual device, stack the clock-sync overhead of both and can add several milliseconds of unpredictable jitter.
Sound propagation matters for live monitoring. At roughly 1 foot per millisecond, a speaker 10 feet from a performer adds about 10 ms of acoustic delay that no DAW setting can compensate for. Direct monitoring through your interface bypasses this entirely.
Callout: A single linear-phase EQ can add thousands of samples of lookahead latency, forcing every other track in the session to wait. That one plugin can push your total PDC offset into ranges that stress even well-configured DAWs.
How DAWs actually implement latency compensation
Automatic plugin delay compensation works by asking each plugin how many samples of delay it introduces, then delaying every other track by enough samples to match the slowest path. The DAW builds a latency map of your entire routing graph at session load and whenever you add or remove a plugin.
Read-ahead vs. write-behind
Two broad strategies exist for applying that compensation. Read-ahead pulls audio from the buffer earlier than it would otherwise play, so the delayed tracks appear to catch up. Write-behind holds the faster tracks in a delay buffer and releases them in sync with the slower path. Most modern DAWs use a combination, and the distinction rarely matters to engineers unless you're debugging export timing or working with video sync.
When automatic PDC breaks down
PDC handles linear signal chains cleanly. It struggles with:
- Feedback loops. Any routing that sends audio back to an earlier point in the graph creates a circular dependency. The DAW cannot calculate a stable latency for a loop, so it either ignores the loop's delay or produces artifacts.
- Side-chain routing. A compressor triggered by a side-chain signal may receive that signal with a different latency than the audio being compressed. The result is a compressor reacting to a signal that is slightly ahead of or behind what you hear.
- Parallel processing. When you split a signal, process one branch with a high-latency plugin, and recombine, the DAW should compensate. But if the routing passes through a return track or a bus that the DAW treats as a separate latency domain, the compensation can be incomplete.
- Plugins that don't report latency. Some older or poorly coded plugins return zero samples regardless of their actual processing delay. The DAW has no way to compensate for a delay it doesn't know about.
Pro Tip: When tracking, use your DAW's "Constrain Delay Compensation" mode (Cubase) or "Reduced Latency When Monitoring" mode (Ableton). These modes temporarily bypass or limit high-latency plugins on the record-armed track's path so your monitoring stays tight, while keeping full PDC active for playback.
How to calculate and measure latency precisely
The buffer latency formula in practice
The formula ms = (buffer size ÷ sample rate) × 1000 gives you the theoretical one-way I/O latency from the buffer alone. Here's what that looks like across common settings:
| Buffer (samples) | 44.1 kHz (ms) | 48 kHz (ms) | — |
|---|---|---|---|
| 64 | 1.46 | 1.34 | 0.68 |
| 128 | 2.91 | 2.67 | 1.34 |
| 256 | 5.81 | 5.33 | 2.67 |
| 512 | 11.62 | 10.67 | 5.33 |
| 1024 | 23.23 | 21.33 | 10.67 |
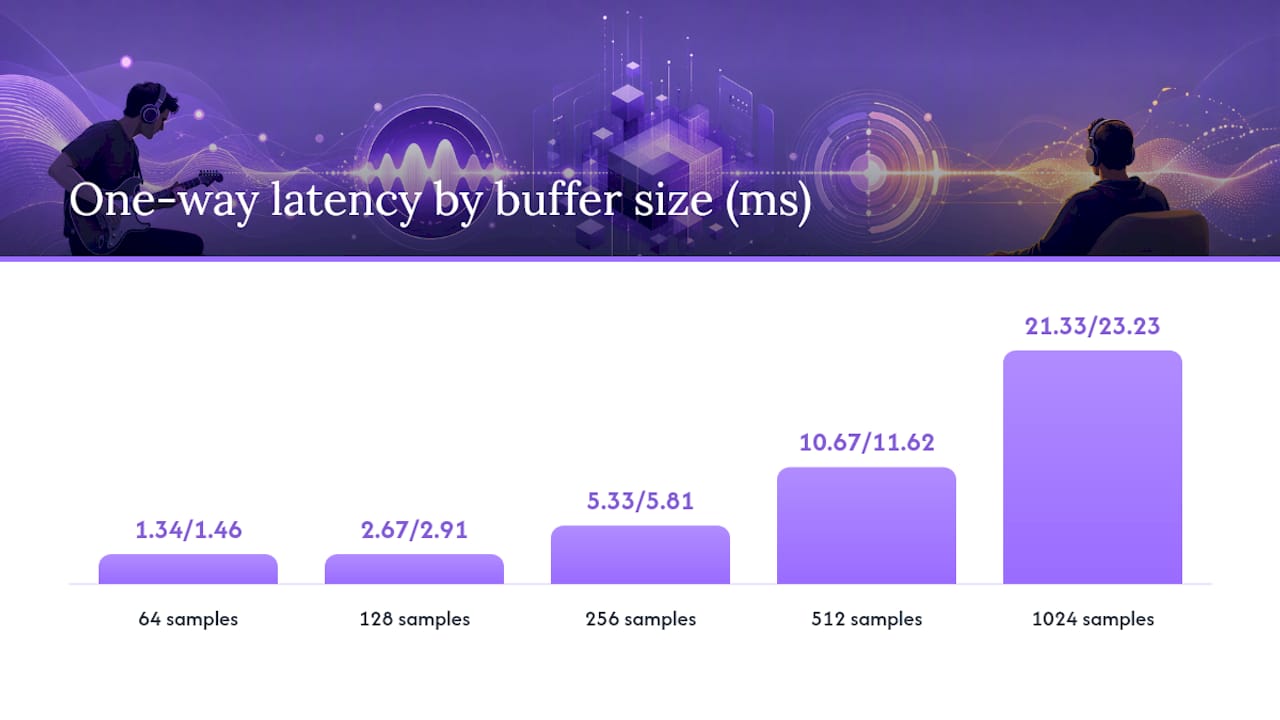
These are output-only figures. Round-trip latency (output to input and back) is roughly double, plus converter overhead.
Converting a measured round-trip to samples: If your loopback test shows a 2.5 ms round-trip at 48 kHz, the sample offset is:
2.5 ms × 48,000 ÷ 1,000 = 120 samples
Enter that value as your hardware offset or manual PDC correction.
Step-by-step measurement workflow
Follow these steps in order. The whole process takes 5–10 minutes.
- Check DAW-reported delay per track. Open your mixer's delay display. Most DAWs show compensated delay in samples per channel. Note the highest value, which is your bottleneck plugin chain.
- Sum plugin chain latency. Add up the reported latency of each plugin in your chain. If your DAW doesn't display this automatically, bypass plugins one at a time and watch the track's reported delay change.
- Set up a hardware loopback. Connect your interface output directly to an input with a short cable. Create a new audio track routed to that input.
- Record a click or impulse. Use your DAW's click track or a short transient sample. Record it back through the loopback. Zoom in on the waveform and measure the sample offset between the original click position and the recorded return.
- Convert to milliseconds. Divide the sample offset by your sample rate and multiply by 1,000. That's your round-trip hardware latency.
- Enter the offset. Input the measured value into your DAW's hardware offset or driver compensation field. For Pro Tools delay compensation, this is the H/W Insert Delay field. In Ardour, it's the I/O latency field in the audio setup.
- Verify alignment. Record another click through the loopback with the offset applied. The returned click should land within 1–2 samples of the original.
Pro Tip: Save a loopback session template with the click track and measurement track already set up. Running this test at the start of any session with external gear takes under two minutes once the template is ready.
Where to find PDC settings in major DAWs
Every major DAW implements plugin delay compensation, but the setting names and locations vary enough to cause real confusion. Here's where to look and what to expect in each.
Major DAWs each provide plugin delay compensation via menus under preferences or audio settings, feature per-track latency displays or indicators, allow manual hardware latency offset input, and provide tracking modes with options to reduce monitoring latency.
Ableton's Delay Compensation offsets all tracks to match the longest latency path and is on by default. One documented caveat: it does not affect level meters or video playback, and external instruments require special handling through the External Instrument device. FL Studio's PDC supports both automatic and manual modes, where manual offsets act as adjustments on top of the automatic calculation. The monitoring bypass toggle lets you record without hearing the PDC delay on your input signal.
Cubase's plug-in delay compensation runs across the entire audio path and includes a "Live" button for certain VST3 lookahead dynamics processors, which disables their lookahead during recording to keep monitoring latency low. That's a practical design: you get the full sound of the processor during playback and a tighter, zero-lookahead version while tracking.
DAWs also have practical PDC limits. When total plugin latency across a chain exceeds the DAW's internal compensation buffer, timing alignment can break silently. If you're stacking multiple linear-phase processors and convolution reverbs on a single bus, you may hit that ceiling without any warning. The fix is to print or commit those chains rather than run them live.
Pro Tip: Keep two buffer presets saved in your audio interface control panel: 64 or 128 samples for tracking sessions, 512 or 1024 samples for mixing. Switching takes 10 seconds and eliminates the need to compromise on either end.
Troubleshooting when compensation still fails
PDC being enabled doesn't guarantee perfect alignment. These are the situations where it breaks down and what to do about each.
Audible flamming despite matching reported delays. This usually means a plugin is reporting zero latency but actually processing with a delay. Bypass plugins one at a time on the offending track while playing a click loop. When the flam disappears, you've found the culprit. Either replace it with a plugin that reports latency correctly, or print the track with that plugin applied and remove it from the live chain.
Consistent offset only when a specific interface is connected. This is a hardware round-trip measurement problem, not a PDC problem. The interface's converter latency isn't being accounted for. Run the loopback measurement described in the previous section and enter the result as a hardware offset.
Side-chain compression that pumps at the wrong time. The side-chain signal and the audio being compressed are arriving at different latency offsets. Check whether the side-chain source track has a different plugin chain length than the audio track. If so, add a compensating delay to the side-chain source, or route both through a bus with matched processing.
Aggregate device instability. Combining two interfaces on macOS or using ASIO4ALL on Windows introduces clock-sync overhead that can vary between sessions. The reported latency may be accurate on average but jittery in practice. The fix is to use a single interface where possible, or to use a dedicated word-clock source if you must combine devices.
Return track compensation gaps. In Ableton, send/return routing has its own latency domain. A plugin on a return track may not be fully compensated relative to the dry signal on the source track. The result is comb filtering or phase issues on wet/dry blends. The workaround is to route to a parallel audio track rather than a return track when phase accuracy matters.
Callout: A plugin reporting zero latency while actually delaying audio is one of the hardest problems to diagnose. The DAW's compensation system is only as accurate as the latency values plugins report. When in doubt, PDC can fail in complex routing scenarios and the practical fallback is always to print the processed audio and remove the live plugin.
Red flags that point to a reporting problem rather than a routing problem: the flam is consistent in size regardless of buffer setting, the offset disappears when you bypass a specific plugin but the DAW still shows the same reported delay for that track, or the problem appears only on export and not during playback.
Tracking vs. mixing: different buffer strategies for each phase
The buffer size that works for tracking will make mixing miserable, and vice versa. Treating them as separate workflows with separate settings is the most practical approach.
During tracking
Keep your buffer at 64 or 128 samples. At 48 kHz, 128 samples gives you 2.67 ms of output latency, which is tight enough that most performers won't notice it through headphones. Use direct monitoring through your audio interface's hardware mixer whenever possible, which bypasses the DAW entirely and gives you near-zero latency on the input signal. Disable any lookahead or linear-phase plugins on the record-armed track's monitoring path. If you need compression while tracking, use a plugin with a simple feed-forward design and no lookahead window. Prepare a "tracking" plugin preset that swaps out high-latency processors for their low-latency equivalents.
For CPU load during tracking, a lower buffer means more frequent audio callbacks and higher CPU demand per unit time. Keep your plugin count low on active tracks and freeze any arrangement tracks that don't need live adjustment.
During mixing
Raise your buffer to 512 or 1024 samples. At 48 kHz, 1024 samples gives you 21.33 ms of output latency, which is irrelevant for mixing since you're not monitoring a live input. Enable full PDC and let the DAW compensate for every plugin in your chain. Use linear-phase EQs and convolution reverbs freely, since their latency is fully compensated during playback. If you hit your DAW's PDC ceiling, print the heaviest chains to audio and remove the live plugins.
Tracking: do/don't summary
- Do: use direct monitoring, keep buffer at 64–128 samples, use low-latency plugin alternatives
- Don't: run linear-phase EQs or convolution reverbs on monitored tracks, leave lookahead compressors active on the record path
Mixing: do/don't summary
- Do: raise buffer to 512–1024 samples, enable full PDC, use the highest-quality processors you need
- Don't: track live audio at mixing buffer sizes, ignore PDC ceiling warnings, leave uncompensated hardware inserts in a mix chain
How plugin delay compensation works under the hood
This section goes a level deeper, for engineers who want to understand the mechanism or who are evaluating plugin behavior.
How DAWs obtain plugin latency
Every major plugin format provides a mechanism for reporting processing delay. In VST3, the plugin sets its latencySamples property. AU plugins use the kAudioUnitProperty_Latency property. AAX plugins report latency through the GetLatency() method. The DAW queries these values at plugin instantiation and whenever the plugin signals that its latency has changed, which can happen when you change oversampling settings or switch between minimum-phase and linear-phase modes.
The DAW then builds a latency graph across the entire routing topology. Each bus, send, and return path has its own latency accumulation. The DAW finds the maximum latency path and delays all other paths to match. For audio callback timing and thread scheduling, this means the DAW must buffer audio for the shorter paths while waiting for the longer ones to complete processing.
Oversampling and lookahead
Oversampling multiplies latency. Lookahead compounds this further: a compressor with 5 ms of lookahead at 48 kHz adds 240 samples before the oversampling filter latency is even counted.
For low-latency audio thread programming, the implication is that plugins with variable latency (where the reported value changes based on user settings) must signal the host every time the latency changes. If a plugin changes its latency silently, the DAW's compensation graph becomes stale and alignment breaks.
Developer-focused guidance
| Design principle | What it means in practice |
|---|---|
| Report latency accurately | Always return the exact sample count your processing introduces, including filter group delay |
| Provide a low-latency mode | Offer a minimum-phase or zero-lookahead variant for tracking contexts |
| Signal latency changes | Call the host's latency-changed notification whenever oversampling or mode changes alter your delay |
| Avoid lookahead on side-chain paths | A side-chain input with lookahead creates a negative-delay dependency the host cannot resolve |
Negative delay is the one case no DAW can compensate for automatically. If a plugin's side-chain input needs audio from the future relative to the main signal, the DAW has no buffer to draw from. The only workaround is to pre-delay the main signal manually so the side-chain's lookahead window lands on real audio.
The part of latency compensation most engineers get wrong
Most engineers treat PDC as a binary: either it's on and everything is fine, or it's off and nothing works. The reality is more nuanced, and the gap between those two positions is where most session problems live.
The assumption that "PDC is on, so my tracks are aligned" breaks down the moment you introduce external hardware, a plugin that doesn't report its latency, or a routing topology the DAW's compensation graph can't model cleanly. PDC is a best-effort system, not a guarantee. The DAW can only compensate for delays it knows about.
Every one of those requires a loopback measurement and a manual offset. Skipping that step and assuming the DAW handled it is the most common source of subtle timing problems in professional sessions.
There's also a tendency to over-rely on high-latency plugins during tracking because PDC "handles it." It does handle it for playback. It does not handle it for your monitoring path if you're listening through the DAW rather than through direct monitoring. A linear-phase EQ on your headphone bus during tracking means you're hearing yourself 50–100 ms late. No amount of PDC fixes that, because the delay is in your monitoring chain, not in the recorded audio.
The practical discipline is to keep two completely separate signal chains: one for tracking (minimal plugins, direct monitoring, low buffer) and one for mixing (full plugin stack, high buffer, PDC doing its job). Engineers who maintain that separation rarely have latency problems. Engineers who blur the line between them spend sessions chasing timing issues that are entirely self-inflicted.
ToneLab keeps your monitoring tight when it matters
When you need a processor that won't force you to choose between sound quality and tracking responsiveness, Vector-dsp ToneLab is worth a close look. ToneLab is built around real-time low-latency DSP with a multi-lane parallel effects architecture, which means you get the processing depth of a full effects chain without the latency overhead that typically comes with it. It supports VST3, AU, and AAX formats and runs on both Windows and macOS, so it slots into any major DAW without a separate compatibility check.

For tracking sessions specifically, ToneLab instances stay tight enough to use on monitored tracks without switching to a stripped-down alternative. You get the actual sound you're going for, not a placeholder. Visit the ToneLab product page to see the full feature set and download the demo.
Sources
The sources below are the most authoritative references for DAW-specific PDC behavior, measurement methods, and developer-level implementation details.
DAW manuals and official documentation
- Latency and Latency-Compensation - The Ardour Manual
- Delay Compensation FAQ – Ableton
- Plugin Latency Compensation Explained: PDC, Lookahead, and Hybrid Mixing — ProducerGrid Blog
- Plug-In Delay Compensation - Cubase Artist - 15.0
Measurement and troubleshooting
Vector-dsp blog posts for related topics