Bus Processing Music Production Workflow: A Mixing Guide
Bus Processing Music Production Workflow: A Mixing Guide

Bus processing is defined as the practice of routing multiple audio tracks into a shared channel to apply collective effects, compression, or EQ across the entire group. A solid bus processing music production workflow gives you macro-level control over your mix without touching every individual track. The industry standard term for this is "bussing" or "group processing," and it sits at the core of professional mixing technique. Producers who build intentional bus architecture mix faster, make better level decisions, and deliver more cohesive results. This guide covers the routing setups, processing chains, and workflow habits that separate efficient mixing from chaotic sessions.
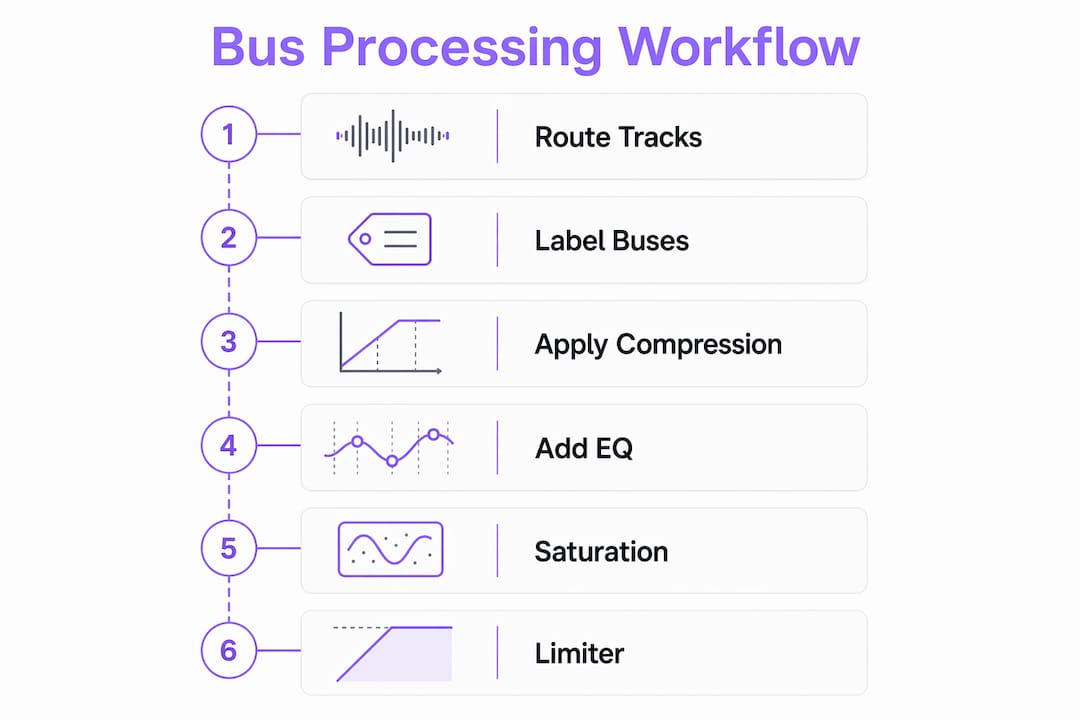
What are the essential buses and routing setups in a music production session?
Industry best practice calls for five core bus groups: Drums, Bass, Instruments, Vocals, and FX. Each group collects its related tracks, then all five route into a single Mix Bus before the master output. That architecture gives you two levels of control: individual group processing and unified mix bus processing.
Here is how a standard routing setup breaks down:
- Drum Bus: Kick, snare, hi-hats, toms, and room mics all feed one bus. You apply glue compression and transient shaping here without touching individual drum channels.
- Bass Bus: Bass guitar and sub-synth tracks share a bus. This is where you manage low-end consistency and apply parallel saturation for harmonic content.
- Instrument Bus: Guitars, keys, pads, and melodic synths route together. Broad EQ cuts here clean up the midrange before the mix bus receives the signal.
- Vocal Bus: Lead and background vocals share a bus. Compression on this bus controls the overall vocal energy relative to the track.
- FX Bus: Reverb returns, delay returns, and parallel effects feed this bus. Controlling them as a group lets you ride the "wet" level of the whole mix with one fader.
All five buses feed the Mix Bus, which is the last stop before the master fader. This centralized routing means you can adjust the balance of entire sections without automation on individual tracks. That is the real efficiency gain. A producer working on a 60-track session can make a drums-versus-vocals balance decision by moving two faders instead of twenty.
Pro Tip: Label every bus before you start tracking or arranging. Renaming buses mid-session wastes time and causes routing errors that are hard to trace under deadline pressure.
How to apply bus compression and processing for glue and mix cohesion
Bus compression creates glue by applying a shared gain-reduction envelope across all elements in a group, making them react as a unified whole rather than as separate parts competing for space. The effect is subtle when done correctly. You hear it as tightness and energy, not as obvious pumping or squashing.
Standard starting settings for bus compression are a 2:1 ratio, a 30ms or slower attack time, and 2–4 dB of gain reduction on the loudest sections. The slow attack preserves transient punch while the compressor catches the body of the sound. Those numbers are a starting point, not a rule. Adjust attack and release to match the tempo and energy of the track.
The correct order of processing on a mix bus
A professional mix bus chain runs in this order: compressor first, then broad mastering EQ, then saturation, then a transparent limiter set below 0 dBTP. Each stage has a specific job.
- Compressor (SSL-style VCA): Applies the glue and controls dynamic range across the full mix.
- Broad mastering EQ: Makes gentle tonal corrections of 1–2 dB, not surgical cuts.
- Saturation: Adds harmonic density and warmth without raising peak levels significantly.
- Transparent limiter: Catches intersample peaks and protects the output ceiling.
Distinguishing mix bus processing from mastering is critical at this stage. Heavy mastering tools on the mix bus can mask problems that need fixing at the source. If your mix needs 6 dB of low-end boost on the bus to sound full, the real problem is in the arrangement or the individual tracks, not the bus chain.
Mixing into the bus compressor from the start
Professionals prefer mixing into a bus compressor early, making level decisions with compression already active. This approach creates a natural glue effect because every fader move you make accounts for the compressor's response. The alternative, adding bus compression at the end of a mix, often requires you to rebalance the entire session because the compressor changes the perceived loudness relationships between elements.
Pro Tip: Engage your mix bus compressor before you set a single fader. Build the mix around the compression, not the other way around. You will spend less time fighting the bus at the end.
What bus processing techniques enhance workflow efficiency and creative control?
Parallel processing on buses allows more aggressive sonic shaping while retaining control over dynamics and clarity. Instead of applying heavy compression directly to a drum bus, you send the drum bus to a parallel channel with a more extreme compressor setting, then blend the two signals. The result is density and punch without losing the natural transient attack of the drums.
Key techniques that improve both speed and creative range:
- Parallel compression: Blend a heavily compressed version of a bus with the dry signal. This adds sustain and energy without flattening the mix.
- Shared reverb and delay sends: Route multiple buses to a single reverb return instead of running separate reverb instances on every track. This creates a unified sense of space and cuts CPU load significantly.
- Bus automation: Automate the fader or a plugin parameter on a bus to shape the energy of an entire section. Dropping the instrument bus by 2 dB during a chorus makes the vocals feel louder without touching the vocal fader.
- Sidechain compression from a bus: Sidechain a pad or instrument bus to the kick drum signal. The whole instrument group ducks on every kick hit, creating a pumping effect that locks the arrangement to the groove.
Bus processing applies compression, EQ, and saturation to grouped audio streams to improve cohesion without sacrificing dynamics. That principle extends to creative techniques. When you treat a bus as a creative tool rather than just an organizational one, you gain the ability to shape the character of entire sections with a single plugin.
Pro Tip: Keep your shared reverb return on its own FX bus with a high-pass filter set around 200 Hz. Low-frequency reverb smears the mix and makes the low end feel undefined. Cutting it at the return bus is faster than adjusting every individual send.
Avoid over-bussing. Routing every sound through multiple nested buses creates phase issues, increases latency in some DAW configurations, and makes the signal flow harder to troubleshoot. A clean, flat bus architecture with five to seven groups is more useful than a complex hierarchy that requires a diagram to understand.
Troubleshooting common bus processing issues and best practices
Bus routing is a workflow tool for organization and intent. It supports level balance decisions. It does not replace them. The most common mistake producers make is using bus processing to fix problems that exist on individual tracks.
Common issues and how to address them:
- Level imbalance before the bus: Fix gain staging at the source. If your kick is 6 dB louder than everything else, no amount of drum bus compression will create a balanced mix. Correct the individual track first.
- Bus compression killing transients: A fast attack time on a bus compressor flattens the punch out of drums and percussion. Set attack to 30ms or slower to let the initial transient pass through before the compressor engages.
- Forcing dissimilar sounds through the same bus: Routing a sub-bass and a lead synth through the same instrument bus creates compromises. The compressor setting that works for the sub will not work for the synth. Separate them into distinct buses.
- Overprocessing the mix bus: Loading the mix bus with too many character plugins reduces clarity and destroys dynamics. Three to four plugins on the mix bus is the practical ceiling for most sessions.
- Bussing too early in the creative phase: Setting up buses too early during writing and arrangement can make the mix feel rigid and stall creative momentum. Build your bus architecture after the core arrangement is established.
Gain staging across the entire bus chain deserves consistent attention. Each bus should receive a signal that peaks around -18 dBFS on average, leaving enough headroom for the mix bus processing to work without clipping. Check your meters at every stage of the chain, not just at the master output.
Key Takeaways
A well-structured bus processing workflow is the single most effective way to gain macro-level control over a mix without multiplying your workload.
| Point | Details |
|---|---|
| Build five core buses | Route Drums, Bass, Instruments, Vocals, and FX into one Mix Bus before the master output. |
| Start with bus compression active | Engage the mix bus compressor before setting faders so every level decision accounts for the compression. |
| Follow the correct chain order | Run compressor, then EQ, then saturation, then limiter on the mix bus for the best results. |
| Use parallel processing for density | Blend a heavily processed parallel bus with the dry signal to add energy without losing dynamics. |
| Fix problems at the source | Bus processing reinforces mix structure. It does not fix individual track issues. |
Why bus architecture is the part of mixing most producers underestimate
Most producers I talk to treat buses as an afterthought. They build the mix track by track, then wonder why it takes three hours to make a single balance adjustment. The architecture of your session determines how fast you can work. A session with no bus structure is like a kitchen with no prep stations. Everything is possible, but nothing is efficient.
The subtlety of mix bus processing is where I see the biggest gap between intermediate and professional work. Beginners reach for heavy compression and loud saturation on the mix bus because the effect is immediately audible. Professionals reach for 2 dB of gain reduction and a gentle high shelf. The professional result sounds like the mix was always that way. The beginner result sounds processed.
I have also learned that the decision of when to engage bus compression matters as much as the settings. Mixing into a compressor from the start changes how you hear the session. Your ears calibrate to the compressed sound, and your level decisions become more accurate. Adding compression at the end of a mix is like putting on glasses after you have already written the prescription wrong.
The DSP algorithms behind bus compressors vary significantly between plugin types. Understanding how a VCA-style algorithm responds differently from an optical or FET design helps you choose the right tool for each bus. That knowledge is not optional at a professional level. It is the difference between a bus compressor that glues and one that just turns things down.
— Kai
Vector-dsp and the tools behind better bus processing

Bus processing depends on the quality of the plugins in your chain. A compressor with poor gain-reduction accuracy or a limiter with intersample peak issues will undermine even the best routing setup. Vector-dsp builds professional-grade audio plugins grounded in advanced DSP technology, designed for producers and engineers who need meticulous control over every stage of the signal path. The audio plugin architecture behind each tool reflects the same intentional design principles that make bus processing work at a professional level. Visit the Vector-dsp blog for in-depth articles on DSP design, plugin behavior, and audio processing workflows built for serious producers.
FAQ
What is bus processing in music production?
Bus processing is the practice of routing multiple audio tracks into a shared channel and applying collective effects such as compression, EQ, or saturation across the entire group. It improves mix cohesion and gives producers macro-level control over grouped sounds.
What are the standard settings for bus compression?
Standard bus compression settings start at a 2:1 ratio, a 30ms or slower attack, and 2–4 dB of gain reduction on the loudest sections. These settings apply subtle glue without flattening the dynamics of the mix.
What is the correct plugin order on a mix bus?
The correct mix bus chain runs compressor first, then broad EQ, then saturation, then a transparent limiter set below 0 dBTP. This order ensures each stage works on the most controlled version of the signal.
How is mix bus processing different from mastering?
Mix bus processing shapes the sound of the mix before it is delivered for mastering. Mastering applies final loudness and tonal adjustments to a finished, printed mix. Using heavy mastering tools on the mix bus can hide problems that need fixing at the track or group level.
When should you avoid bus processing?
Avoid setting up buses too early during the writing and arrangement phase, as it can make the mix feel rigid before the creative decisions are finalized. Build bus architecture once the core arrangement is established and the session structure is clear.