Multiband Processing Explained: A Practical Engineer's Guide
Multiband Processing Explained: A Practical Engineer's Guide
Multiband processing splits audio into discrete frequency bands using crossover filters, processes each band independently, then recombines them into a single output. The result: you can compress the low end without touching the mids, de-ess a vocal without dulling the air, or saturate only the upper harmonics of a guitar without muddying the body. Common applications include transient smoothing on drum buses, bass control on mix buses, de-essing on vocals, and creative multiband distortion on guitars and synths.
The signal path is straightforward:
- Crossover filters split the input into two to six frequency bands
- Each band gets its own processor (compressor, limiter, EQ, saturator)
- The processed bands recombine at the output, summing back to a full-range signal
Table of Contents
- What does multiband processing actually do?
- How does multiband processing work under the hood?
- When should you reach for multiband processing?
- How to set up a multiband processor step by step
- Dynamic EQ, transient shapers, and when to use them instead
- Practical starting settings for common tasks
- Why crossover placement is a DSP decision, not just a preference
- Key Takeaways
- The case for getting crossovers right before anything else
- Vector-dsp: built for engineers who care about crossover precision
- Useful sources for further reading
What does multiband processing actually do?
At its core, multiband processing treats different parts of the frequency spectrum as separate, independent signals. Think of it like an active PA crossover: the same principle that sends lows to subwoofers and highs to tweeters, applied to dynamics and effects processing inside your DAW.
Multiband processing uses filters like an active crossover, and three- or four-band setups are the most common compromise between versatility and setup complexity. You get enough bands to address specific problem areas without the phase and CPU overhead of running six or eight.
Common forms of multiband processing:
- Multiband compression: The most widely used form. Each band has its own threshold, ratio, attack, and release. A loud kick transient won't trigger gain reduction in the mids or highs.
- Dynamic EQ: Frequency-specific gain reduction or boost that activates only when a signal crosses a threshold. Closer to a surgical EQ than a compressor, but the line between dynamic EQ and narrow-band multiband compression is genuinely thin.
- Multiband distortion and saturation: Multiband processing enables creative effects like frequency-specific amp modeling, adding harmonic content to the mids or highs of a guitar without thickening the low end.
- Multiband transient shaping: Attack and sustain control applied per band, useful for tightening drum transients in the high-mid range without affecting the body of the kick.
Multiband vs. single-band (broadband) processing at a glance:
- Single-band: one detector, one gain-reduction stage, affects the entire spectrum simultaneously. A loud low-end transient can trigger audible pumping in the highs.
- Multiband: per-band detectors, independent gain stages. A transient in one band stays isolated. A loud transient in one frequency range won't trigger gain reduction in other bands, which is the core advantage over broadband compression.
- Audible consequence of single-band overuse: pumping, where the whole mix breathes in and out with the kick or bass. Multiband avoids this by containing the response to the offending band.
How does multiband processing work under the hood?
The mechanics matter because they directly affect the choices you make in session. Understanding what happens inside the plugin changes how you set crossovers, choose filter types, and handle latency.
Crossover filters and band counts
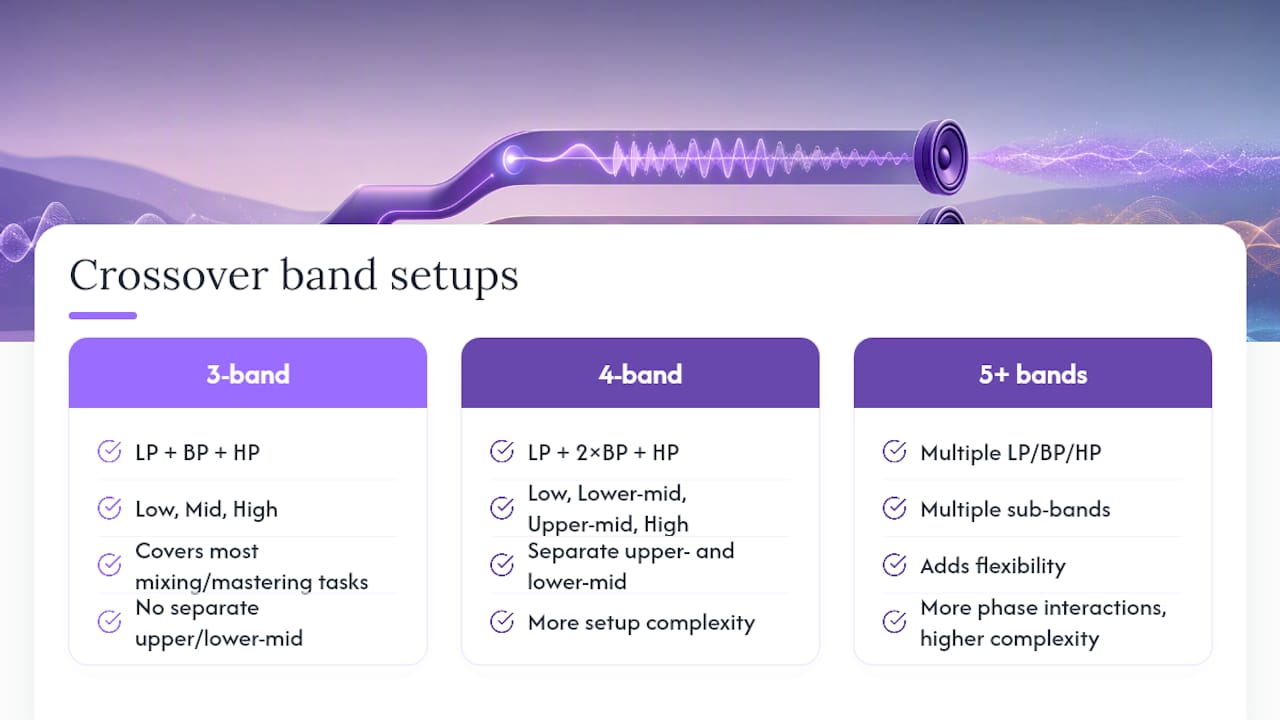
Crossover filters divide the spectrum using combinations of low-pass, band-pass, and high-pass filters. A three-band setup uses one low-pass, one band-pass, and one high-pass filter, creating low, mid, and high bands. Four bands add a second mid range, which is useful for separating upper-mid harshness from lower-mid warmth. Going beyond four bands adds flexibility but also adds phase interaction points and makes setup significantly more complex. For most mixing and mastering tasks, three or four bands cover the territory.
Per-band detectors and side-chain behavior
Each band runs its own detector, which monitors the signal level within that band and drives the gain-reduction stage. This means threshold, attack, and release settings act only on the energy in that band's frequency range. Set a fast attack on the high band to catch cymbal transients without affecting how the compressor responds to bass energy. The side chain can also be fed an external signal in some plugins, which opens up frequency-dependent ducking and more advanced routing.
Band-linking and stereo image
When processing stereo material, you can link left and right channels within each band so gain reduction is equal on both sides, preserving stereo image. Unlinked processing lets each side respond independently, which can widen or narrow the image in that band. On a master bus, linked processing is almost always the right call. On a mid-side setup, you might process the mid and side channels of a specific band independently to tighten the low-end center without collapsing the stereo width of the mids.
Linear-phase vs. minimum-phase crossovers
This is where DSP algorithm choices have real audible consequences. Minimum-phase crossovers introduce phase shift at the crossover frequencies, which can cause subtle comb-filtering when bands recombine. Linear-phase crossovers maintain phase coherence but introduce pre-ringing, an artifact where transient energy appears slightly before the actual transient. In mastering, linear-phase is usually preferred because phase coherence across the full spectrum matters more than a small latency hit. In mixing, minimum-phase often sounds more natural and adds less pre-ringing smear to transients.
Most DAWs handle the latency introduced by linear-phase processing through automatic plugin delay compensation, so track alignment is rarely a manual problem in modern sessions.
When should you reach for multiband processing?
The honest answer: less often than most engineers think. Multiband processing is the right tool when the problem is spectral-specific and level-dependent. If a vocal sounds too bright all the time, a static high-shelf cut on an EQ is faster and more transparent. If the vocal sounds too bright only when the singer pushes hard on certain consonants, that's a multiband job.
Mixing use cases where multiband earns its place:
- Pick noise and sibilance on guitars and vocals: High ratios and fast attack in the upper band targeting around 6 kHz to 10 kHz catch transient spikes without dulling overall presence. A narrow high-band setup functions similarly to a dedicated de-esser.
- Vocal proximity bass buildup: A low-band compressor with a moderate ratio and medium attack can tighten the proximity effect on close-miked vocals without thinning the midrange.
- Cymbal and hi-hat spikes: Fast attack in the high band can smooth out harsh cymbal contact without affecting the body of the drum.
- Drum bus control: Separate low-band compression for kick and bass energy, mid-band for snare body, high-band for transient control. Each band responds only to its own content.
Mastering use cases:
- Taming a problematic mid-range peak that only appears on loud passages, without affecting the overall tonal balance at lower levels.
- Controlling low-end buildup in a dense mix without cutting bass with a static EQ that would thin out quieter sections.
- Adding subtle high-band limiting to catch inter-sample peaks in the air frequencies without limiting the full signal.
When to skip it: If the problem is consistent across all dynamic levels, a static EQ or a broadband compressor handles it more transparently and with less phase interaction. Automation is often a better solution than heavy multiband processing for passages where a single section of a song is problematic.
How to set up a multiband processor step by step
A repeatable workflow prevents the most common multiband mistakes. Soloing bands, narrowing bandwidth, and starting with thresholds set high are the practical steps that separate a clean result from a pumping mess.
- Bypass unused bands. Saving templates and bypassing unused bands reduces CPU load and prevents crossover filtering from introducing unnecessary phase interaction on bands you're not actually processing.
Pro Tip: Save your crossover positions and band settings as a session template before you start tweaking thresholds. That way, you can recall the clean starting state if you go too far and need to reset.
Parallel routing is worth considering for heavy multiband work. Blend the processed signal with the dry signal at the bus level to preserve transient punch and natural dynamics while still getting the spectral control you need.
Dynamic EQ, transient shapers, and when to use them instead
Multiband compression is not always the most precise tool. Understanding the alternatives helps you pick the right processor for the job.
Dynamic EQ vs. multiband compression:
- Dynamic EQ applies gain change at a specific frequency with a bell or shelf curve, activated by a threshold. The processing is additive or subtractive EQ, not compression. It's more surgical and introduces less phase interaction at the processing point.
- Multiband compression applies gain reduction across a defined frequency band, using a compressor's full parameter set. The band width is set by crossover filters, not a Q value. It's better for controlling the overall energy of a frequency range rather than notching a specific resonance.
- For a narrow, specific resonance that only appears at high levels (a room mode, a vocal formant), dynamic EQ is usually cleaner. For controlling the overall energy of the low end or taming a broad harshness in the upper mids, multiband compression handles it better.
When to prefer other tools:
- Static EQ: The problem is consistent at all dynamic levels. No threshold needed.
- Transient shaper: You want to control attack and sustain independently without affecting frequency balance. Useful on drum buses where you want more snap without compressing the body.
- Broadband compressor: The whole signal needs glue or level control, not frequency-specific treatment. A well-set broadband compressor is more transparent than multiband for general dynamics control.
- Parallel compression: Blend a heavily compressed signal with the dry signal for density and punch without losing transients. Works as a complement to multiband processing on drum buses.
Multiband distortion and creative routing are a separate category where multiband processing genuinely has no direct substitute. Applying saturation only to the mids of a guitar, or driving only the upper harmonics of a synth pad, produces results that a broadband saturator simply cannot match.
Practical starting settings for common tasks
These are starting points, not finished settings. Solo each band while setting crossovers, then unmute and adjust in context.
| Task | Band ranges | Threshold | Ratio | Attack | Release | Makeup gain |
|---|---|---|---|---|---|---|
| Vocal de-esser | High: 6–10 kHz | Just catching peaks | 4–8:1 | 5–10 ms | 25–50 ms | Minimal |
| Vocal body control | Low: 80–250 Hz, Mid: 250 Hz–3 kHz | Moderate | 2–4:1 | around 10 ms | 60 ms or more | 1–2 dB |
| Drum bus | Low: 20–100 Hz, Mid: 100 Hz–5 kHz, High: 5–16 kHz | Conservative | 2–3:1 | 25–50 ms (low), 10 ms (high) | 60 ms (low), 30 ms (high) | Match input |
| Bass guitar | Low: 20–80 Hz, Mid: 80–300 Hz | Moderate | 2–3:1 | 25–50 ms | 60 ms or more | 1–2 dB |
| Master bus | Low: 20–120 Hz, Mid: 120 Hz–5 kHz, High: 5–20 kHz | Conservative | 2–3:1 | 60 ms or more | 60 ms or more | Minimal |
A few notes on tightening or relaxing these settings:
- Vocal de-essing: Moderate ratios of 2–4:1 preserve transient energy; push to 4–8:1 when sibilance is aggressive. Mute the high band while setting the threshold, then unmute to confirm you're catching the sibilance without creating a lisp.
Pro Tip: On the master bus, use the band-solo method to confirm each crossover point before engaging any compression. A crossover placed through the fundamental of the kick or bass will cause audible phase issues the moment you start reducing gain.
Why crossover placement is a DSP decision, not just a preference
Placing a crossover through an instrument's fundamental frequency is one of the most common and least-discussed multiband mistakes. When the crossover sits at, say, 80 Hz and the bass guitar's fundamental is also 80 Hz, the fundamental gets split between two bands. Each band processes it independently, then the bands recombine. Because minimum-phase filters introduce phase shift at the crossover frequency, the recombined fundamental arrives with phase cancellation, making the bass sound thin or hollow even when the gain reduction is minimal.
The rule of thumb: set crossovers at least an octave away from the fundamental of any instrument you're trying to control. If the kick's fundamental is around 60 Hz, the low-band crossover should sit at 100 Hz or higher, keeping the full fundamental inside a single band.
Linear-phase crossovers solve the phase-cancellation problem but introduce pre-ringing, where energy from a transient appears slightly before the transient itself. On a snare hit, this can sound like a faint pre-attack smear. In mastering, where phase coherence across the full spectrum is the priority, linear-phase is usually the right choice despite the pre-ringing. In mixing, where transient definition matters more, minimum-phase crossovers often sound cleaner, and the phase shift is less audible in a dense mix context. Understanding hardware vs. software crossover implementations helps clarify why plugin crossover types behave differently from analog hardware designs.
Pro Tip: When using linear-phase mode on a multiband plugin, check that your DAW's plugin delay compensation is active. Linear-phase filters introduce significant latency, and without compensation, the processed track will be out of time with the rest of the session.
Key Takeaways
Multiband processing gives you spectral-specific, level-dependent control that broadband compression and static EQ cannot match, but it works best when applied with minimal active bands and carefully placed crossovers.
| Point | Details |
|---|---|
| Use minimal active bands | Start with three bands; add a fourth only when three genuinely can't solve the problem. |
| Crossover placement is critical | Keep crossovers at least an octave away from an instrument's fundamental to avoid phase cancellation. |
| Band-solo method first | Solo each band and sweep the crossover before engaging any compression to find the right split point. |
| Match time constants to content | Use longer attack/release (25–50 ms attack, 60+ ms release) on low bands; faster settings (around 10 ms attack) on high bands. |
| Vector-dsp for precision DSP | Vector-dsp's low-latency plugin architecture and template-saving support make multiband session setup faster and more consistent. |
The case for getting crossovers right before anything else
Most engineers who struggle with multiband processing are fighting the wrong battle. They spend hours tweaking ratios and thresholds when the real problem is a crossover sitting through the fundamental of the kick or bass. The compression is doing exactly what it's told; it's just operating on a signal that's already been phase-smeared by a poorly placed split.
The tools available now, from FabFilter Pro-MB's visual crossover display to iZotope Ozone's spectrum analyzer overlay, make it easier than ever to see where you're splitting the signal. But seeing it and understanding what it means are different things. A crossover at 80 Hz looks reasonable on a spectrum display. It only reveals its problem when you solo the low band and hear the bass guitar's fundamental getting processed in two places at once.
The minimal-band approach is not a limitation. It's a discipline. Three bands, carefully placed, with conservative ratios and time constants matched to the content, will outperform a six-band setup with aggressive settings on every band. The engineers who get the most out of multiband processing are the ones who use it least, and use it precisely.
Vector-dsp: built for engineers who care about crossover precision

Vector-dsp builds professional audio plugins around the same DSP principles this guide covers: precise crossover design, low-latency real-time performance, and workflow efficiency that holds up in actual sessions. The plugin architecture supports VST3, AU, and AAX formats across Windows and macOS, so your multiband setups move between DAWs without reconfiguration. Template saving is built into the workflow, which means your preferred crossover positions and band settings carry over from session to session without manual reconstruction.
If you're ready to apply multiband techniques with tools designed around the engineering rationale rather than marketing presets, explore the Vector-dsp plugin lineup and download a demo to test with your own material.
Useful sources for further reading
- Multi-band compression tips | Sound On Sound
- How to control mixed material with multiband compression | MusicRadar
- A Crash Course on Multiband Compression | FOH
- Multiband Signal Processing | Craig Anderton
- Why use multiband processing on guitars | Reverb
- Studio Concepts: What is Multiband Compression? | Perfect Circuit
- The Best Compressor Settings for Vocals (Exact Settings to Use) | Music Guy Mixing