Sound design basics explained: The emerging designer's guide
Sound design basics explained: The emerging designer's guide

Most producers assume sound design is reserved for synthesizer nerds programming patches from scratch. It isn't. Sound design is the practice of shaping timbre and texture through synthesis, sampling, and effects — and you're already doing it every time you adjust a filter cutoff or stack two samples together. Getting the sound design basics explained properly isn't about memorizing gear. It's about understanding why sounds behave the way they do so you can make confident, intentional choices every single session.
Table of Contents
- Core sound design techniques you must know
- Understanding synthesis: From preset to patch
- Mixing and processing sound design elements effectively
- The layered approach: Conceptual frameworks and practical layering
- Bringing sounds to life with movement and evolution
- Why mastering basics unlocks creative freedom in sound design
- Explore Vector DSP: Your partner in sound design innovation
- Frequently asked questions
Key Takeaways
| Point | Details |
|---|---|
| Sound design is about timbre | It focuses on shaping the texture and character of sounds, not just melodic notes. |
| Master core techniques | Subtractive, FM, wavetable, sampling, layering, and effects processing form the foundation of sound design. |
| Build patches not just use presets | Understanding synthesis lets you modify sounds at the source, improving mix compatibility. |
| Mix with intention | Use EQ, compression, reverb, and delay strategically to place and glue sounds in the mix. |
| Add movement for life | Continuous parameter changes over time create dynamic and engaging sound textures. |
Core sound design techniques you must know
With the basics introduced, let's get into the fundamental core sound design techniques that give you real control over sound creation. The essential toolkit for modern sound design includes six methods, and each one opens a different door.
The six fundamental techniques:
- Subtractive synthesis starts with harmonically rich waveforms (sawtooth, square, noise) and uses filters to remove frequencies until you've carved the shape you want. Think of it like sculpting: you start with more than you need and subtract down to your vision.
- FM synthesis (frequency modulation) uses one oscillator to modulate the frequency of another, producing complex metallic and bell-like timbres that subtractive methods struggle to replicate. The DX7 bass sound that defined 80s pop? Pure FM.
- Wavetable synthesis stores single-cycle waveforms in a table and lets you scan through them over time. This is how you get pads that breathe and leads that morph without automation.
- Sampling and resampling takes recorded audio and lets you pitch it, chop it, and feed it back through synthesis engines iteratively. Resampling your own sounds through filters and effects builds entirely new textures from familiar material.
- Layering stacks multiple sources across frequency ranges to build density. A kick drum is almost always layered: a sine-wave body, a transient click, and a mid-range thud working together.
- Effects-chain processing means the order of your effects matters enormously. Distortion before reverb creates a saturated wash. Reverb before distortion produces a blown-out, unnatural smear. Same tools, completely different results.
| Technique | Sound character | Best use case |
|---|---|---|
| Subtractive | Warm, analog, classic | Basses, leads, pads |
| FM | Metallic, complex, electric | Electric piano, bells, plucks |
| Wavetable | Evolving, modern, textural | Evolving pads, modern leads |
| Sampling | Organic, realistic, flexible | Percussion, foley, hybrid sounds |
| Layering | Dense, full, wide | Cinematic textures, complex drums |
| Effects chain | Variable | Glitch, atmosphere, color |
Pro Tip: When learning a new technique, pick one synth and stay on it for 30 days. The goal isn't to collect tools — it's to understand one tool deeply enough that it stops being a puzzle.
Understanding synthesis: From preset to patch
Now that you know the main techniques, let's explore how to create and personalize sounds at their source. The clearest distinction in synth patch building is this: a preset is someone else's sound you load, while a patch is one you built or reconstructed yourself. That difference matters more than most beginners realize.
Here's the standard signal path for a subtractive synth patch, and understanding it is the single biggest unlock in learning how to design sound from scratch:
- Oscillator generates the raw waveform. Choose your shape (saw, square, sine) based on the harmonic content you need. A sawtooth has all harmonics; a square has only odd harmonics; a sine has none.
- Filter shapes the frequency content of that waveform. Cutoff determines where filtering starts; resonance boosts frequencies right at the cutoff point, adding that classic nasal or aggressive character.
- Amplitude envelope (ADSR) controls how loud the sound gets over time. Attack determines how quickly it reaches full volume, decay brings it down, sustain holds it, and release lets it fade.
- Modulation is where sounds come alive. An LFO (low-frequency oscillator) assigned to filter cutoff creates a rhythmic filter sweep. Envelope-to-pitch creates pitch drops on impact sounds.
- Output stage may include a master volume, pan, and final gain staging before the sound hits your effects chain.
Don't skip the preset-modification phase. Load a preset you like, then break it apart parameter by parameter until you understand what each element contributes. This approach teaches you why a sound works, not just that it does.
Pro Tip: If your sound isn't sitting in the mix, fix it at the source first. Adjust the envelope or filter before reaching for EQ. Fixing a mix problem at the synthesis stage saves you three steps downstream.
Mixing and processing sound design elements effectively
With your patches designed, processing them properly is what makes the difference between sounds that impress in isolation and sounds that work in a full production. The fundamentals of sound design don't stop at synthesis. Mixing sound design basics are where your creative vision becomes audibly clear.
The principles of corrective and creative processing give your sounds room to breathe and hit hard:
- High-pass filtering as the first move on almost every sound. Unless something needs low-end energy (kick, bass, pad), roll off below 80-200Hz to remove rumble, handling noise, and frequency clutter that muddies a mix.
- Surgical EQ cuts before any boosts. Narrow a Q and sweep through the frequency range to find harsh or nasal resonances. Cut those first. Then boost broad areas for color.
- Compression on impact sounds controls how the transient and sustain relate to each other. A slower attack on a snare lets the crack punch through before the compressor clamps down. A fast attack on a pad smooths out peaks and creates that glued, even texture.
- Reverb at 5-15% wet adds depth without washing out presence. Anything above 20% wet for a primary sound element usually signals a mix problem rather than a creative choice.
- Short delays (5-30ms) create stereo width through the Haas effect without adding reverb tails. Tempo-synced delays on rhythmic elements create groove cohesion that ties a mix together.
Pro Tip: Process your reverb return channel with EQ. Roll off below 200Hz and above 8kHz on most reverb returns. This keeps your reverb sounding spacious without filling up the low-end or adding air you didn't ask for.
The layered approach: Conceptual frameworks and practical layering
Beyond individual sounds, smart layering is what separates a polished mix from an overcrowded one. Learning audio layering frameworks means thinking about your entire soundscape as a stack of distinct, purposeful layers.
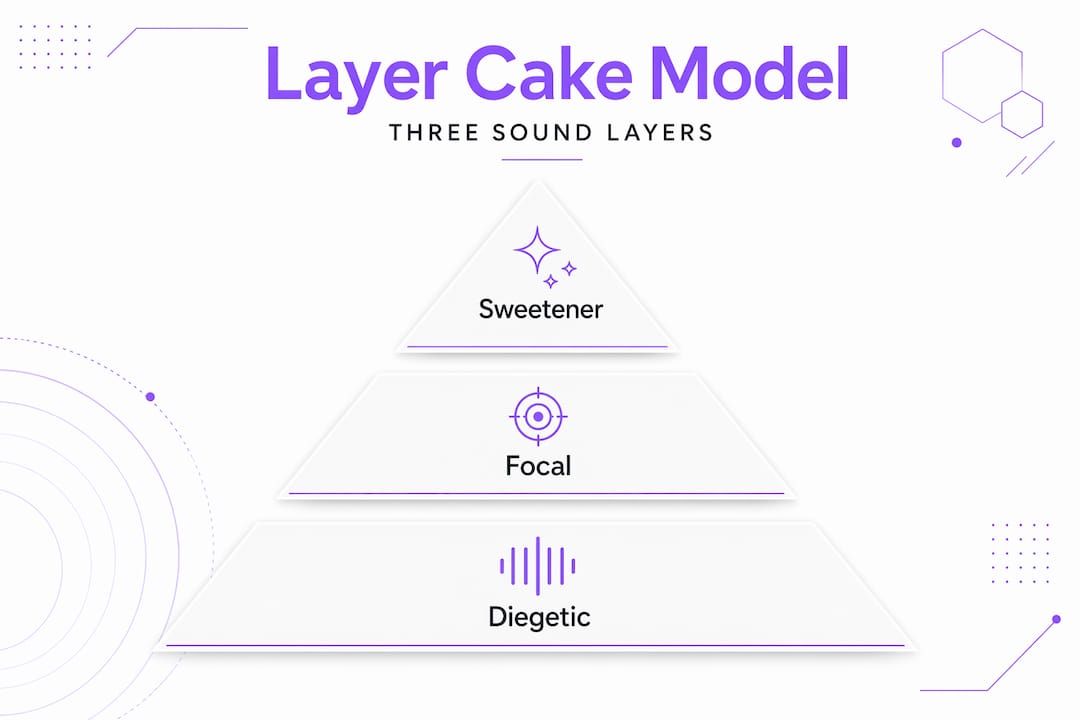
The "layer cake" model organizes sounds into three categories based on their function:
| Layer type | Role in the mix | Typical volume % |
|---|---|---|
| Diegetic | World sounds: footsteps, effects, ambience | 60-70% |
| Non-diegetic | Score, UI feedback, narration | 20-30% |
| Psychoacoustic | Subtle emotional frequency cues | 10-20% |
Even if you're producing music rather than sound for film or games, this model applies. Your drums and melodic elements are diegetic. Your reverb tails, background pads, and atmospheric textures are psychoacoustic. Non-diegetic layers are things like vinyl crackle or crowd noise added for mood rather than function.
What makes layering fail:
- Stacking elements in the same frequency range without EQ carving
- Using the same reverb on every layer, which collapses the sense of depth
- Treating all layers at equal volume, which flattens the emotional hierarchy
- Ignoring phase relationships between layered sounds (especially in parallel processing)
Practical approach: assign each layer a frequency zone before you start blending. Your low layer owns below 200Hz. Your mid layer lives between 200Hz and 3kHz. Your high layer fills 3kHz and above. Then cut competing frequencies before raising volumes. This alone solves most muddy mix problems before they start.
Bringing sounds to life with movement and evolution
After layering your sounds, adding motion and evolution keeps listeners engaged across the full duration of a track or scene. Creating dynamic sound design isn't about automating everything. It's about knowing which parameters to move, and when.
Here's a practical workflow for developing expressive, evolving sounds:
- Set up a record-ready environment in your DAW and enable parameter recording. You're about to perform your sound, not program it.
- Start with filter cutoff movement. Play the sound for 2-3 minutes while slowly opening and closing the cutoff. Don't aim for perfection. Aim for feel.
- Add envelope shape changes. Gradually increase the attack or release while the sound plays. Notice how the same timbre becomes urgent, relaxed, or searching.
- Introduce modulation rate shifts. Speed up or slow down your LFO in real time. Fast modulation creates tension; slow modulation creates drift.
- Record stereo width changes. Widening and narrowing a sound over time creates a physical, spatial feel that static stereo placement never achieves.
- Comp your best moments. Take the most expressive 8-16 bars and arrange them. Sound feels alive when listeners perceive contrast and transformation over time, not when every moment is polished.
Pro Tip: Allow imperfections. A filter sweep that overshoots slightly, or a modulation that gets slightly out of sync with the groove, gives a sound personality. Perfect movement often reads as mechanical. Slightly imperfect movement reads as human.
Why mastering basics unlocks creative freedom in sound design
Here's the perspective most beginner guides won't give you: the goal of learning sound design basics isn't to stop using presets. It's to stop being limited by them.
When you understand sound design as a decision about timbre and texture, even loading a preset becomes a creative act. You're not accepting it. You're auditioning it against what you actually hear in your head. That's the distinction that separates a designer from a browser.
We see a consistent pattern with producers who plateau early. They've collected hundreds of presets and sample packs, but they can't translate what they hear in their head into what comes out of the speakers. The gap isn't talent. It's signal-flow literacy. Once you understand that oscillator shapes determine harmonic content, that filter cutoff determines brightness, and that envelope attack determines aggression, you stop fighting your tools and start collaborating with them.
Mixing and spatial processing aren't afterthoughts in this discipline. Reverb placement and compression behavior are creative decisions that belong in the same conversation as synthesis. A sound that feels emotionally right in a mix is usually one that was designed with the mix in mind from the first note, not retrofitted with effects later.
The most counterintuitive truth we'd offer: movement and evolution aren't advanced techniques. They're basic ones you should apply immediately. Static, perfectly-sculpted sounds are actually harder to place in a mix than evolving ones because they compete for attention without ever earning it.
Explore Vector DSP: Your partner in sound design innovation
Understanding signal flow, synthesis, and layering is only the beginning. Applying these principles with the right tools is where growth accelerates.

Vector DSP tools are built specifically for producers and sound designers who want precision at every stage of the signal chain. From effects processors to synthesis-focused instruments, every plugin in the Vector DSP lineup is engineered around real-time DSP performance with the low-latency response that detailed sound design demands. If you're ready to move beyond stock plugins and apply the concepts in this guide with advanced sound design plugins that match your technical ambitions, Vector DSP gives you the architecture to do it right.
Frequently asked questions
What is the difference between a sound design patch and a preset?
A preset is a ready-made sound someone else built that you load directly, while a patch is a sound you built or reconstructed by adjusting synthesis parameters to fit your specific mix context.
How does compression improve sound design beyond just making sounds louder?
Compression controls dynamics by allowing attack transients to pass through before clamping down on sustain levels, which adds punch and helps individual sounds glue together within a full mix.
Why is movement over time important in sound design?
Listeners perceive contrast and evolution over time as more engaging than static textures, making sounds with changing parameters feel alive and emotionally connected rather than flat.
What are the three layers in the layer cake model of sound design?
The model divides audio into diegetic sounds (world-based effects and ambience), non-diegetic sounds (score and UI), and psychoacoustic layers that subtly influence emotion through frequency and spatial cues, each carrying a distinct volume weight in a mix.