Serial vs. Parallel Compression: When to Use Each
Serial vs. Parallel Compression: When to Use Each
Serial compression stages dynamics across multiple compressors in a single signal path; parallel compression blends a heavily compressed duplicate with the dry signal to add density while preserving transients. The choice between them isn't about which is "better" — it's about what the track needs. If you're chasing control and transparency, serial is your tool. If you need body and punch without killing the attack, go parallel.
| Serial | Parallel | |
|---|---|---|
| Placement | Insert chain (in-line) | Aux/send, duplicate track, or mix knob |
| Sonic goal | Transparent control, tonal shaping | Density, sustain, perceived loudness |
| Typical gain reduction | 3–6 dB per stage | 10–20 dB on wet path, blended back |
| Common uses | Vocals, bass smoothing, mix bus glue | Drums, percussion bus, full mix punch |
Quick decision rules:
- Try parallel first when the source has great transients you don't want to lose (snare crack, plucked bass, acoustic guitar attack).
- Try serial first when the source has erratic peaks or needs tonal shaping across multiple stages.
- Use both when you need control AND density — a common approach on vocals and drum buses.
Key Takeaways
Serial compression controls dynamics across multiple stages; parallel compression adds density by blending a heavily compressed wet path with the dry signal, preserving transients throughout.
| Point | Details |
|---|---|
| Serial = control, parallel = density | Use serial for peak catching and smoothing; use parallel to add body without losing transient attack. |
| Wet path settings can be extreme | Ratios of 8:1 or higher and 12–18 dB of gain reduction on the wet path are standard for parallel compression. |
| Phase alignment is non-negotiable | Run the polarity-flip silence test on every parallel setup; add sample delay if the signal doesn't collapse. |
| Combine both for vocals and drums | Serial stages handle control; a parallel return adds presence and density, especially effective during choruses. |
| Define the problem first | Identify whether the source needs control, density, or both before choosing a technique or compressor type. |
Table of Contents
- How does serial compression work?
- What is parallel compression and how do you route it?
- How do serial and parallel compression sound different?
- When should you use serial vs. parallel compression?
- Quick recipes: starting settings for common sources
- DAW routing, latency, and phase alignment in parallel setups
- How to combine serial and parallel compression in advanced workflows
- Common mistakes and how to fix them
- Recommended compressor types and classic pairings
- A five-minute cheat sheet for setting up serial and parallel compression
- What experienced engineers actually do in real sessions
- Sources
How does serial compression work?
Serial compression places two or more compressors consecutively in the same signal path, each handling a portion of the total gain reduction. Instead of one compressor clamping down 12 dB, you might run 4 dB through a fast FET, then 4 dB through a slower optical, and arrive at the same reduction with far less audible pumping or distortion. MakeUseOf's breakdown of serial vs. parallel compression confirms this: sharing gain reduction across stages keeps the result more transparent than a single heavy stage.
The order of compressors in the chain matters more than most engineers realize. A fast-attack FET unit at the front catches transient peaks before they overload the second compressor. The optical or VCA stage that follows then smooths the sustained body of the signal with its characteristic slower response. Flip that order and the optical unit misses peaks entirely, leaving the FET to work too hard on a signal that's already been shaped wrong.
Common serial staging patterns:
- FET first, optical second: Peak control then smoothing. Classic on vocals and bass.
- VCA first, tube second: Tight dynamic control followed by harmonic warmth. Works well on drum buses.
- Two VCAs in series: Precise, clean control across two stages. Useful on mix buses where coloration is unwanted.
Pro Tip: Use compressors with different characters in a serial chain, not just different settings. A FET unit adds a specific kind of edge and speed; an optical unit adds smoothness and a gentle knee. Stacking two of the same type often just sounds like one compressor working harder — you lose the tonal benefit of staging.
For a deeper look at how compressor types behave differently in chains, the types of audio compression plugins guide from Vector-dsp covers FET, optical, VCA, and tube characteristics in practical terms.
What is parallel compression and how do you route it?
Parallel compression, historically called "New York compression," splits the signal into a dry path and a heavily compressed wet path, then blends them back together. Wikipedia's entry on parallel compression documents this technique's origins and explains the core mechanic: the dry signal preserves the transient attack while the compressed signal adds body and sustain underneath it. The result behaves like upward compression — quieter elements get louder without the loudest peaks being crushed.
Three routing options and their trade-offs:
- Aux/send method: Route the channel to an aux bus, compress heavily on the aux, and blend the aux return alongside the dry channel. Clean separation, easy to automate the blend, but requires careful gain staging on the return.
- Duplicate track method: Copy the track in your DAW, compress the duplicate aggressively, and mix both faders. Gives you full plugin flexibility on each path but creates latency alignment issues you'll need to address manually (more on that in the DAW routing section).
- Plugin mix knob: Some compressor plugins include a built-in dry/wet control. Fastest to set up, but you lose independent control over the wet path's level and EQ.
On the wet path, aggressive settings are not just acceptable — they're the point. Ratios of 8:1 or higher, fast attack, and 10–20 dB of gain reduction are common. AudioSpectra's guide to parallel compression notes that these extreme settings work precisely because the dry path absorbs the transient; the compressed signal only contributes sustain and density when blended back.
Pro Tip: On the wet path, try a slower attack (20–40 ms) when you want the compressed signal to reinforce the transient rather than just add sustain. A fast attack on the wet path kills the attack on that path too, which is fine when the dry signal carries it — but a slightly slower attack lets the wet path contribute a bit of punch alongside the body.
How do serial and parallel compression sound different?
The clearest way to hear the difference is to listen to the attack of a snare or a plucked bass note. Serial compression, even done well, will always modify the transient to some degree — the first compressor in the chain sees the full attack and responds to it. Parallel compression leaves the transient completely untouched on the dry path. That's not a subtle distinction; it's the entire reason the technique exists.
Transient and sustain behavior:
- Serial chains shape the transient — faster attack settings reduce it, slower settings let more through, but the compressor always reacts.
- Parallel blending preserves the original transient from the dry path while the wet path adds sustain and density underneath.
- The result of parallel compression is a track that feels simultaneously punchy and full, which is difficult to achieve with serial compression alone.
Perceived loudness behaves differently too. Sound On Sound's analysis of parallel compression explains the psychoacoustic mechanism: the ear tolerates raising quieter elements more than it tolerates lowering loud ones. Parallel compression raises the floor of the signal (the quieter sustain and room) without touching the ceiling (the peaks), which registers as louder and denser without sounding squashed.
Tonal coloration is where serial chains have an advantage. Running a signal through a FET then an optical compressor imparts the character of both units — harmonic content, knee shape, release behavior — in ways that parallel blending can't replicate. Parallel compression is largely colorless in terms of the dry path; all the color comes from the wet path, which is blended in at a lower level.

Pro Tip: To confirm transient preservation in a parallel setup, solo the wet path and listen to the attack. It should sound squashed and almost unnatural. Then unsolo and blend it back — if the transient snaps back clearly, the dry path is doing its job. If the attack still sounds soft in the full blend, your dry/wet ratio is off or the wet path attack is too fast.
When should you use serial vs. parallel compression?
Think of it as two questions: does this source need control, or does it need density? Serial compression answers the first. Parallel answers the second. When the answer is both, you combine them.
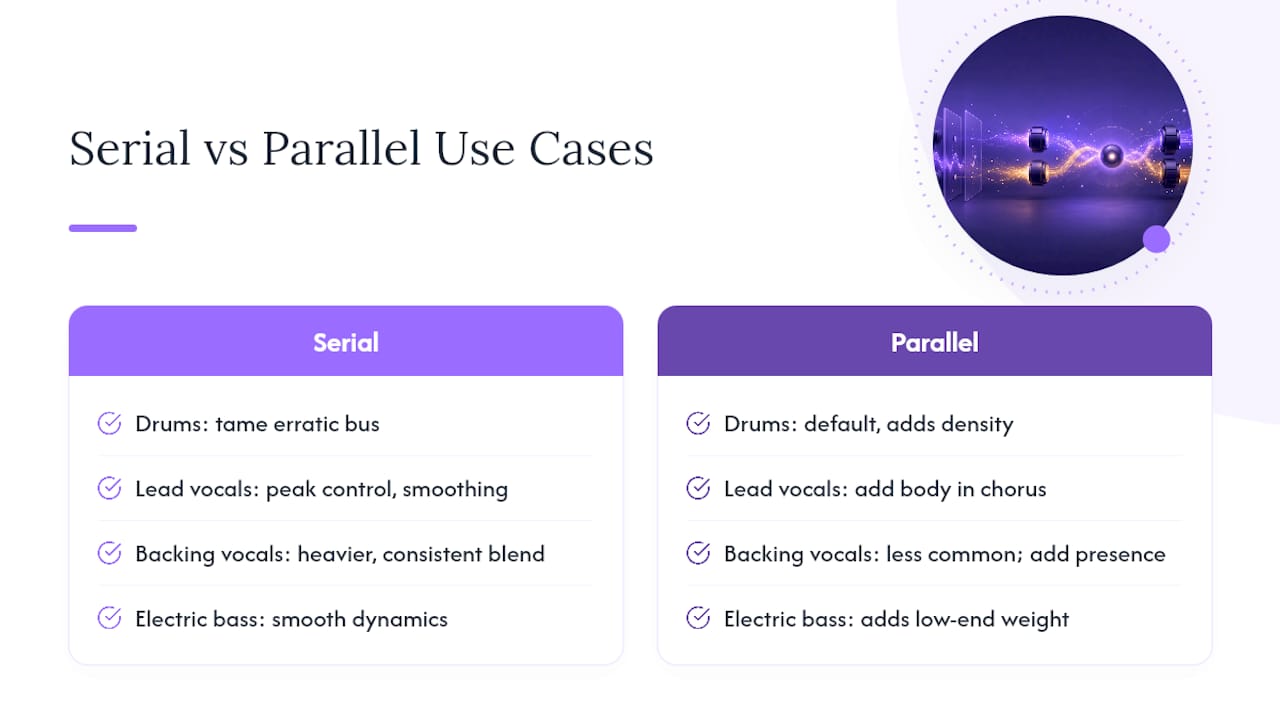
Drums and percussion bus: Parallel is the default choice here. Serial compression on a drum bus works when the bus is dynamically erratic and needs taming before any parallel treatment.
Lead vocals: Serial compression is almost always the starting point — a fast compressor to catch peaks, a slower one to smooth the phrase-level dynamics. Parallel can be added as a separate bus to bring up the body of the vocal during choruses without changing the peak behavior.
Backing vocals: Often benefit from heavier serial compression to create a consistent, blended texture. Parallel is less common here unless you're trying to add presence to a thin-sounding stack.
Electric bass: Serial works well for smoothing the dynamic range between notes. A gentle first stage catches the hardest plucks; a second stage evens out the sustain. Parallel adds low-end weight and density, particularly useful when the bass needs to sit under a dense mix without getting lost.
Acoustic instruments: Serial compression with careful attack settings preserves the natural pick or bow attack while controlling the body. Parallel can work on acoustic guitar but risks making it sound unnatural if the wet path is too aggressive.
Mix bus: Light serial compression for glue — 2–3 dB of gain reduction across two stages — is a common approach. Parallel compression on the mix bus is less common but can work as a sub-bus technique where a compressed parallel return adds density to the low-mids.
For practical bus-processing workflows and when to place serial vs. parallel stages on buses, the bus processing workflow guide from Vector-dsp covers the decision points in detail.
Quick recipes: starting settings for common sources
These are starting points, not final destinations. Adjust based on what you hear.
Drums (parallel bus)
Wet path: high ratio, attack in the low millisecond range, release medium-fast, significant gain reduction. Blend the wet return at a moderate level alongside the dry drum bus. Low-cut the wet path if the parallel return sounds boomy.
Lead vocal (serial + optional parallel)
First compressor: fast attack, medium release, moderate ratio, moderate gain reduction. Second compressor: slower attack, lower ratio, light gain reduction. Optional parallel return: higher ratio, moderate attack and release, blended at a low to moderate level.
Electric bass (serial)
First stage: fast attack, moderate ratio, moderate gain reduction for peak control. Second stage: slower attack, lower ratio, light gain reduction for body smoothing.
Mix bus (serial glue)
Two gentle stages with mild ratios, moderate attack, program-dependent release, light gain reduction per stage. Keep total gain reduction modest.
Pro Tip: Set release time relative to the tempo of the track. A release that's too slow causes the compressor to still be recovering when the next transient hits, which creates pumping. A rough starting point: 60,000 divided by the BPM gives you the length of one beat in milliseconds — set release to half that value and adjust by ear.
DAW routing, latency, and phase alignment in parallel setups
Digital parallel compression introduces a problem that analog hardware never had: processing latency. When a plugin compressor processes the wet path, it introduces a small delay — sometimes just a few samples, sometimes dozens depending on the plugin's lookahead setting. FOH Online's guide on avoiding latency in parallel compression documents this directly: even with DAW plug-in delay compensation active, mismatched plugin counts or lookahead settings can leave the wet and dry paths out of time alignment, causing comb filtering.
Three routing methods and their latency behavior:
- Aux/send: Most DAWs compensate automatically for plugin latency on aux returns. This is the safest method, but check that your DAW's PDC covers the aux path, not just the insert chain.
- Duplicate track: Gives you maximum flexibility but requires manual latency matching. If the compressor on the duplicate introduces 512 samples of lookahead, the dry track needs a 512-sample delay plugin inserted to match.
- Plugin mix knob: The plugin handles both paths internally, so latency is inherently matched. The trade-off is less flexibility.
Step-by-step phase alignment check:
- Set the parallel blend to 50/50 (equal dry and wet).
- Invert the polarity of the wet path using a polarity-flip plugin or your DAW's phase button.
- Listen. If the paths are time-aligned, the signal should collapse to near silence.
- If you still hear significant signal, add sample delay to the dry path in small increments until the cancellation is as complete as possible.
- Remove the polarity inversion and restore your blend.
- Check the result in the full mix, not just in solo, since comb filtering is often masked at low blend levels but audible in context.
Lookahead is a specific culprit worth checking independently. Some compressor plugins use lookahead to achieve zero-overshoot gain reduction, which adds a fixed delay to the wet path. Disable lookahead if you don't need it, or add matching sample delay to the dry path if you do.
Pro Tip: If you're running multiple plugins on the wet path, the total latency is cumulative. Match the number of plugins on the dry path using zero-latency dummy plugins (a gain plugin with no processing, for example) to keep DAW PDC calculations accurate. For a deeper technical look at latency in real-time DSP, Vector-dsp's low-latency audio programming guide covers the architecture behind it.
How to combine serial and parallel compression in advanced workflows
The most effective chains assign each stage a specific job. Serial compression handles control; parallel compression handles density. When those roles blur, the chain becomes hard to troubleshoot and easy to overdo.
A practical vocal chain might look like this: a fast FET compressor as the first serial stage catches peaks and adds a bit of edge; a slower optical compressor as the second serial stage smooths phrase-level dynamics and adds warmth. Both are in the insert chain.
Drum bus example: A gentle VCA compressor on the drum bus insert (2–3 dB of gain reduction, slow attack to let the transients through) provides glue. A parallel NY compression bus, fed from the same drum bus, runs at 15 dB of gain reduction with a faster attack and adds low-end weight and sustain. The serial stage controls; the parallel stage adds character.
Guidelines for keeping stages clear:
- Define what each compressor is doing before you add it. "Peak catching," "phrase smoothing," and "density" are three different jobs.
- Bypass each stage individually and listen to what disappears. If bypassing a stage changes nothing audible, remove it.
- Keep the parallel blend conservative until you're sure the serial chain is doing its job. A parallel return that's too loud masks problems in the serial chain.
Pro Tip: Automate the parallel blend level across arrangement sections. This creates dynamic interest without touching any compressor settings — the track gets denser and more intense exactly where the arrangement calls for it.
Common mistakes and how to fix them
Frequent errors:
- Parallel on already-compressed material: If the source is already squashed (a heavily limited sample, a pre-mastered stem), parallel compression has nothing to work with. The dry path has no transients to preserve, so you just add more compression on top of compression. AudioSpectra's guide specifically cautions against this.
- Wet path blend too high: When the parallel return is louder than the dry signal, you lose the transient preservation benefit entirely. The wet path should support the dry path, not replace it.
- Unclear serial roles: Two compressors in series doing the same job (both set to fast attack, similar ratios) is just one compressor working in two steps. Differentiate the attack, release, and ratio between stages.
- Ignoring plugin lookahead: Lookahead desynchronizes paths even when DAW PDC is active. Check it on every compressor in a parallel setup.
Rescue sequence (60–90 seconds):
- Bypass the parallel return entirely and confirm the serial chain sounds correct on its own.
- Re-engage the parallel return at a very low blend (10%) and listen for comb filtering — a hollow, phasey quality.
- Run the polarity-flip silence test described in the DAW routing section. Add sample delay if needed.
- Raise the blend slowly until the source sounds denser but the transient is still clearly present.
- Bypass the entire compression chain and compare against the unprocessed signal. If the compressed version sounds worse, roll back the most recent change.
Listening-check checklist:
- Does the transient still snap clearly? (Parallel check)
- Is the sustain or body of the note fuller than the dry signal? (Parallel working)
- Does the signal sound hollow or phasey? (Phase alignment problem)
- Does the serial chain sound transparent when the parallel return is bypassed? (Serial check)
- Is the total gain reduction across all serial stages under 10 dB? (Transparency guard)
Recommended compressor types and classic pairings
The 1176 (FET-style) and LA-2A (optical-style) are the two most referenced compressors in serial chain discussions, and for good reason — their characteristics are almost perfectly complementary.
The 1176 responds in microseconds. Its FET gain element means it catches transients before most other compressor types even react. At higher ratios (4:1 to 8:1), it adds a forward, aggressive quality; at lower ratios, it's surprisingly transparent. In a serial chain, it belongs first — it handles the peaks and sets the character.
The LA-2A uses a photocell and electroluminescent panel to create a gain reduction that's inherently program-dependent. It can't be set to a specific attack time; it responds to the signal's average level over time. That makes it poor at catching peaks but excellent at smoothing the sustained body of a signal. In a serial chain, it belongs second — after the 1176 has handled the peaks, the LA-2A smooths what's left.
Common pairings and where they work:
- 1176 then LA-2A on vocals: The most documented serial pairing in professional mixing. The 1176 controls the consonants and peak energy; the LA-2A smooths the vowels and phrase dynamics. Both are available as plugin emulations across multiple formats.
- VCA then optical on bass: A tight VCA (SSL-style) catches the hardest plucks; an optical unit smooths the sustain. Keeps the low end controlled without sounding mechanical.
- FET then VCA on drum bus: The FET adds punch and character; the VCA provides clean, transparent glue. Works well when you want the drum bus to feel cohesive without sounding processed.
For parallel setups, compressor character matters less because the wet path is blended at a lower level. A VCA tends to be the most neutral choice for the wet path; a tube or optical unit adds more color, which can be useful or distracting depending on the source.
A note on emulations: Plugin emulations of the 1176 and LA-2A vary significantly between developers. A/B different emulations on the same source before committing — the differences in knee shape, harmonic content, and release behavior are audible and affect how well they pair in a serial chain.
A five-minute cheat sheet for setting up serial and parallel compression
Serial setup (2 minutes)
- Insert the first compressor on the channel. Set ratio to 4:1, attack to 1–3 ms, release to 60–100 ms. Adjust threshold until you see 3–5 dB of gain reduction on peaks.
- Insert the second compressor after the first. Set ratio to 2:1, attack to 10–20 ms, release to 100–150 ms. Adjust threshold for 2–4 dB of gain reduction on the sustained body.
- Bypass both compressors and compare against the unprocessed signal. The compressed version should sound more controlled but not obviously squashed.
Parallel setup (2 minutes)
- Create an aux bus or duplicate the track.
- Insert a compressor on the wet path. Set ratio to 8:1, attack to 5–10 ms, release to 50–80 ms. Push the threshold until you see 12–18 dB of gain reduction.
- Blend the wet return at 20–30% alongside the dry signal.
- Run the polarity-flip silence test to confirm phase alignment.
A/B and refinement (1 minute)
- Bypass the entire chain and listen to the dry signal for 10 seconds.
- Re-engage and listen for: transient clarity, body and sustain, absence of hollow/phasey quality.
- Adjust blend or gain reduction until the track sounds denser and more present without losing its attack.
Pass/fail checks:
- Transient snaps clearly: pass.
- Body and sustain are fuller: pass.
- Hollow or phasey quality: fail — run the phase alignment check.
- Sounds squashed or lifeless: fail — reduce gain reduction or lower the parallel blend.
Pro Tip: Do the A/B comparison in the context of the full mix, not in solo. Compression decisions that sound obvious in solo often disappear in the mix, and problems that are masked in solo become audible in context.
What experienced engineers actually do in real sessions
The conventional advice is to pick a technique and apply it. In practice, most experienced engineers make the decision in the first 30 seconds of listening to a track and spend the rest of the time adjusting blend levels and release times, not debating methodology.
The more useful habit is to define the musical problem before touching a compressor. A vocal that sounds thin and inconsistent needs serial compression to control the dynamics and a parallel return to add body. A snare that sounds great but disappears in the mix needs parallel compression to add sustain, not serial compression to change its character. Those are different problems with different solutions, and the technique follows from the diagnosis.
What gets overlooked is how often the answer is "less of both." Engineers new to parallel compression tend to push the wet blend too high because the effect sounds impressive in solo. In a dense mix, that same blend level creates a muddy, undefined low-mid buildup that's hard to trace back to the compression. The fix is almost always to pull the parallel return back by 5–8 dB and reassess.
The streaming era has made parallel compression more relevant, not less. Streaming normalization targets mean that tracks with well-preserved transients and raised sustain floors translate better across playback systems than tracks that are simply limited hard at the top. Parallel compression raises perceived density without sacrificing the peak structure that normalization algorithms respond to.
The best sessions use serial and parallel compression as a system: serial for control and character, parallel for density and presence, with clear roles assigned to each stage and regular bypass checks to confirm each stage is earning its place in the chain.
Sources
- Parallel compression — Wikipedia
- Serial vs. Parallel Compression: When and How to Use Each One in Your DAW — MakeUseOf
- Avoiding Latency When Using Parallel Compression | FOH
- Parallel compression — Sound On Sound
- Parallel Compression: What It Is & When to Use It — AudioSpectra