Sample-Accurate MIDI Processing: A Developer's Guide
Sample-Accurate MIDI Processing: A Developer's Guide
Sample-accurate MIDI scheduling means one thing in practice: convert host musical time to sample time, then emit timestamped MIDI events from inside the audio/render callback using per-block sample offsets. Keep a persistent global sample counter. Handle loop wrap and tempo changes explicitly. Everything else is implementation detail.
Quick action plan:
- Obtain the host playhead (JUCE
AudioPlayHead, AUv3AUHostMusicalContextBlock, or VST3IProcessContextRequirements) - Compute
bufferStartTimeandbufferEndTimein samples from beat position and BPM - Select events whose sample timestamps fall inside that window (or straddle a loop boundary)
- Calculate
offset = eventSampleTime - bufferStartTime - Call the host MIDI output API with that offset, not with a zero timestamp
Three common integration checkpoints: JUCE processBlock for cross-platform plugin development, Ableton Live as the host to test transport accuracy and loop behavior, and MOTU interfaces as a hardware reference for driver-level timestamp support.
Key Takeaways
Sample-accurate MIDI scheduling requires computing sample offsets inside the audio callback from host beat position and BPM, maintaining a persistent sample counter, and handling loop wrap and tempo changes explicitly.
| Point | Details |
|---|---|
| Schedule inside the audio callback | Compute sample offsets from host playhead data; never emit MIDI from non-audio threads with zero timestamps. |
| Store events in beat coordinates | Derive sample positions each block from current BPM so tempo changes never corrupt precomputed positions. |
| Handle loop wrap explicitly | When bufferEndSample exceeds loop length, split event scheduling across the wrap point using remainingFramesBeforeWrap. |
| Use lock-free queues for MIDI input | Transfer incoming MIDI from non-audio threads via SPSC ring buffer; convert timestamps at the top of each block. |
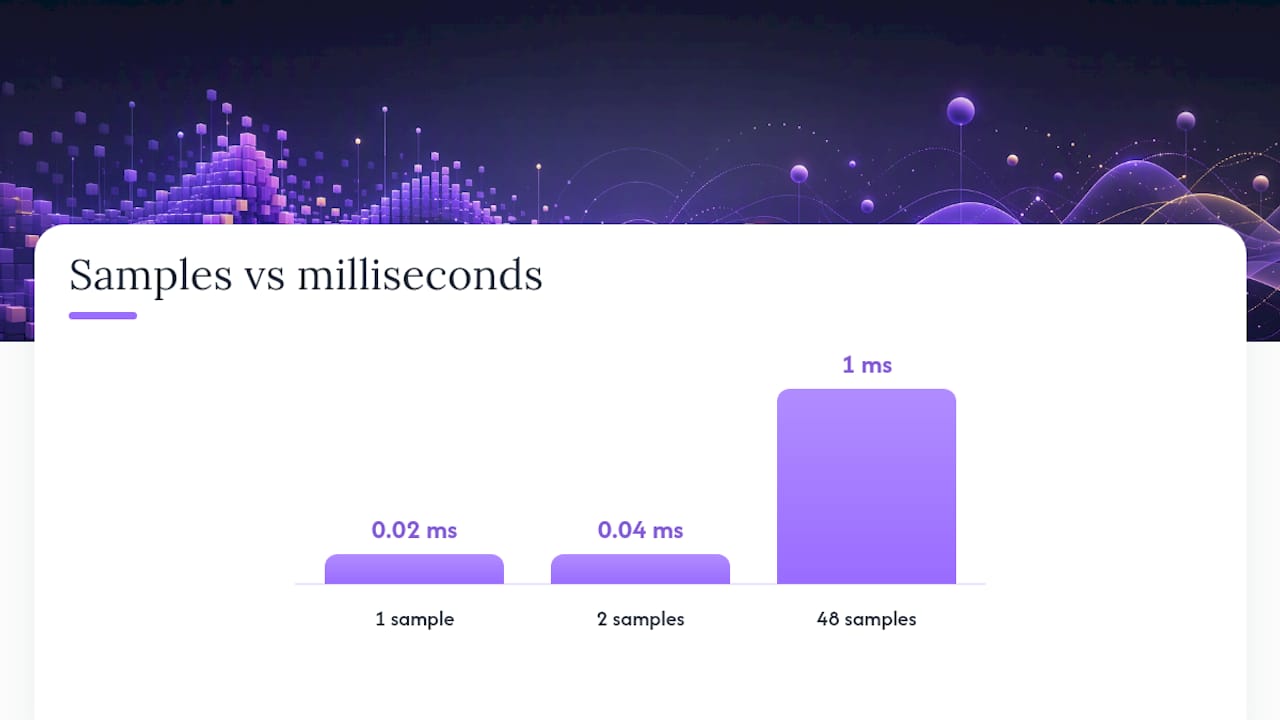
| Test with loopback and jitter metrics | Measure MAE and worst-case deviation in samples; at 48 kHz, 48 samples = 1 ms. |
Table of Contents
- Why does the audio callback give you sample accuracy?
- How do you convert beats, PPQ, and samples?
- How do you implement the processBlock scheduling pattern?
- How do you handle loop wrap and multiple events per block?
- How do you stay accurate across tempo changes and playhead jumps?
- What causes MIDI jitter outside your plugin?
- How do you measure and verify sample accuracy?
- How do you add humanization without breaking sample accuracy?
- Vector-dsp engineering checklist and production recommendations
- An engineer's perspective on where implementations actually break
- Sources
Why does the audio callback give you sample accuracy?
The fundamental problem is a clock mismatch. OS-level MIDI delivery runs on a system timer or USB poll cycle, which operates on a wall-clock timeline that has no fixed relationship to your audio buffer's sample grid. When you send a MIDI message from a non-audio thread, the host receives it at some indeterminate point relative to the current render block. You might be off by a full buffer length or more.
The audio callback is different. The host calls processBlock (or its AU/VST3 equivalent) with a precise buffer start position expressed in musical time: beat position, BPM, and sample rate. That context lets you compute exactly which sample inside the current block each event belongs to. Sample-accurate MIDI timing in AUv3 plugins makes this explicit: timing calculations must happen on the audio thread, and events must be passed back to the host as sample offsets rather than emitted immediately from any other thread.
Practical plugin threads reinforce this warning: user-space timers are driven by different system clocks and drift under OS scheduling pressure. A timer that fires every 10 ms at 120 BPM is not the same as a timer that fires every 22,050 samples at 44,100 Hz. Those two numbers look close. Under load, they diverge.
The table below shows where each timing source lives and what alignment guarantee it actually provides.
| Timing source | Thread | Alignment to sample grid | Typical jitter |
|---|---|---|---|
| OS MIDI timestamp | System / USB poll | None | 1–10 ms |
| User-space timer | Non-audio | None | Variable, OS-dependent |
| Host playhead (beat position + BPM) | Audio thread | Exact, per-buffer | 0 samples |
| AUHostMusicalContextBlock | Audio thread | Exact, per-buffer | 0 samples |
| VST3 IProcessContext | Audio thread | Exact, per-buffer | 0 samples |
A buffer at 48 kHz with a 256-sample block starts at a known sample index. Every event you schedule inside that block gets an offset from 0 to 255. That is the grid. Everything outside the audio thread is working from a different map.
How do you convert beats, PPQ, and samples?
The math is three formulas chained together. Memorize them; you will use them constantly.
samples = seconds × sampleRate
seconds = (beats / BPM) × 60
samples = (beats / BPM) × 60 × sampleRate
For PPQ-based sequences, convert ticks to beats first:
beats = ticks / ticksPerQuarterNote
MIDI beat clock defines 24 clock pulses per quarter note, which gives a fixed relationship between frames and PPQ that you can use for timecode-derived scheduling. For MIDI Time Code (MTC) quarter-frame messages, the sample interval is:
sampleInterval = sampleRate / FPS / 4
Numeric example: 48,000 Hz, 120 BPM, PPQ = 960. An event at tick 1,200 falls at beat 1.25 (1,200 / 960). Converting to seconds: (1.25 / 120) × 60 = 0.625 s. Converting to samples: 0.625 × 48,000 = 30,000 samples from the sequence start.
If bufferStartTime is 29,952 samples (block 117 at 256 samples/block), the offset inside the current block is 30,000 − 29,952 = 48 samples. Always round to the nearest integer and clamp to [0, bufferSize − 1].
Note-on and note-off pairs need separate treatment. Schedule the note-off at noteOnSampleTime + durationInSamples. Use an exclusive upper boundary for the current block (eventTime < bufferEndTime) so a note-off that lands exactly on the first sample of the next block is not emitted one block early.
| Unit | Conversion formula | Notes |
|---|---|---|
| Samples to seconds | seconds = samples / sampleRate |
Use cached sampleRate from prepareToPlay |
| Seconds to samples | samples = seconds × sampleRate |
Round to nearest integer |
| Beats to samples | samples = (beats / BPM) × 60 × sampleRate |
BPM from host playhead |
| PPQ ticks to beats | beats = ticks / ticksPerQuarterNote |
TPQ from sequence header |
| MTC quarter-frame interval | samples = sampleRate / FPS / 4 |
FPS = 24 or 30 |
How do you implement the processBlock scheduling pattern?
This is the canonical loop. Every sample-accurate MIDI engine follows this shape, whether it is a JUCE plugin, an AUv3 instrument, or a VST3 effect.
Setup (prepareToPlay / prepareToRender):
- Cache
sampleRateandmaxBufferSizefrom the host. - Initialize a persistent
sampleCounter(int64) to zero. - Pre-allocate your event list and MIDI output buffer. No heap allocations happen inside the audio thread.
- Initialize any lock-free ring buffer used to transfer incoming MIDI from the UI or MIDI input thread.
Inside processBlock / internalRenderBlock:
- Fetch the host playhead:
AudioPlayHead::CurrentPositionInfo pos; getPlayHead()->getCurrentPosition(pos); - Compute
bufferStartSamplefrompos.ppqPosition,pos.bpm, andsampleRateusing the formulas above. For AUv3, readAUHostMusicalContextBlockforcurrentBeatandtempo. - Set
bufferEndSample = bufferStartSample + numSamples. - Drain the lock-free queue: import any incoming MIDI events and convert their timestamps to absolute sample positions.
- Iterate your event list. For each event where
eventSampleTime >= bufferStartSample && eventSampleTime < bufferEndSample, computeoffset = (int)(eventSampleTime - bufferStartSample)and add it to the MIDI output buffer with that offset. - Increment
sampleCounter += numSamples.
The JUCE forum thread on precise MIDI intervals shows exactly this pattern: maintain a global sample counter, check [sampleCounter .. sampleCounter + numSamples] each block, and compute per-sample offsets for placement.
Here is a minimal pseudocode sketch:
void processBlock(AudioBuffer& audio, MidiBuffer& midi) {
    auto pos = getPlayHead()->getCurrentPosition();
    int64 bufStart = beatsToSamples(pos.ppqPosition, pos.bpm, sampleRate);
    int64 bufEnd   = bufStart + audio.getNumSamples();

    drainInputQueue(midi);  // lock-free queue → midi buffer

    for (auto& event : pendingEvents) {
        if (event.sampleTime >= bufStart && event.sampleTime < bufEnd) {
            int offset = (int)(event.sampleTime - bufStart);
            midi.addEvent(event.message, offset);
        }
    }
    sampleCounter += audio.getNumSamples();
}
Thread safety: MIDI input arrives on a non-audio thread. Never write directly into the event list from that thread. Use a lock-free ring buffer or SPSC queue (JUCE's AbstractFifo works well). The audio thread reads from the queue at the top of processBlock and converts timestamps before the scheduling loop. The LinuxSampler event pipeline uses exactly this architecture: fragment/fragmentPosition timestamps in a lock-free queue preserve sample-accurate positions through the transfer.
Pro Tip: Clear or pre-fill your MIDI output buffer at the top of every block, and never call new, delete, malloc, or any mutex inside the audio callback. Pre-allocate everything in prepareToPlay.
How do you handle loop wrap and multiple events per block?
Loop wrap is where most naive implementations drop notes. When the sequencer loops, bufferEndSample logically exceeds the loop length. Events near the loop start belong in the current block at an offset after the wrap point, not in the next block.
Detection and handling:
- Compute
loopLengthInSamples = (loopEndBeat - loopStartBeat) / BPM × 60 × sampleRate - If
bufferEndSample > loopLengthInSamples, a wrap occurs inside this block remainingFramesBeforeWrap = loopLengthInSamples - bufferStartSample- Events after the wrap point have
eventSampleTime < fmod(bufferEndSample, loopLengthInSamples); their offset =remainingFramesBeforeWrap + eventSampleTime
The Cp3 documents this explicitly: adding remainingFramesInBuffer to the offset calculation is the standard remedy for wrap-crossing events.
Multiple events per block require a while-loop pattern, not a single conditional:
while (nextEventIndex < events.size()) {
    int64 t = events[nextEventIndex].sampleTime;
    if (t >= bufStart && t < bufEnd) {
        midi.addEvent(events[nextEventIndex].message, (int)(t - bufStart));
        nextEventIndex++;
    } else break;
}
Common failure modes to guard against:
- Zero-timestamp events: Emitting with
AUEventSampleTimeImmediate(or offset 0 for every event) collapses all timing to the block boundary. Always compute the real offset. - Off-by-one on note-off: Use
eventTime < bufferEndTime(exclusive), not<=. A note-off at the exact boundary belongs to the next block. - Skipped events on transport jump: If the host repositions the playhead mid-session,
bufferStartSamplejumps. Events between the old and new positions are skipped. Keep your event index stateful and reset it on transport changes.
How do you stay accurate across tempo changes and playhead jumps?
Tempo changes break precomputed sample positions. An event at beat 4.0 that was 96,000 samples from the start at 120 BPM is now 80,000 samples from the start at 144 BPM. If you cache sample positions at sequence load time, they are wrong the moment the user edits the tempo map.
The reliable approach: store events in beat coordinates, not sample coordinates. Recompute eventSampleTime from beat position and current BPM at the top of every processBlock. This costs a few multiplications per event per block, which is negligible.
For tempo changes inside a single buffer, split the block into sub-blocks at the change point. Most hosts report tempo changes at a specific beat position; compute how many samples into the current block that beat falls, process the first sub-block at the old BPM, then the remainder at the new BPM.
Transport jumps (stop/start/rewind) require flushing pending events. When pos.isPlaying transitions from true to false, send note-offs for any held notes and reset your event index. When playback resumes, recompute bufferStartSample from the new ppqPosition rather than from sampleCounter. The two values will not match after a jump.
Practical code hints:
- Cache
lastBPMandlastPPQPositionbetween blocks - If
abs(pos.bpm - lastBPM) > 0.001orabs(pos.ppqPosition - lastPPQPosition - expectedAdvance) > 0.01, treat it as a tempo or position change and recompute - Prefer
pos.ppqPosition + pos.bpmoversampleCounterfor absolute position; usesampleCounteronly for relative offset arithmetic within a block
Hosts differ in how they report tempo changes. Ableton Live reports the new BPM at the start of the block in which the change takes effect. Some hosts report it mid-block via automation. When in doubt, re-derive sample positions from beat coordinates every block.
What causes MIDI jitter outside your plugin?
A perfect scheduling engine cannot fix a jittery driver. The chain has four links: your plugin, the host, the OS/driver, and the hardware interface. Jitter at any link propagates downstream.
Common hardware and OS causes:
- USB polling: Standard USB MIDI polls at 1 ms intervals. At 48 kHz, 1 ms = 48 samples of potential jitter before the signal even reaches your driver.
- Driver timestamp support: Not all interfaces generate hardware timestamps. Without them, the driver assigns a timestamp when the USB packet is processed, not when the note was physically played. MOTU interfaces and similar professional devices support hardware timestamping; check your interface's driver documentation and firmware version.
- CoreMIDI vs. Windows driver stack: CoreMIDI on macOS generates timestamps in host time units that map cleanly to audio sample time. Windows MIDI drivers vary; the newer Windows MIDI Services (available in Windows 11) improve timestamp fidelity over the legacy WinMM stack.
- Audio interface clock drift: If your audio interface and MIDI interface run on separate clocks, drift accumulates over long sessions. Use a single interface or sync clocks via word clock.
Best-practice hardware checklist:
- Use a professional audio/MIDI interface with hardware timestamping (MOTU, RME, and similar)
- Keep drivers and firmware current; manufacturers regularly fix timing bugs
- Use ASIO (Windows) or Core Audio (macOS) with the smallest buffer size your CPU tolerates
- Avoid USB hubs between your interface and the host machine
- Do not use user-space timers or
Sleep()-based loops for MIDI scheduling
The Digital Performer getting-started documentation recommends high-quality MIDI interfaces with current drivers as a baseline requirement for accurate MIDI timestamps. Projects like the Raspberry Pi Pico USB MIDI processor demonstrate that inspecting USB MIDI packets at the hardware level reveals how much timestamp fidelity depends on the interface itself.
For hardware vs. software timing tradeoffs, the short version is that hardware clocking is deterministic in ways software scheduling cannot replicate without hardware timestamp support.
How do you measure and verify sample accuracy?
Testing is not optional. Subjective listening cannot detect 2-sample jitter at 48 kHz (roughly 0.04 ms). You need numbers.
Recommended test methods:
- MIDI-to-audio loopback: Route your plugin's MIDI output to a simple click generator (a short sine burst on note-on). Record the audio output. Measure the distance in samples between expected and actual click positions across many events.
- DAW export comparison: Export a fixed-BPM sequence to audio, then compare the exported waveform against a reference click track using a sample-level diff tool. Ableton Live's export engine is deterministic enough to use as a reference.
- Logic analyzer / oscilloscope: For external MIDI hardware, connect a logic analyzer to the MIDI DIN or USB lines. Measure the time between the expected event (derived from your sequence) and the actual electrical transition.
- Headless CI test: Run your plugin in a headless test harness with a deterministic sequence and a fixed-seed RNG. Assert that all events land within a threshold (e.g., ±1 sample).
Jitter metrics to report:
- Mean absolute error (MAE): Average |measured − expected| across all events, in samples and milliseconds
- Standard deviation: Spread of timing errors; a low MAE with high SD indicates occasional large outliers
- Worst-case deviation: The single largest error in the test run
Unit conversion: at 48 kHz, 1 ms = 48 samples. A worst-case deviation of 48 samples is 1 ms. DAWs typically tolerate a few milliseconds of MIDI jitter before it becomes audible on percussive material; true sample accuracy means worst-case deviation under 1 sample (0.02 ms at 48 kHz).
For studio-level test setups, Sound Lab and similar professional environments provide the controlled monitoring chains needed to isolate plugin-level jitter from room and monitoring artifacts.
How do you add humanization without breaking sample accuracy?
The key is separating the engine from the creative layer. Your scheduling engine computes exact sample positions. Humanization applies a deterministic offset to those positions before emission, not by relying on imprecise timers.
Implementation approach:
- Convert all events to sample positions first (the engine layer)
- Apply micro-timing offsets at scheduling time:
finalSampleTime = engineSampleTime + humanizationOffsetInSamples - Generate offsets from a seeded RNG or a precomputed offset table, not from wall-clock noise
At 48 kHz, a ±1–12 sample offset corresponds to roughly ±0.02–0.25 ms. That range covers subtle groove and feel without audible flamming. Larger offsets (±240–480 samples, or ±5–10 ms) are appropriate for swing and laid-back feels on slower material.
The Ardour manual frames humanization as a deliberate aesthetic layer applied on top of a precise timing engine, with deterministic micro-timing controls to avoid a robotic sound while preserving scheduling accuracy. Seeded RNG is the practical implementation: the same seed produces the same humanization on every playback, so automation and recall are reproducible.
Velocity variation follows the same principle. Apply it at event construction time, not by modifying the engine's timing. Keep humanization parameters exposed as plugin parameters so they are automatable and recallable. For UI implementation of these controls, the design goal is editable, automatable parameters that do not touch the scheduling math.
Vector-dsp engineering checklist and production recommendations
This is the checklist Vector-dsp uses internally when reviewing a MIDI scheduling implementation before shipping.
Core implementation checks:
- Cache
sampleRate,maxBufferSize, and playhead blocks inprepareToPlay; never query them inside the audio callback - Maintain a persistent
sampleCounter(int64) across blocks; reset only on transport stop or sample-rate change - Use a lock-free SPSC queue for all MIDI input from non-audio threads; the audio thread reads and converts timestamps at the top of every block
- Store sequence events in beat coordinates; derive sample positions each block from current BPM and beat position
- Use host-timestamped MIDI output when available; never emit with zero-offset or immediate timestamps
Performance tips:
- Pre-allocate all event lists and MIDI buffers in
prepareToPlay; zero heap activity inside the audio thread - Batch MIDI output calls: collect all events for the block, then write them to the output buffer in one pass
- In debug builds, log per-block jitter metrics (MAE, worst-case deviation) to a lock-free log buffer; read it from the UI thread for display
Suggested internal tests:
- Automated CI test: headless sequence with deterministic RNG, assert MAE < 1 sample and worst-case < 2 samples across 10,000 events
- Loop-wrap smoke test: sequence that crosses a loop boundary every block; verify no dropped note-ons or note-offs
- Tempo-change regression: insert a tempo change mid-sequence; verify events after the change land at correct sample positions
For deeper architectural context, Vector-dsp's audio plugin architecture guide covers threading, buffering, and prepareToPlay patterns that underpin this checklist. The VST3 plugin development guide covers host-specific considerations for scheduling events in VST3 contexts.
The single most common mistake in MIDI plugin development is emitting events with a zero sample offset or using
AUEventSampleTimeImmediatefor every note. It works in simple test cases and fails under any real-world load. Compute the offset. Every time. No exceptions.

Vector-dsp's ToneLab plugin is built on these same engineering principles: real-time low-latency DSP, host-timestamped event scheduling, and pre-allocated audio thread resources. It is a concrete example of what this checklist produces in a shipping product.
An engineer's perspective on where implementations actually break
The articles and forum threads on this topic all agree on the what: schedule inside the audio callback, compute sample offsets, handle loop wrap. Where they diverge is on the when it breaks in production.
The failure mode that costs the most debugging time is not the zero-timestamp mistake. It is the tempo-change edge case combined with a stateful event index. A developer implements the canonical pattern, ships it, and then a user reports that notes drop after a tempo automation event. The bug is almost always the same: event sample positions were precomputed at load time, the tempo changed, and the precomputed positions are now wrong. The event index advances past events that were never emitted because their stale sample positions no longer fall in any buffer window.
The fix is not complicated. Store events in beats. Recompute sample positions every block. The CPU cost is trivial. The correctness gain is total.
A second underappreciated issue is the interaction between humanization and loop wrap. If you apply a humanization offset that pushes an event past the loop boundary, the event may land in the wrong loop iteration or be dropped entirely. Apply humanization after loop-wrap detection, not before. The order matters.
For MIDI processing in a production plugin context, the architecture decisions made at the design stage determine whether these edge cases are fixable in a patch or require a structural rewrite.
Sources
The sources below are the primary technical references behind this guide. Each one covers a specific layer of the implementation.
- Cp3
- Event Processing Pipeline | linuxsampler/linuxsampler | DeepWiki
- Ardour manual - performance and editing notes