Plugin CPU Optimization for Music Producers and Engineers
Plugin CPU Optimization for Music Producers and Engineers
Six targeted workflow changes will cut plugin CPU load and stop dropouts faster than any hardware upgrade. Route shared effects to a single aux return, raise your buffer for mixing, freeze heavy tracks, close plugin GUIs, identify expensive instances with your DAW's performance meter, and kill background apps. That sequence, drawn from PreSonus and Image-Line technical documentation and the workflow research behind Vector-dsp's DSP design philosophy, addresses the most common causes of core spikes before you spend a dollar on new gear.
Quick action list (run in this order):
- Increase buffer size for mixing sessions (start at a moderate level on Intel/AMD; a lower level on Apple silicon)
- Route identical reverbs, delays, and compressors to a shared aux/return track
- Freeze or bounce the three heaviest tracks in your session
- Close every open plugin GUI you are not actively editing
- Use your DAW's per-core performance meter to find the worst offenders
- Quit all background apps and set OS power mode to High Performance
TL;DR: Most producers can eliminate audible dropouts and cut peak core spikes within 15–30 minutes using routing and buffer changes alone, with no new hardware required.
Table of Contents
- How do DAWs and plugins actually consume CPU?
- Routing tactics that cut CPU without changing a single plugin
- DAW settings and multi-core best practices
- Workflow controls that free CPU without losing quality
- How to choose CPU-efficient plugins, and where ToneLab fits
- A 10-step rundown you can run right now
- Authoritative sources for deeper reading
- Key Takeaways
- Why workflow-first CPU management beats reflexive hardware upgrades
- ToneLab by Vector-dsp: built for sessions where CPU headroom matters
How do DAWs and plugins actually consume CPU?
Your OS task manager and your DAW's performance meter are measuring two different things. The OS shows aggregate CPU load across all cores. Your DAW measures audio processing time relative to the buffer deadline on each core. You can have 40% OS CPU usage and still get dropouts, because one core missed its audio deadline while the others sat idle.
The reason single cores spike is serial processing. Every plugin on a single mixer channel is processed sequentially by one core. A channel strip with an EQ, compressor, saturation plugin, and reverb insert is a four-deep serial chain on one thread. Add a second reverb insert and that core's deadline gets tighter, not spread across the machine.
Common CPU drivers to watch:
- Convolution reverbs (especially long IR tails at high sample rates)
- High-polyphony software instruments with many simultaneous voices
- Oversampling modes set to 4x or 8x inside effects plugins
- Open plugin GUI windows drawing frames in real time
- Bridged 32-bit plugins running inside a 64-bit DAW
Pro Tip: Open your DAW's dedicated performance monitor before touching any system setting. In Studio One, it's the Performance Monitor panel. In FL Studio, double-click the CPU indicator at the top of the window to see per-plugin load. In Ableton Live, use the Performance Impact view in Session View's mixer section. These meters tell you exactly which channel or plugin to address first.
Routing tactics that cut CPU without changing a single plugin
Routing identical effects to one shared aux return is almost always more CPU-efficient than inserting the same plugin on every track. One instance of a reverb on a return track does the work that four insert instances would otherwise do, and consolidating effects on a single return is standard practice in professional mixing for exactly that reason.
The practical pattern: four tracks send to one return with a single reverb instance, each at a different send level. Compare that to four tracks each carrying their own reverb insert. The CPU cost of the second approach is roughly four times higher for the same acoustic result. The same logic applies to bus compression on a subgroup and parallel saturation lanes.
Routing is the first lever. Before you freeze a track or raise your buffer, ask whether you have the same plugin instantiated on five channels when one return would do the same job.
Edge cases exist. If each track needs a meaningfully different plugin state (a short room on drums, a long hall on pads), a shared return won't work cleanly. In that case, use two returns with trimmed settings rather than five inserts. Pre-fader sends give you consistent levels regardless of fader automation, which also makes freezing and flattening those tracks cleaner later.
Pro Tip: Use pre-fader sends to your reverb and delay returns. It keeps send levels stable when you automate the source fader, and it makes the return track trivial to freeze independently.
For a deeper look at mixer track organization and multi-core routing patterns, the Vector-dsp producer guide covers the architecture in detail.
DAW settings and multi-core best practices
Set your buffer and threading based on the task. Low buffer (64–256 samples) for tracking, where latency matters. Higher buffer (512–1024 samples) for mixing, where it doesn't. FL Studio recommends starting at a low sample buffer on Apple silicon and a moderate level on Intel/AMD Windows systems, then incrementing upward until CPU load drops to a stable level.
The linked-track pitfall is the most overlooked multi-core issue. When mixer tracks are linked or grouped with shared send dependencies, the DAW cannot split their processing across cores. Linked tracks create dependencies that concentrate work on a single thread, which is why you can see one core maxing out while overall CPU looks fine. The fix is routing high-CPU plugins to independent mixer tracks with no shared send channels.
Settings checklist for recording sessions:
- Buffer: 64–256 samples
- ASIO driver selected (Windows); Core Audio (macOS)
- Smart Disable enabled for idle plugins
- Background apps closed
- OS power mode: High Performance
Settings checklist for mixing sessions:
- Buffer: 512–1024 samples (Intel/AMD) or 256–512 (Apple silicon)
- Dropout Protection or Device Block Size set to a safe level in Studio One
- Plugin load balancing enabled only if one core is visibly spiking (Cakewalk/SONAR: plug-in load balancing adds overhead when not needed)
- Unused inputs/outputs disabled in audio interface settings
- Mixer tracks routed independently for multi-core parallelism
Workflow controls that free CPU without losing quality
Disciplined project hygiene, specifically freeze/bounce, closing GUIs, and disabling unused plugins, typically delivers the largest practical CPU gains in a real session. Engineers consistently cite freezing tracks and closing plugin windows as their primary tools, not hardware.
When to freeze vs. bounce:
- Freeze when you might need to tweak the source later (non-destructive, reversible).
- Bounce/commit when the sound is locked and you want the CPU freed permanently.
- Name frozen audio with the original track name and date so you can find the source quickly.
- Unfreeze one track at a time on slower machines to make edits, then re-freeze.
GUI overhead is real and measurable. Closing plugin windows reduces the GPU and CPU draw from frame rendering. Test it yourself: open 10 plugin GUIs simultaneously and watch your DAW's CPU meter, then close them all and compare. The drop is often visible within seconds.
Additional housekeeping: disable unused audio inputs and outputs in your interface settings, set Windows power mode to High Performance or disable sleep on macOS, and match your project sample rate to your interface. Higher sample rates like 96 kHz or 192 kHz use significantly more CPU than 44.1 kHz for no audible benefit in most production contexts.
Pro Tip: Keep a simple text note inside your DAW project called "Heavy Plugins" listing your top five CPU consumers and their track names. When you hit a dropout, you know exactly what to freeze first without hunting through the performance meter.
How to choose CPU-efficient plugins, and where ToneLab fits
Pick plugins that expose efficiency controls: adjustable oversampling, voice count limits, algorithm quality modes, and a headless or minimal-GUI option. Native 64-bit formats (VST3, AU, AAX) run leaner than bridged 32-bit wrappers, which add roughly 2% CPU overhead per instance and can cause instability.
What to evaluate before buying:
- CPU cost per voice at your working sample rate
- Oversampling options (can you set it to 1x for mixing, 2x only for final render?)
- GUI vs. headless mode availability
- Plugin format: VST3 or AU preferred over legacy VST2
- Multi-lane or parallel processing architecture
A plugin that lets you dial oversampling down to 1x during tracking and back up to 4x for final render gives you the same quality ceiling with a fraction of the live CPU cost.
ToneLab from Vector-dsp is built around exactly these criteria. Its multi-lane parallel effects architecture processes independent signal paths without the serial-chain bottleneck that spikes single cores. Per-lane EQ targeting means you apply processing only where it's needed, not across the full signal. The low-latency DSP design keeps real-time performance stable even in dense sessions, and native VST3, AU, and AAX support means no bridging overhead. For producers evaluating plugin architecture efficiency, ToneLab's design directly addresses the serial-processing problem described earlier in this guide.
To benchmark any plugin: create a test project with a single instance, play a dense patch, and read your DAW's per-core meter. Then duplicate the instance to five channels and compare. That delta tells you the real per-instance cost before you commit it to a full session.
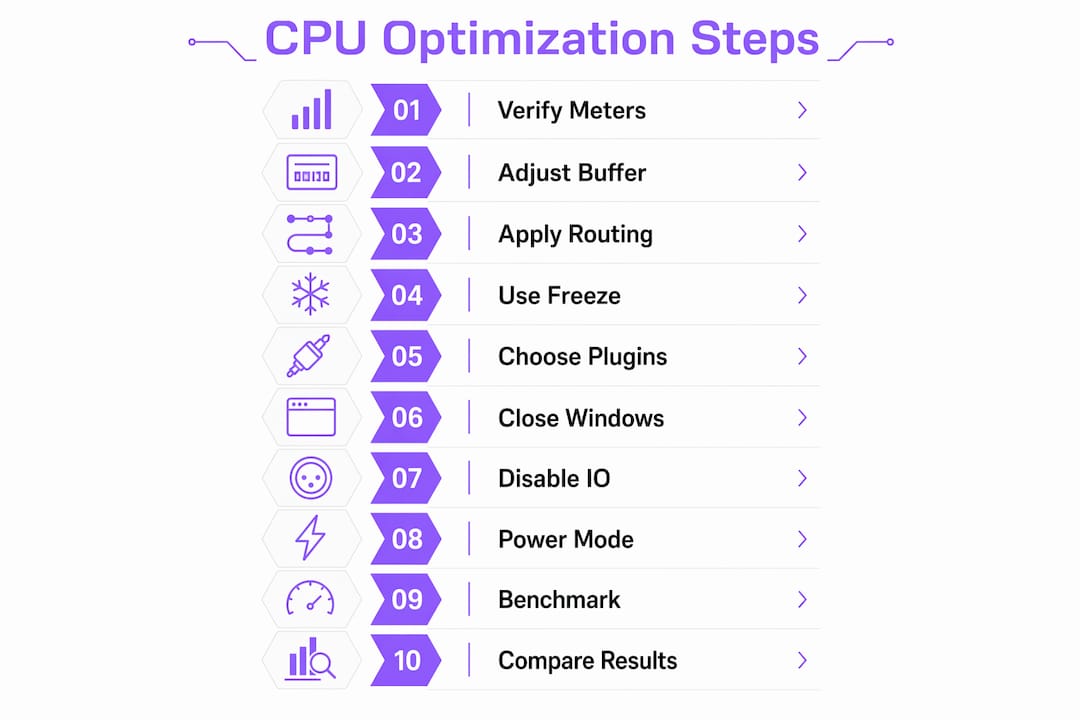
A 10-step rundown you can run right now
Follow these in order. Most sessions stabilize within 5–30 minutes.
| Step | Action | Time estimate |
|---|---|---|
| 1. Verify meters | Open DAW performance meter; note worst core | 30 seconds |
| 2. Adjust buffer | Set to 1024 samples (mixing) or 256 (tracking) | 1 minute |
| 3. Driver/power check | Select ASIO (Windows); set OS to High Performance | 2 minutes |
| 4. Close background apps | Quit browser, streaming, and startup apps | 1 minute |
| 5. Route heavy effects to returns | Move shared reverbs/delays to aux tracks | 5–15 minutes |
| Freeze heavy tracks | Freeze top 3 CPU consumers from performance meter | 2–10 minutes |
| Reduce oversampling and polyphony | Set oversampling to 1x; lower voice counts | 2–5 minutes |
| 8. Close all plugin GUIs | Close every open plugin window | 30 seconds |
| Disable unused plugin formats | Remove bridged/32-bit instances; replace with native | 5–10 minutes |
| 10. Final verification | Re-read DAW meter; compare before/after core load | 1 minute |
Record your DAW performance meter reading before step 1 and after step 10. The before/after comparison is the only honest measure of whether the session is actually more stable.
Authoritative sources for deeper reading
These are the primary technical references behind this guide. Go here when you need DAW-specific confirmation of a setting.
- PreSonus Studio One CPU guide: Covers Device Block Size, Dropout Protection, and the Studio One Performance Monitor in detail.
- Image-Line FL Studio optimization docs: Buffer recommendations for Apple silicon vs. Intel/AMD, Smart Disable setup, and multi-core routing rules.
- Cakewalk SONAR plug-in load balancing: When to enable load balancing and its overhead trade-offs.
- EDMProd latency and CPU tips: Practical buffer and sample rate guidance applicable across DAWs.
- DepartureMusic engineer workflows: Real-session techniques from working engineers, including freeze/commit and plugin consolidation.
- Ableton Live CPU monitoring: Explains the difference between Average CPU and Current CPU meters, and how Live calculates audio processing time.
Key Takeaways
Routing-first CPU management, combined with disciplined buffer strategy and freeze/bounce habits, resolves most plugin CPU problems without touching your hardware.
| Point | Details |
|---|---|
| Route before you freeze | Move shared effects to a single aux return before freezing tracks; it often eliminates the problem entirely. |
| Buffer by task | Use low buffers (64–256 samples) for tracking, higher buffers (512–1024) for mixing to balance latency and CPU load. |
| Freeze and close GUIs | Freezing heavy tracks and closing open plugin windows are the fastest single-session CPU wins available. |
| Prefer native 64-bit formats | VST3, AU, and AAX plugins run leaner than bridged 32-bit wrappers; avoid bridging wherever possible. |
| ToneLab for efficiency | Vector-dsp's ToneLab uses multi-lane parallel architecture and per-lane EQ targeting to avoid the serial-chain bottlenecks that spike single cores. |
Why workflow-first CPU management beats reflexive hardware upgrades
The instinct to buy more RAM or a faster CPU is understandable. A dropout mid-session feels like a hardware problem. But in most cases, the bottleneck is architectural, not computational. One core is maxed out while three others sit at 20%. No amount of additional RAM fixes a serial plugin chain on a single thread.
The workflow-first approach is also reproducible. A routing template you build once, with shared reverb returns and independent mixer tracks, carries forward to every future session. A hardware upgrade raises the ceiling but doesn't change the architecture, so the same bad habits hit the new ceiling faster than you'd expect.
That said, hardware upgrades are justified when you've applied every routing and buffer fix, your per-core meters are consistently at 90%+ across multiple cores simultaneously, and you're working at professional session sizes (100+ tracks, dense orchestral templates). That's a real bottleneck. But most producers I see hitting dropouts are nowhere near that point. They have a 40-track session, six instances of the same reverb on individual tracks, and every plugin GUI open. Fix the routing first.
Vector-dsp's approach to DSP design, building plugins like ToneLab with parallel lane architecture and exposed efficiency controls, reflects the same philosophy: the tool should work with your system's architecture, not against it. For more on the technical reasoning, the Vector-dsp blog covers DSP design and workflow in depth.
ToneLab by Vector-dsp: built for sessions where CPU headroom matters

ToneLab is Vector-dsp's multi-lane parallel effects plugin, designed from the ground up for real-time DSP efficiency. Where a conventional insert chain stacks processing serially on one core, ToneLab's parallel lane architecture distributes the work, keeping individual core loads lower in dense sessions. Per-lane EQ targeting means processing applies only to the signal path that needs it. The plugin ships natively in VST3, AU, and AAX, so there's no bridging overhead regardless of your DAW.
It fits directly into the workflows covered in this guide: route ToneLab to a shared return track, freeze the return when the sound is locked, and re-open only when you need to adjust. A free demo version is available so you can benchmark it against your current session before committing. Try ToneLab and run it through the 10-step checklist above to see where it lands on your per-core meter.