Mid/Side Processing: 3 Engineer Tested Mix Recipes That Preserve Mono
Mid/side processing splits a stereo signal into a center channel (mid) and a difference channel (side), letting you EQ, compress, or widen each independently instead of treating the whole stereo field as one block. Use it to tighten low-end energy in the center, add air to the sides, or fix masking that's cluttering your mix, without smearing changes across the entire stereo image. It belongs mostly on buses and masters for global balance, applied in small, deliberate moves rather than heavy-handed sweeps.
TL;DR:
- Mid/side processing allows precise EQ and compression targeting the middle or the stereo difference, helping fix masking and enhance stereo imaging without smearing changes.
- Applying mid/side moves on buses or during mastering is most effective for fixing phase issues, reducing mud, and increasing perceived width, but requires careful mono checks and level matching.
- Low-end side-channel filtering (80–150 Hz) and gentle high-frequency boosts (7–12 kHz) are common initial moves, with caution about over-boosting which can collapse in mono.
- Careful use of mid/side compression targets stable center elements and preserves stereo width, but over-compression can lead to phase cancellation and a hollow sound in mono.
- Cross-checking on headphones, monitors, and in mono is essential, especially since misaligned phase or excessive side gain can cause thinness or instability in the mix.
Table of Contents
- What Is Mid/Side Processing, Exactly?
- How Mid/Side Routing Actually Works in a DAW
- Quick-Start Mid/Side Setup Recipes
- Mid/Side EQ: Which Bands to Touch and Why
- Mid/Side Compression: Controlling Center and Space Separately
- Fixing Phase Issues and Verifying Mono Compatibility
- A DSP Engineer's Notes on Mid/Side in Practice
- Mid/Side Beyond EQ and Compression
- Advanced Mid/Side Techniques Worth Learning Next
- Real-World Mid/Side Fixes on Common Mix Problems
- Does Mid/Side Translate Across Headphones, Mono, and Surround?
- When Mid/Side Belongs in Your Core Workflow
- How Vector DSP Approaches Mid/Side-Ready Plugin Design
- Sources
What Is Mid/Side Processing, Exactly?
Mid/side processing isn't a plugin category. It's a way of encoding audio so two channels represent something other than left and right.
The math is simple. Mid equals left plus right (M = L + R), which captures everything that's identical or nearly identical between the two channels: your kick, bass, lead vocal, snare, anything panned dead center. Side equals left minus right (S = L − R), which captures everything that differs between the channels: reverb tails, stereo synths, double-tracked guitars, room ambience. Decoding reverses the process, matrixing mid and side back into left and right so the signal plays normally again.
Perceptually, this maps almost exactly to how you already hear a mix. The mid channel is your foundation, the stuff that anchors the track and needs to translate on a phone speaker. The side channel is the space around that foundation, the width and air that make headphones feel immersive. When you EQ or compress mid and side separately, you're not making a stereo-wide change. You're making a change to only the "center" or only the "space," which is a much more surgical move than anything you can do with a standard left/right EQ.
The technique didn't start in a plugin. Mid/side originated as a microphone technique, pairing a cardioid mic (mid) with a figure-8 mic (side) to capture a variable-width stereo image from two capsules. Engineers later realized the same sum/difference math could be applied entirely inside the digital domain, no microphones required.
A few things worth keeping straight as you work:
- Mid is not "mono." It's the sum of what's common to both channels, and it still carries stereo information once decoded.
- Side is not "reverb." It's whatever doesn't match between left and right, which could be a hard-panned guitar just as easily as a room mic.
- A fully mono source has zero side signal. Boosting the side channel on that source does nothing, which is a useful diagnostic in itself.
How Mid/Side Routing Actually Works in a DAW
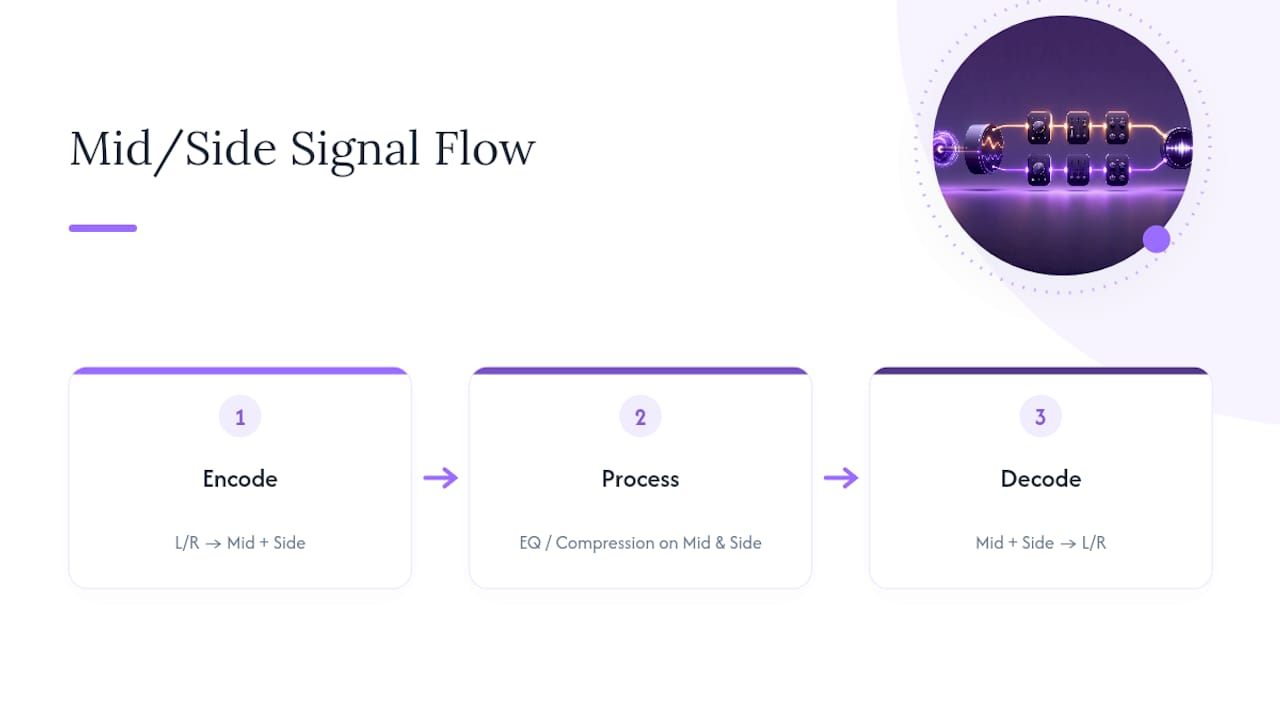
Every mid/side workflow follows the same three-step logic: encode, process, decode. You convert left/right into mid/side, apply your EQ or compressor to those two new channels, then convert back to left/right before the signal hits your output. Some tools skip the visible steps entirely by handling the matrixing internally, but the underlying signal flow is the same either way.
1. Native mid/side mode. Plugins like FabFilter Pro-Q 3 or Ableton's EQ Eight offer a built-in M/S mode you select from a dropdown or button. The plugin handles encode and decode internally, so you just pick "Side" as your channel target and dial in your band. This is the cleanest option when it's available, since there's no risk of forgetting to decode before the signal moves downstream.
2. The M/S sandwich. If your processor doesn't have native M/S support, you can build the sandwich yourself: an encoder plugin (Voxengo MSED is a common free choice) converts the signal to mid/side, your EQ or compressor works on those two channels as if they were left and right, and a matching decoder plugin converts back before the chain continues. This is more fiddly, but it works with literally any stereo plugin, including ones from decades ago with no M/S awareness at all.
3. The parallel-chain trick. In DAWs without a dedicated encoder, you can duplicate your track or bus, set one copy's utility or width control to isolate the mid content and the other to isolate the side content, process each separately, then sum them back together on a return bus. It's more manual routing than the other two methods, but it's fully achievable in Ableton Live without buying anything extra.
A few practical habits will save you from confusing yourself mid-session. Level-match before and after any M/S chain, to avoid perceptual bias from changes in loudness. Turn off automatic makeup gain on compressors when doing M/S work, since gain compensation calculated on a mid or side signal in isolation often doesn't translate correctly once decoded back to stereo. And solo the mid or side channel while you're dialing in a move, but always audition the full decoded mix before committing, since isolated soloing can make a boost sound more dramatic or more subtle than it actually is in context.
Pro Tip: Bypass your entire M/S chain every 60 seconds while you work, not just at the end. Ears adapt to added width or brightness within a couple of minutes, and what sounded like a tasteful side boost can quietly turn into an overcooked one if you never A/B against the untouched signal.
Quick-Start Mid/Side Setup Recipes
These three starting points cover the situations where mid/side processing earns its place fastest: the mix bus, the drum bus, and wide stereo instruments like pads and synths. Treat every number here as a starting point, not a rule, and always confirm the result against your reference monitors and headphones.
Mix bus recipe:
- High-pass the Side channel with a gentle filter starting in the low-frequency range to remove low-end phase smear that muddies mono playback.
- Add a gentle side high-shelf, roughly +0.5 to +1.5 dB starting around 7 to 12 kHz, for a sense of air without brightening the center.
- If the mix feels buried, try a small mid presence boost around 2 to 4 kHz rather than reaching for the master EQ.
Drum bus recipe:
- Compress the Mid channel at a 2:1 to 3:1 ratio to keep kick and snare stable and centered under heavier arrangement sections.
- Compress the Side channel gently, with a slower attack and lower ratio, since overhead and room mics live here and aggressive settings will cause audible pumping.
- Check the drum bus in mono after this step specifically. Side compression artifacts hide well in stereo and reveal themselves fast in mono.
Stereo pad or synth recipe:
- High-pass the Side channel between 200 and 700 Hz depending on the patch, since wide synths often carry low-frequency content on the sides that smears the low-mid range.
- Add a small side-only boost in the upper frequencies for sparkle, keeping the move under a couple of decibels so it reads as air rather than hiss.
Mastering engineers who work with mid/side tend to recommend shelf moves in the 0.5 to 2 dB range rather than anything more aggressive, and that guidance holds just as well one stage earlier, on a mix bus or stereo instrument group.
Mid/Side EQ: Which Bands to Touch and Why
Mid/side EQ settings work because they let you solve two completely different problems with one plugin instance, instead of compromising between them on a stereo band.
The single most common move in the entire technique is high-passing the side channel somewhere in the 80 to 150 Hz range. Low frequencies rarely carry useful stereo information. What they do carry is phase-shifted energy between left and right that reads as mud on mono playback and as a vague, unfocused low end even in stereo. Icon Collective's engineering staff point to this range specifically as the fix for exactly that problem, and it's one of the few M/S moves you can apply almost by default. Dense, bass-heavy genres like hip-hop or dance music often sit better with the cutoff closer to 100 to 150 Hz, since more of the low-end identity needs to stay locked in the mid channel. Airier acoustic or orchestral material can sometimes go lower, closer to 80 Hz, since there's less low-end energy competing for space in the first place.
Once the low end is cleaned up, the sides become a canvas for width and air rather than weight. A gentle high-shelf starting around 7 to 12 kHz, lifted by half a decibel to a decibel and a half, adds a sense of openness that doesn't touch the center image at all. This is different from boosting the same range on a stereo bus, which brightens everything, including the vocal or lead instrument you might not want brighter. Keep the Q wide and the gain conservative here. A narrow, aggressive side boost tends to sound like hiss rather than air, and it's one of the fastest ways to introduce listening fatigue over a full track.
The mid channel deserves its own attention beyond just "leave it alone." A small boost around 2 to 4 kHz on the mid channel can push vocal or lead presence forward without widening anything, which matters when a stereo-wide presence boost would also lift reverb tails and backing elements you didn't intend to bring up. On the cutting side, a mid cut somewhere around 200 to 400 Hz is one of the more useful moves for removing boxiness or mud that's specifically coming from center-panned elements like bass, kick, or rhythm guitar, without thinning out the stereo elements sitting on the sides.
A short reference table for where these moves typically live:
| Move | Channel | Typical range | Typical gain |
|---|---|---|---|
| Low-end cleanup | Side | 80–150 Hz (high-pass) | N/A (filter) |
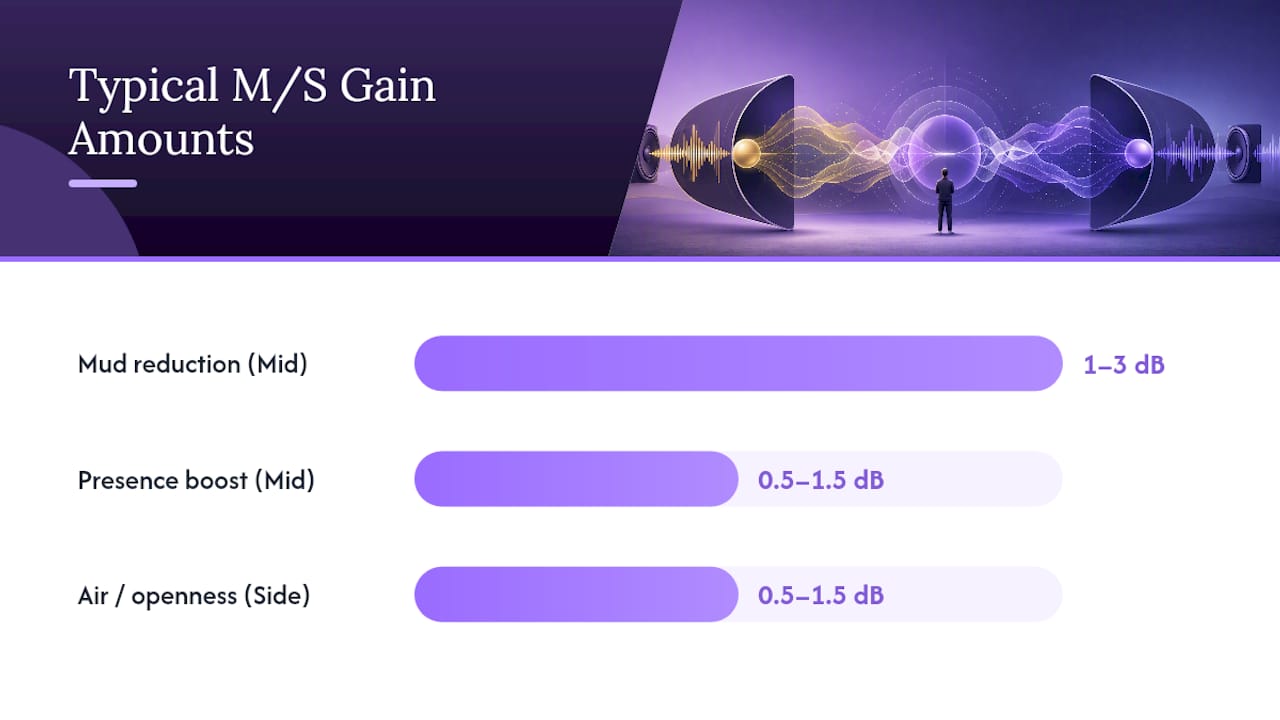
| Mud reduction | Mid | 200–400 Hz (cut) | 1–3 dB |
| Presence boost | Mid | 2–4 kHz | 0.5–1.5 dB |
| Air / openness | Side | 7–12 kHz (shelf) | 0.5–1.5 dB |
A caution worth repeating because it trips up a lot of engineers new to the technique: broad, generous boosts on the side channel are the number-one cause of mixes that sound exciting in stereo and collapse in mono. If a side shelf sounds thin or harsh once you fold to mono, the fix usually isn't more EQ. It's less gain on the move you already made.
Pro Tip: When cutting mud on the mid channel, solo the mid signal by itself first and sweep slowly through 150 to 500 Hz. The exact frequency that sounds boxy varies by song, and a narrow, well-placed 2 dB cut will almost always beat a wide, cautious 1 dB cut across the whole range.
Mid/Side Compression: Controlling Center and Space Separately
Mid/side compression solves a problem that stereo bus compression can't: the center and the sides usually need different dynamic treatment, and squashing them together forces a compromise neither one wants.
The mid channel typically holds your most dynamically important elements, the kick, bass, and lead vocal, and these usually benefit from a firmer hand. The side channel holds ambience, width, and stereo movement, and heavy compression there tends to flatten exactly the quality you're trying to preserve.
-
Set the Mid compressor first, using a ratio around 2:1 to 3:1 with a medium attack time. The goal is stability, keeping center elements consistent through louder and quieter passages, not squashing them into a flat line.
-
Set the Side compressor separately and more conservatively, aiming for a lower ratio and gentler gain reduction overall, roughly 1 to 3 dB on average across the track. Slower attack times on the side compressor matter here specifically, since a fast attack clamps down on stereo transients that give a mix its sense of width, and once that transient information is gone, it doesn't come back in the mix.
-
Check your make-up gain settings on both compressors before trusting your ears. Automatic makeup gain calculated separately on mid and side signals can quietly shift the balance between them once the signal decodes back to stereo, since the plugin has no way of knowing how its two compensations will interact after the matrix reverses. Manual, level-matched make-up gain, confirmed with a quick bypass A/B, is more reliable than trusting an algorithm that's working blind on half the stereo picture.
Watch total gain reduction across both channels combined, not just each one individually. Two compressors each pulling 3 dB feels moderate on their own, but stacked across mid and side, that's enough combined dynamic change to noticeably shift the perceived width and depth of the mix, sometimes in a direction you didn't intend.
Fixing Phase Issues and Verifying Mono Compatibility
Mid/side processing is powerful precisely because it can change stereo width, and that same power makes it the fastest way to accidentally break mono playback if you're not checking your work.
The telltale symptom is a mix that sounds full and wide in stereo but hollow, thin, or oddly quiet the moment you fold it to mono. This happens because a side channel boost can push certain frequencies out of phase between left and right, and mono summing cancels out anything that's perfectly out of phase between the two channels. A correlation meter will usually flag this before your ears do, showing values drifting toward negative territory as out-of-phase content increases.
A short verification routine catches nearly every M/S problem before it ships:
- Bypass A/B constantly. Toggle your M/S processing on and off throughout the session, not just once at the end, and level-match the two states so you're comparing quality, not loudness.
- Fold to mono and listen. If the mix loses clarity, punch, or low-end weight in mono, the side processing needs to come down, not up.
- Watch a correlation meter. Values sitting consistently near zero or negative signal a wide, phase-risky mix; values closer to positive one signal a narrower, safer image.
- Check on small speakers and headphones, not just your main monitors, since translation problems often hide behind a good monitoring setup and reveal themselves on cheaper playback systems.
If problems show up, the fixes are usually simple: pull back the low end you added to the side channel first, since bass-range side content is the most common phase offender. Switch to linear-phase EQ on mastering-critical moves, since minimum-phase filters introduce phase shift that compounds with the M/S matrix itself. If you built a parallel-chain M/S setup manually, double check that both paths are perfectly time-aligned, since even a few samples of drift between the mid and side paths will smear into audible phase cancellation once summed.
| Symptom | Likely cause | Fix |
|---|---|---|
| Hollow or thin in mono | Excess side low-end or phase shift | High-pass sides higher, check phase alignment |
| Correlation meter reads negative | Wide, decorrelated side content | Reduce side gain, narrow the boost |
| Harsh or fatiguing on headphones | Aggressive side high-shelf | Lower gain, widen Q, shelf later in frequency |
| Mix feels unstable at speaker distance | Combined mid + side gain reduction too high | Reduce total compression across both channels |
A DSP Engineer's Notes on Mid/Side in Practice
Mid/side plugin design carries trade-offs that matter more than most tutorials mention. Linear-phase EQ avoids the extra phase shift that can compound inside an M/S matrix, which is why it's often recommended for mastering-stage mid/side moves. But linear-phase processing also adds latency and costs more CPU, since it has to look ahead across a window of samples to build a phase-neutral filter.
That trade-off matters differently depending on where you are in a session. A few things worth keeping in mind:
- During tracking or live monitoring, latency kills feel. Minimum-phase M/S processing, kept to small moves, is the more practical choice when you're listening in real time.
- During final mastering, latency is irrelevant since you're working on a fixed file. That's when linear-phase becomes worth the CPU cost, particularly on side-channel EQ where extra phase shift is most audible.
- Multichannel routing accuracy matters as much as the EQ curve itself. A plugin that mismatches sample timing between its encode and decode stages introduces the exact kind of phase error mid/side processing is supposed to eliminate, not create.
The practical rule that comes out of this: build your session with minimum-phase, low-latency M/S processing while you're mixing and making decisions in real time, then apply linear-phase treatment as a final pass once the arrangement and balance are locked. Chasing perfect phase accuracy on every pass wastes CPU and adds latency you don't need until the finish line.
Mid/Side Beyond EQ and Compression
EQ and compression get most of the attention, but mid/side routing applies just as well to time-based effects, and arguably makes a bigger creative difference there.
Reverb sent only to the side channel creates a sense of space and depth without smearing the center image, which matters a lot for genres where vocal or lead clarity is non-negotiable. Instead of a stereo reverb return diffusing everything equally, a side-only send lets the room tail bloom around the mix while the kick, bass, and vocal stay locked and defined in the middle. This is a common trick for keeping a track wide and immersive on headphones without losing punch on a mono Bluetooth speaker.
Delay behaves similarly. A short stereo delay applied to the side channel only adds a subtle sense of movement and dimension that's nearly impossible to place by ear as "delay," because there's no discrete, audible echo, just a wider, more three-dimensional feel to the same part. Engineers use this on background vocals, guitar layers, and synth pads specifically because it adds interest without adding clutter.
The reverse move works too: sending reverb or delay predominantly to the mid channel keeps ambience tighter and more centered, useful on genres like classic rock or acoustic material where a wash of side-channel reverb would feel out of place against the recording's original character. The point in both directions is the same one that runs through this entire technique: you're choosing exactly where an effect lives in the stereo field, rather than accepting wherever a stereo plugin happens to put it by default.
Advanced Mid/Side Techniques Worth Learning Next
Static mid/side EQ and compression solve most problems, but two more advanced approaches are worth knowing once the basics feel comfortable.
Dynamic mid/side processing applies EQ or gain changes only when a triggering condition is met, rather than as a constant, always-on move. A common example is a side-channel de-esser or dynamic EQ that only reduces harshness in the 7 to 10 kHz range when that energy crosses a threshold, leaving quieter passages untouched. This solves a real problem with static side shelving: a side boost that sounds tasteful in a quiet verse can turn brittle and fatiguing the moment a loud chorus hits, and dynamic processing adjusts automatically instead of forcing you to automate gain by hand.
Multiband mid/side processing takes this further by splitting the mid and side channels into multiple frequency bands, each with its own compressor or gain stage, similar in concept to standard multiband compression but applied independently to the sum and difference signals. This lets you, for example, compress low-mid energy in the center more aggressively than high-mid energy in the center, while the side channel gets an entirely different multiband treatment tuned for width rather than punch. It's a heavier, more CPU-intensive approach, and it's easy to overcomplicate. Most mixes need this kind of granularity only on stubborn mastering material where simpler two-band M/S EQ isn't cutting it.
Both techniques reward restraint more than complexity. A single well-placed dynamic side de-esser usually beats a six-band multiband M/S chain built out of habit rather than necessity.
Real-World Mid/Side Fixes on Common Mix Problems
The clearest way to understand mid/side processing is through the specific problems it solves that other tools handle poorly.
A muddy, bass-heavy mix bus is one of the most common cases. The kick and bass sound powerful in isolation, but the moment the full arrangement plays, the low end turns into an undefined wall, and boosting presence elsewhere doesn't fix it. High-passing the side channel around 100 to 150 Hz often clears this instantly, because the muddiness frequently isn't coming from the mid-channel bass and kick at all. It's coming from phase-smeared low frequencies bleeding into the sides from reverb, room mics, or a wide stereo synth pad sitting underneath everything else.
A vocal that feels buried in a wide, lush arrangement is another frequent case. Rather than pushing the vocal fader or adding a stereo presence boost that also lifts the guitars and pads around it, a small mid-channel boost around 2 to 4 kHz brings the center-panned vocal forward specifically, leaving the wide elements exactly where they were.
A mix that sounds impressive on studio monitors but strangely narrow or dead on a laptop speaker is the classic side-channel deficiency, usually fixed with a conservative side shelf for air rather than a global brightness boost that would also thin out the vocal and lead.
And a mastering job that needs "more width" without a full remix is the case mid/side processing was arguably built for. Sound On Sound's guidance on this is worth internalizing: mid/side EQ can genuinely widen and refine a stereo image at the mastering stage, but it has to be judged against real translation tests, not just how exciting it sounds soloed in stereo.
Does Mid/Side Translate Across Headphones, Mono, and Surround?
Mid/side processing lives and dies by how well it survives outside a controlled stereo monitoring setup, and each playback format tests it differently.
Headphones are the most forgiving and the most dangerous environment at once. Stereo separation is exaggerated on headphones, which makes side-channel boosts sound more dramatic and more pleasing than they will on speakers, and that's exactly why relying on headphone auditioning alone leads to overcooked width. A move that sounds subtle and tasteful on headphones can sound thin or artificial on a proper stereo monitor pair, so cross-checking both is worth the extra minute every time.
Mono is the format that actually tells the truth. Bluetooth speakers, phone speakers, PA systems in smaller venues, and a meaningful share of streaming playback situations all sum to mono at some point in the signal path, and any side-channel content that's out of phase between left and right simply disappears in that sum. A mix that depends heavily on side-channel information to feel complete will sound noticeably thinner the moment it's folded down, which is exactly why the mono fold-down check belongs in every session, not just mastering.
Surround and immersive formats complicate the picture further, since mid/side logic built for two-channel stereo doesn't map directly onto multichannel or object-based mixes. The center channel in a surround mix is a discrete, dedicated channel rather than a derived sum, and side-channel logic has to be rethought around the format's actual channel layout instead of assumed. If a project is heading toward a surround or Atmos deliverable, treat the stereo mid/side pass as a separate, earlier stage rather than something that transfers automatically.
When Mid/Side Belongs in Your Core Workflow
Learn mid/side processing early, but treat it as a scalpel, not a hammer you reach for on every session. Bus-level mid/side work earns its place solving global problems: a muddy low end, a mix that won't translate to mono, a master that needs air without brightness. Track-level mid/side makes sense only when a specific source has a genuine stereo problem worth isolating.
The workflow that serves most engineers best is trying mid/side late in the mix, once the balance is mostly settled, then circling back earlier only on buses that are visibly fighting you. Every move gets checked in mono before it's trusted, and every A/B happens with levels matched, because an unmatched comparison will always favor whichever version is louder. Small moves, checked often, beat clever moves checked once.
— Kai
How Vector DSP Approaches Mid/Side-Ready Plugin Design
Precise mid/side work depends on the plugin doing exactly what it claims, sample for sample, every time you encode and decode. Vector-dsp builds its DSP architecture around that expectation: real-time, low-latency processing with multichannel routing precise enough that a mid/side sandwich doesn't introduce the phase drift you're trying to eliminate in the first place.

When you're evaluating any mid/side-capable plugin, a short checklist helps separate the tools worth trusting from the ones that just add a label. Check whether the plugin offers native M/S mode or requires an external encoder. Confirm it supports both minimum-phase and linear-phase filtering, since you'll want different behavior while tracking versus while mastering. And look for multichannel routing accurate enough that encode and decode stay perfectly time-aligned, since even a handful of samples of drift undoes the phase benefits M/S is supposed to deliver.
Some plugin lineups, including multi-lane architectures with per-lane EQ targeting, are built around that principle: giving engineers precise, low-latency control over how signal moves through a chain, whether that chain is stereo, mid/side, or something more elaborate. If you want a closer look at how routing choices like these play out in a full mixing session, the bus processing workflow guide and the plugin architecture breakdown are both worth a read. Head to Vector DSP to check out the current plugin lineup and demo downloads for your next session.
Sources
- How to process a drum mix with mid/side compression (MusicRadar)
- Creative mid/side processing (Sound On Sound)
- Mid-side processing mixing techniques (LordReverb)
- Mid-Side EQ tips (Icon Collective)