How to Match Dry Wet Gain Without Losing Perceived Loudness
How to Match Dry Wet Gain Without Losing Perceived Loudness
Level-match your processed and unprocessed signals before you judge anything, pick equal-power or RMS blending instead of a linear crossfade, and compensate for wet-path latency before the two signals ever touch. That's dry wet gain match in one sentence. If you're building or tuning a plugin, three fixes solve most complaints:
- Trim the plugin's output right after the processor, matched by ear or meter to unity with bypass.
- Expose an output-gain knob separately from the mix knob, never bundled into one control.
- Run a quick bypass-level check at 0%, midpoint, and 100% wet before trusting your ears on tone.
Pro Tip: Bypass the plugin, note the RMS level, then re-enable it and match output gain to within 0.5 dB before you make any tonal decision. Your ears will lie to you otherwise.
Key Takeaways
Consistent perceived loudness across a dry/wet blend depends on level-matching before comparison, equal-power or RMS mixing instead of linear crossfades, and latency-compensated summing.
| Point | Details |
|---|---|
| Level-match first | Always match RMS or LUFS between bypass and processed signal before judging tone or quality. |
| Choose the right mix law | Use equal-power or RMS for decorrelated signals; use parallel wet with input gain for reverb. |
| Compensate latency before mixing | Delay the dry path to match reported wet latency, using a pattern like JUCE's DryWetMixer. |
| Auto-gain needs an override | Automatic compensation helps fair A/B testing but must stay user-overridable for intentional loudness effects. |
| Test with sweeps, not spot checks | Sweep mix 0 to 100% while logging LUFS to catch dips or jumps before shipping. |
| Vector DSP's ToneLab separates mix and gain | Its multi-lane architecture keeps output-gain and mix as distinct controls per lane, avoiding hidden loudness shifts. |
Table of Contents
- Why Mixes Dip or Jump Around the Midpoint Wet
- What Mix Law Formula Keeps Loudness Consistent?
- How Do You Actually Compensate Dry Wet Gain by Ear or Meter?
- Building the DryWetMixer Pattern for Plugin Developers
- How Do You Test Dry Wet Gain Compensation Before Shipping?
- Why Does Wet Level Feel Louder or Quieter Than It Measures?
- What Vector DSP Gets Right About Dry Wet Balance
- Try Vector DSP's Approach to Gain-Matched Processing
- Frequently Asked Questions
- Sources
Why Mixes Dip or Jump Around the Midpoint Wet
That perceived hole around the midpoint of a mix knob isn't your imagination. It comes from three separate mechanisms stacking on top of each other, and most plugin developers only fix one of them.
First, phase. When a processed signal recombines with its unprocessed source, any phase offset between the two, even a few samples, causes partial cancellation at specific frequencies. Reverb tails and modulated delays are especially prone to this because their phase relationships to the dry signal drift constantly.
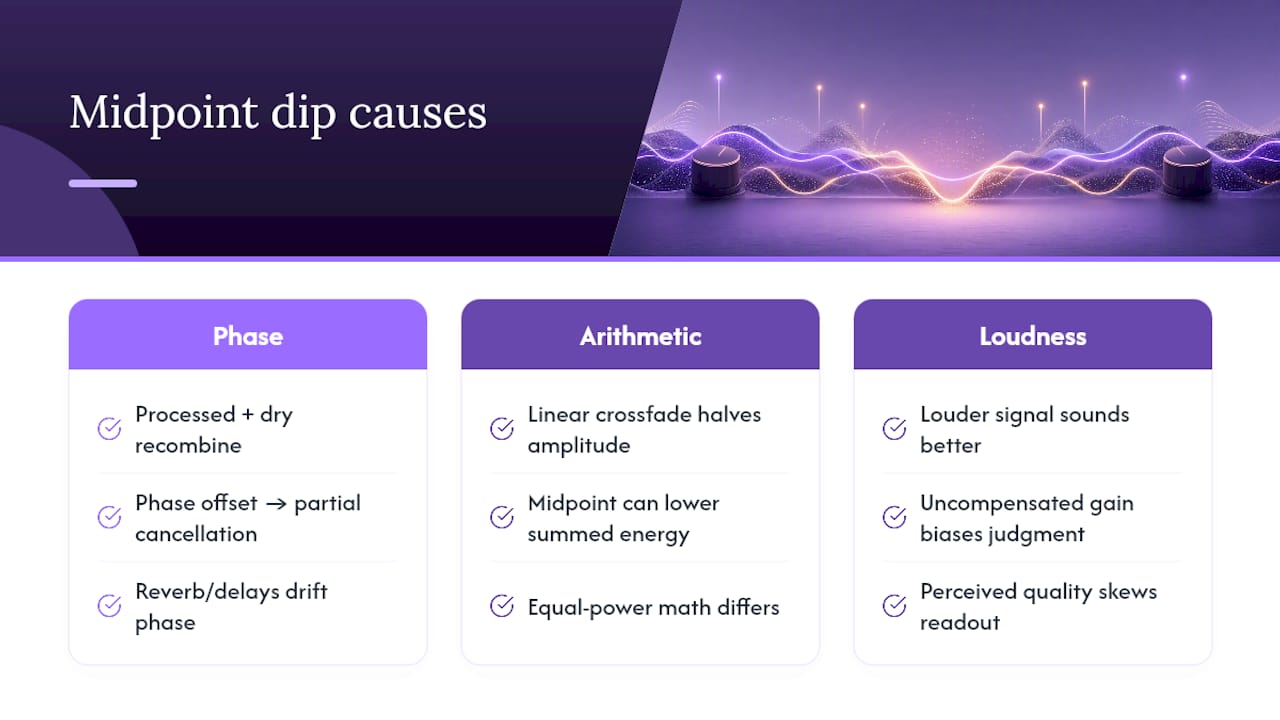
Second, arithmetic. A naive linear crossfade computes output = dry * (1 - mix) + wet * mix. At midpoint, both signals sit at half amplitude, and if they aren't fully correlated, the summed energy is measurably lower than what the equal-power math would produce.
Third, loudness bias skews your judgment before you even get to the math: the louder of two signals almost always sounds "better" to human ears, so any uncompensated gain difference between the wet and dry paths gets misread as a tonal or quality difference.
What Mix Law Formula Keeps Loudness Consistent?
- Linear amplitude crossfade.
dry_gain = 1 - mix,wet_gain = mix. Simple, cheap, and audibly inconsistent when dry and wet are uncorrelated. This is the default in a lot of hobbyist plugins and the main source of mid-mix volume loss. - Equal-power (cosine law).
dry_gain = cos(mix * π/2),wet_gain = sin(mix * π/2). Keeps power constant across the sweep, which is the standard approach for crossfading uncorrelated or partially correlated signals. - RMS / power-sum.
output_rms = sqrt(dry_rms² + wet_rms²)for fully independent signals, scaled back to a target level. This is the more rigorous version of equal-power and the one worth implementing if you're doing your own DSP from scratch.
Here's how the three compare across a sweep, using a normalized 1.0 amplitude reference signal:
Use equal-power or RMS whenever the wet signal is decorrelated from dry, which covers most distortion, saturation, and modulation effects. For reverb and other ambience processors, skip the crossfade entirely.
Pro Tip: If your plugin only supports one mix law, make it equal-power. It's the safer default for the widest range of processor types.
How Do You Actually Compensate Dry Wet Gain by Ear or Meter?
Level-matching only works if you're consistent about how you measure it. Picking a target and sticking to it removes most of the guesswork from A/B testing.
- By ear: loop a short section, toggle bypass, and nudge output gain until the perceived loudness swap disappears. This catches gross mismatches but is unreliable below about 1 dB.
- By meter: match RMS or short-term LUFS between bypassed and processed signal. A proper gain-staging pass after any processor that changes level, compressors and saturators especially, keeps this repeatable across a session.
- Auto-gain: measure the input-to-output RMS delta continuously and apply the inverse as makeup gain. This is standard developer practice, but the compensation always needs a user override, because sometimes the loudness change is the entire point of the effect.
- Parallel wet with kill-dry: for reverb, delay, and other ambience effects, running wet fully in parallel with an independent input-gain knob and a "kill dry" switch sidesteps the mid-mix dip problem entirely, since there's no crossfade math to get wrong in the first place.
Pro Tip: Give auto-gain a visible on/off toggle right next to the mix knob, not buried in a settings page. Engineers who want manual control need to find it in one click.
Building the DryWetMixer Pattern for Plugin Developers
Most of the dry/wet gain problems producers hit in a DAW trace back to decisions made at the DSP layer. If you're building the plugin, get the architecture right and the level-matching problem mostly disappears downstream.
- Use a DryWetMixer pattern that accepts a reported wet-path latency and delays the dry signal to match before summing. The juce::dsp::DryWetMixer documentation is the reference implementation worth studying, with
setWetLatency,pushDrySamples, andmixWetSampleshandling the time alignment for you. - Expose exactly five parameters where they make sense: mix, output gain, auto-gain on/off, kill dry, and mix law selection. Fewer than this and power users complain; more than this and you're cluttering the UI for no benefit.
- Implement RMS or equal-power scaling carefully. Guard against denormal numbers when signal levels decay toward silence, since denormal arithmetic can spike CPU usage on some architectures. Keep a few dB of headroom in the summing stage to avoid clipping when both paths peak simultaneously.
- Write unit tests that sweep mix from 0 to 100% at multiple latency settings and assert the output stays within a defined loudness tolerance unless the processor is deliberately changing level.
A dry-wet mixer that doesn't report and compensate for its own wet-path latency will produce phase cancellation that no amount of gain matching can fix. Time-alignment comes first; loudness matching comes second.
Pro Tip: Smooth your auto-gain compensation factor with a short attack/decay filter on the measured RMS. Applying raw per-frame corrections causes audible pumping on transient material.
How Do You Test Dry Wet Gain Compensation Before Shipping?
A repeatable test plan catches regressions that ad hoc listening misses, especially after you change latency reporting or swap mix laws.
- Record a dry reference tone or program material, insert the processor, and match output level to bypass using RMS or LUFS.
- Sweep the mix control from 0 to 100% in fixed steps while logging short-term LUFS and peak level, listening specifically for dips or jumps at intermediate positions.
- Automate the sweep as a regression test: assert that logged loudness stays within a defined tolerance window across the full sweep, unless the processor is designed to change loudness.
- Re-run the same sweep after any change to latency handling or mix law, since these are the two places regressions hide.
Use a mix of tools here: a proper metering plugin for LUFS and RMS readouts, plus a sine sweep or pink noise test tone for consistent, repeatable measurement conditions that program material can't give you.
Why Does Wet Level Feel Louder or Quieter Than It Measures?
Loudness perception isn't linear, and that gap between measured level and perceived level is where most dry/wet complaints actually originate. Two signals can measure identically on an RMS meter and still sound noticeably different in loudness because of how the ear weights frequency content and transient density.
A wet signal loaded with high-frequency content, a bright reverb tail or a saturator's harmonic content, reads louder to human hearing than a dry signal of the same RMS value with more energy concentrated in the low mids. This is a basic consequence of equal-loudness contours: your ear is more sensitive in the 2 to 5 kHz range than at 100 Hz, so a wet path emphasizing that range earns a loudness bump the meter doesn't fully capture.
Transient density matters too. A wet signal with dense, rapid transients (chorus, flanger, certain distortion algorithms) can feel louder than a smoother dry signal at matched RMS, because perceived loudness integrates over roughly 200 to 400 milliseconds and short-term peaks within that window influence the impression disproportionately.
This is why meter-matching alone sometimes isn't enough. A plugin that levels dry and wet to identical RMS can still produce an A/B comparison where the wet setting sounds "better" purely because of spectral tilt, and that's the exact mechanism behind loudness bias skewing plugin evaluations. The practical fix is the same one that solves gain mismatch: match level with a real meter first, then apply your ears to tone and character judgments, not loudness ones.
What Vector DSP Gets Right About Dry Wet Balance
Vector DSP defaults to parallel wet paths for reverb-style effects and always ships auto-gain with a visible override, because loudness change is sometimes the intended effect, not a bug to hide. That design discipline shapes every recommendation above.
Try Vector DSP's Approach to Gain-Matched Processing
Vector DSP builds plugins where mix and output gain are separate, dedicated controls, not a single knob that hides what's actually happening to your levels. That distinction matters most in ToneLab's multi-lane parallel architecture, where each lane runs its own EQ targeting and gain staging independently, so a wet-heavy reverb lane never steals perceived loudness from a drier delay lane sitting next to it.

If you've been fighting mid-mix dips or auto-gain that fights your ears, download the ToneLab demo and run your own bypass comparisons using the workflow described above. For the deeper DSP architecture behind latency handling and metering choices, the latency compensation guide and metering plugin breakdown cover the implementation details plugin developers ask about most. Start with the ToneLab demo and see how the mix and gain controls behave on your own material.
Frequently Asked Questions
What does "dry wet gain match" actually mean in plugin design?
Why does a midpoint mix setting often sound quieter than either extreme? Linear crossfades sum two half-amplitude signals that are often only partially correlated, producing less combined energy than equal-power or RMS math would deliver at the same setting.
Should I use auto-gain or manual gain matching? Offer both. Auto-gain helps fair comparisons and faster workflows, but manual override matters because some engineers want the loudness change as part of the effect.
Does latency compensation actually affect perceived gain? Yes. Misaligned dry and wet paths cause phase cancellation at specific frequencies, which changes the summed signal's energy independent of any gain setting.
What's the difference between equal-power and RMS mixing? Equal-power uses a cosine/sine curve to keep power constant across the sweep; RMS/power-summing calculates combined energy directly from both signal levels. Both outperform linear crossfades for most decorrelated processing.
Sources
- juce::dsp::DryWetMixer documentation
- Music Mixing Fundamentals — Music Production Authority
- The loudness bias problem: why your mix sounds better when it is louder — MUSCO SOUND
- How to gain stage plugins properly — Sound Under Control